BusbeeTech
This is where I park my lab notes and how-tos—take what you need and break things with me. The Intune-Lab is now wrapped up, so if you want a zero-touch Windows 11 deployment that’s ready for a new hire in under an hour, start there. Next I’m kicking off the SOC101-Lab, wiring Zeek sensors into Splunk and Elastic, tossing Atomic Red Team at the targets, and tuning detections as I go. Stick around if that sounds fun.
Security Lab Goals
I wanted to build this security lab as a place I can learn and practice security concepts. I needed a place I could safely download and detonate malware and practice detections. Since I already have a Proxmox Virtual Environment setup I decided I would use it as the basis of my lab.
Right now the core of my lab is a Malware Sandbox consisting of a FlareVM installation running on Windows 11 to detonate the malware and a REMnux instance to handle network analysis and simulations. This way I have host and network based scenarios covered. These two are connected by a host-only network provided by a pfSense router that connects all lab VMs together and isolates them from the internet.
Next I would like to get a Security Onion and Splunk install setup so I can mirror the network traffic coming from the host-only network interface via a SPAN port connection on Security Onion and then send that data to Splunk for analysis.
Proxmox Setup
Enable Firewall
Datacenter > Firewall > Options
- Firewall: Enabled
- Input Policy: DROP
- Output Policy: ACCEPT
(Leave Forward Policy at default.)
Datacenter > [Node] > Firewall > Options
- Firewall: Enabled
Create New Network Interface
Datacenter > [Node] > Network > Create > OVS Bridge
- Name: vmbr2
- Autostart: Checked
(Keep other blank defaults).
Note: I chose vmbr2 because I already had vmbr1 in place for another project.
Add Firewall Rules
Datacenter > [Node] > Firewall > Add
Block host access from vmbr2
- Enable: ✓
- Direction: in
- Action: DROP
- Interface: vmbr2
- Comment: Block all host-bound packets from sandbox
REMnux Setup
VM Config
- Name: REMnux
- VM ID: 901
- OS: Do not use any media
- Cores: 2
- RAM: 24GB
- Network: vmbr2
Delete Hard Disk:
Go to Datacenter > [Node] > REMnux > Hardware > Hard Disk and click Detach to remove the default Hard Drive from the VM. Next click Remove to remove it.
Import REMnux VM
Download and Install page: https://docs.remnux.org/install-distro/get-virtual-appliance
Current download link: https://app.box.com/shared/static/k60473jsgmtklrlgmlhl90ikbagnek1b.ova
Download the OVA file then run these commands:
Unzip the .ova file
tar -xzvf remnux-v7-focal.ova
Unzip the .vmdk file
gzip -d remnux-v7-focal-disk1.vmdk.gz
Copy to Proxmox Server
scp remnux-v7-focal-disk1.vmdk root@10.31.0.3:/root/remnux/
Note: This assumes there is already a directory on the Proxmox server at /root/remnux. Create one if you don't already have it.
Import OVA to blank VM
qm importdisk 901 remnux-v7-focal-disk1.vmdk local-lvm -format qcow2
You should now see a disk listed with a name like local-lvm:vm-901-disk-0
Now go to Datacenter > [Node] > REMnux > Hardware > Unused Disk and click Edit.
Select the local-lvm:vm-901-disk-0 from the drop down then click the Add button to apply it to the VM.
Also in the Hardware page change the Display from Default to VMware compatibile and Processor Type to qemu64.
FlareVM Setup
Snapshots
The FlareVM machine will be detonating malware so it will be important to take several snapshots of the setup as we go so we can rollback if needed.
Look out for these SNAPSHOT CHECKPOINTS:
Base-InstallPre-FlareVMFlareVM-BasePre-Detionation
VM Config
- Name: FlareVM
- VM ID: 900
- OS: Windows 11 ISO
- Disk: 64GB
- CPU: 2 Cores
- Type: host
- Memory: 8GB
- Network: vmbr0
- Model: E1000
Turn on the VM and run through the installer. Create a local admin user and log in.
SNAPSHOT CHECKPOINT: Base-Install
Windows Settings
Disable Proxy Settings
Network and Internet > Proxy Settings
- Automatically Detect Settings: Off
Disable Windows Defender
Privacy and Security > Windows Security > Virus and Threat Protection
Click Virus and Threat Protection Settings
- Turn all On buttons to Off
- Especially make sure Real-Time Protection is turned off
Edit Group Policy
Administrative Templates > Network > Network Connections > Windows Defender Firewall
There are two profiles:
- Domain
- Standard
Go into each profile and change this setting:
- Windows Defender Firewall: Protect all network connections: Disabled
SNAPSHOT CHECKPOINT: Pre-FlareVM
Install FlareVM
Run the following commands on the Windows 11 host to install FlareVM
(New-Object net.webclient).DownloadFile('https://raw.githubusercontent.com/mandiant/flare-vm/main/install.ps1',"$([Environment]::GetFolderPath("Desktop"))\install.ps1")

cd ~\Desktop\

Unblock-File .\install.ps1

Set-ExecutionPolicy Unrestricted

.\install.ps1 -customConfig https://raw.githubusercontent.com/HuskyHacks/PMAT-labs/main/config.xml
Update Network Interface
Go to Datacenter > [Node] > FlareVM > Hardware > Network Device and change from vmbr0 to vmbr2 to move the FlareVM to the Host-Only network.
Host-Only Network with pfSense
https://www.pfsense.org/download/
VM Config
- Name: pfSense
- VM ID: 902
- OS: pfsense ISO
- Disk: 32gb
- CPU: 2 Cores
- Memory: 4GB
- Network: vmbr2
Make another network device connected to vmbr0.
Set WAN=vmbr0 and LAN=vmbr2
Go to WAN IP address and run through setup wizard. Set LAN IP to 10.0.0.1.
Once setup wizard is done delete vmbr0 network device interface.
Confirm Network
On the FlareVM check IP Address:
ipconfig
On the REMnux VM check IP Address:
ip a | grep "inet "
If you do not get a 10.0.0.x IP address for either of these you may need to double check that all 3 VMs are connected to vmbr2 with the correct settings as shown above.
Make sure you can ping between FlareVM <--> REMnux IP addresses
Make sure you cannot ping outside the network: ping google.com
Update FlareVM DNS
Go to Settings > Network & Internet > Ethernet > DNS Server > Edit
Set the Manual IPv4 Address to the REMnux IP Address: 10.0.0.11
SNAPSHOT CHECKPOINT: FlareVM-Base
Update REMnux INetSim DNS
sudo nano /etc/inetsim/insetsim.conf
Uncomment and set the following lines
start_service dns
service_bind_address 0.0.0.0
dns_default_ip [REMnux IP Address] for example: dns_default_ip 10.0.0.11
Now start INetSim:
inetsim
Download Lab Files
Since our lab environment in Proxmox does not have copy/paste or file share we have to make an extra step to get files to the FlareVM called ISO dropping.
First download the zip file for the lab contents here: https://github.com/HuskyHacks/PMAT-labs/archive/refs/heads/main.zip
wget https://github.com/HuskyHacks/PMAT-labs/archive/refs/heads/main.zip -O PMAT-labs-main.zip

unzip PMAT-labs-main.zip

hdiutil makehybrid -iso -joliet -o ~/Downloads/PMAT-labs-main.iso ~/Downloads/PMAT-labs-main
This will output a file called PMAT-labs-main.iso that you can upload to Proxmox the same as you would any other ISO installer file. Once uploaded you can plug it into the VM as a CD/DVD.
First got to Datacenter > local ([Node]) > ISO Images > upload and select the PMAT-labs-main.iso file. Once uploaded, go to Datacenter > [Node] > FlareVM > Hardware > CD/DVD Drive and select the ISO from the dropdown. Now if you go into the drives in File Explorer on the FlareVM you should see the lab files. You can copy/paste them over to the desktop and disconnect the CD/DVD and delete the ISO.
Before taking the Pre-Detonation snapshot, its worth checking your Microsoft Defender Antivirus settings one more time to make sure Real-Time Protection didn't turn itself back on.
SNAPSHOT CHECKPOINT: Pre-Detonation
About the Project
The Intune‑Lab exists to give me (and anyone who follows along) hands‑on, end‑to‑end practice with Intune, Autopilot, Entra ID, Defender for Endpoint, and adjacent Microsoft 365 technologies. The focus is on building a production‑style lab that:
- Automates new‑hire onboarding via Intune and Autopilot.
- Applies role‑based security and update policies using Entra dynamic groups.
- Demonstrates real‑world scenarios such as white‑glove provisioning, remote user OOBE, and mobile device management.
To keep things realistic, I asked ChatGPT to generate simulation data—a 25‑user CSV import file with randomized names, departments, and job titles. That file (and every other artifact the lab produces) lives in this repo so you can clone, tweak, and reuse them in your own tenant.
Quick links
• Repo:mbusbee505/Intune-Lab
• User CSV:busbeecorp_user_import.csv
Lab Outline
- Set up the lab environment
- Sign up for free trials
- Upload users to Entra
- Create groups in Entra
- Assign licenses to users
- Enroll devices to Intune
- Gather hardware hashes
- Create deployment profile
- Configure Enrollment Status Page
- Confirm OOBE proof‑of‑concept
- Improve OOBE experience
- Remove unnecessary user prompts
- Install apps
- Google Chrome
- Zoom
- Microsoft Office
- GlobalProtect VPN
- Configure update rings
- Pilot group
- Broad user group
- Improve security posture
- Install security baselines
- Connect Defender for Endpoint
- Create compliance policies
- Enforce compliance via Conditional Access
- Set up iPhone enrollments
- Apple Push Notification certificate
- Company Portal app
- User login & profile installation
- Deploy Intune apps from Company Portal
- Set up Android enrollments
- Connect Managed Google Play
- Company Portal login
- Deploy Intune apps from Managed Play Store
Helpful Links
Admin Portals
- Intune admin center: https://intune.microsoft.com
- Entra admin center: https://entra.microsoft.com
- Defender portal: https://security.microsoft.com
Lab Resources
- GitHub repo: https://github.com/mbusbee505/IntuneLab
- Users CSV: https://raw.githubusercontent.com/mbusbee505/IntuneLab/main/busbeecorp_user_import.csv
Microsoft 365 Free Trials
- Intune free trial: https://aka.ms/IntuneTrial
- Entra ID free trial: https://aka.ms/EntraSuiteTrial
- Defender for Endpoint P2 trial: https://www.microsoft.com/security/business/endpoint-security/microsoft-defender-endpoint
Signing Up for Intune
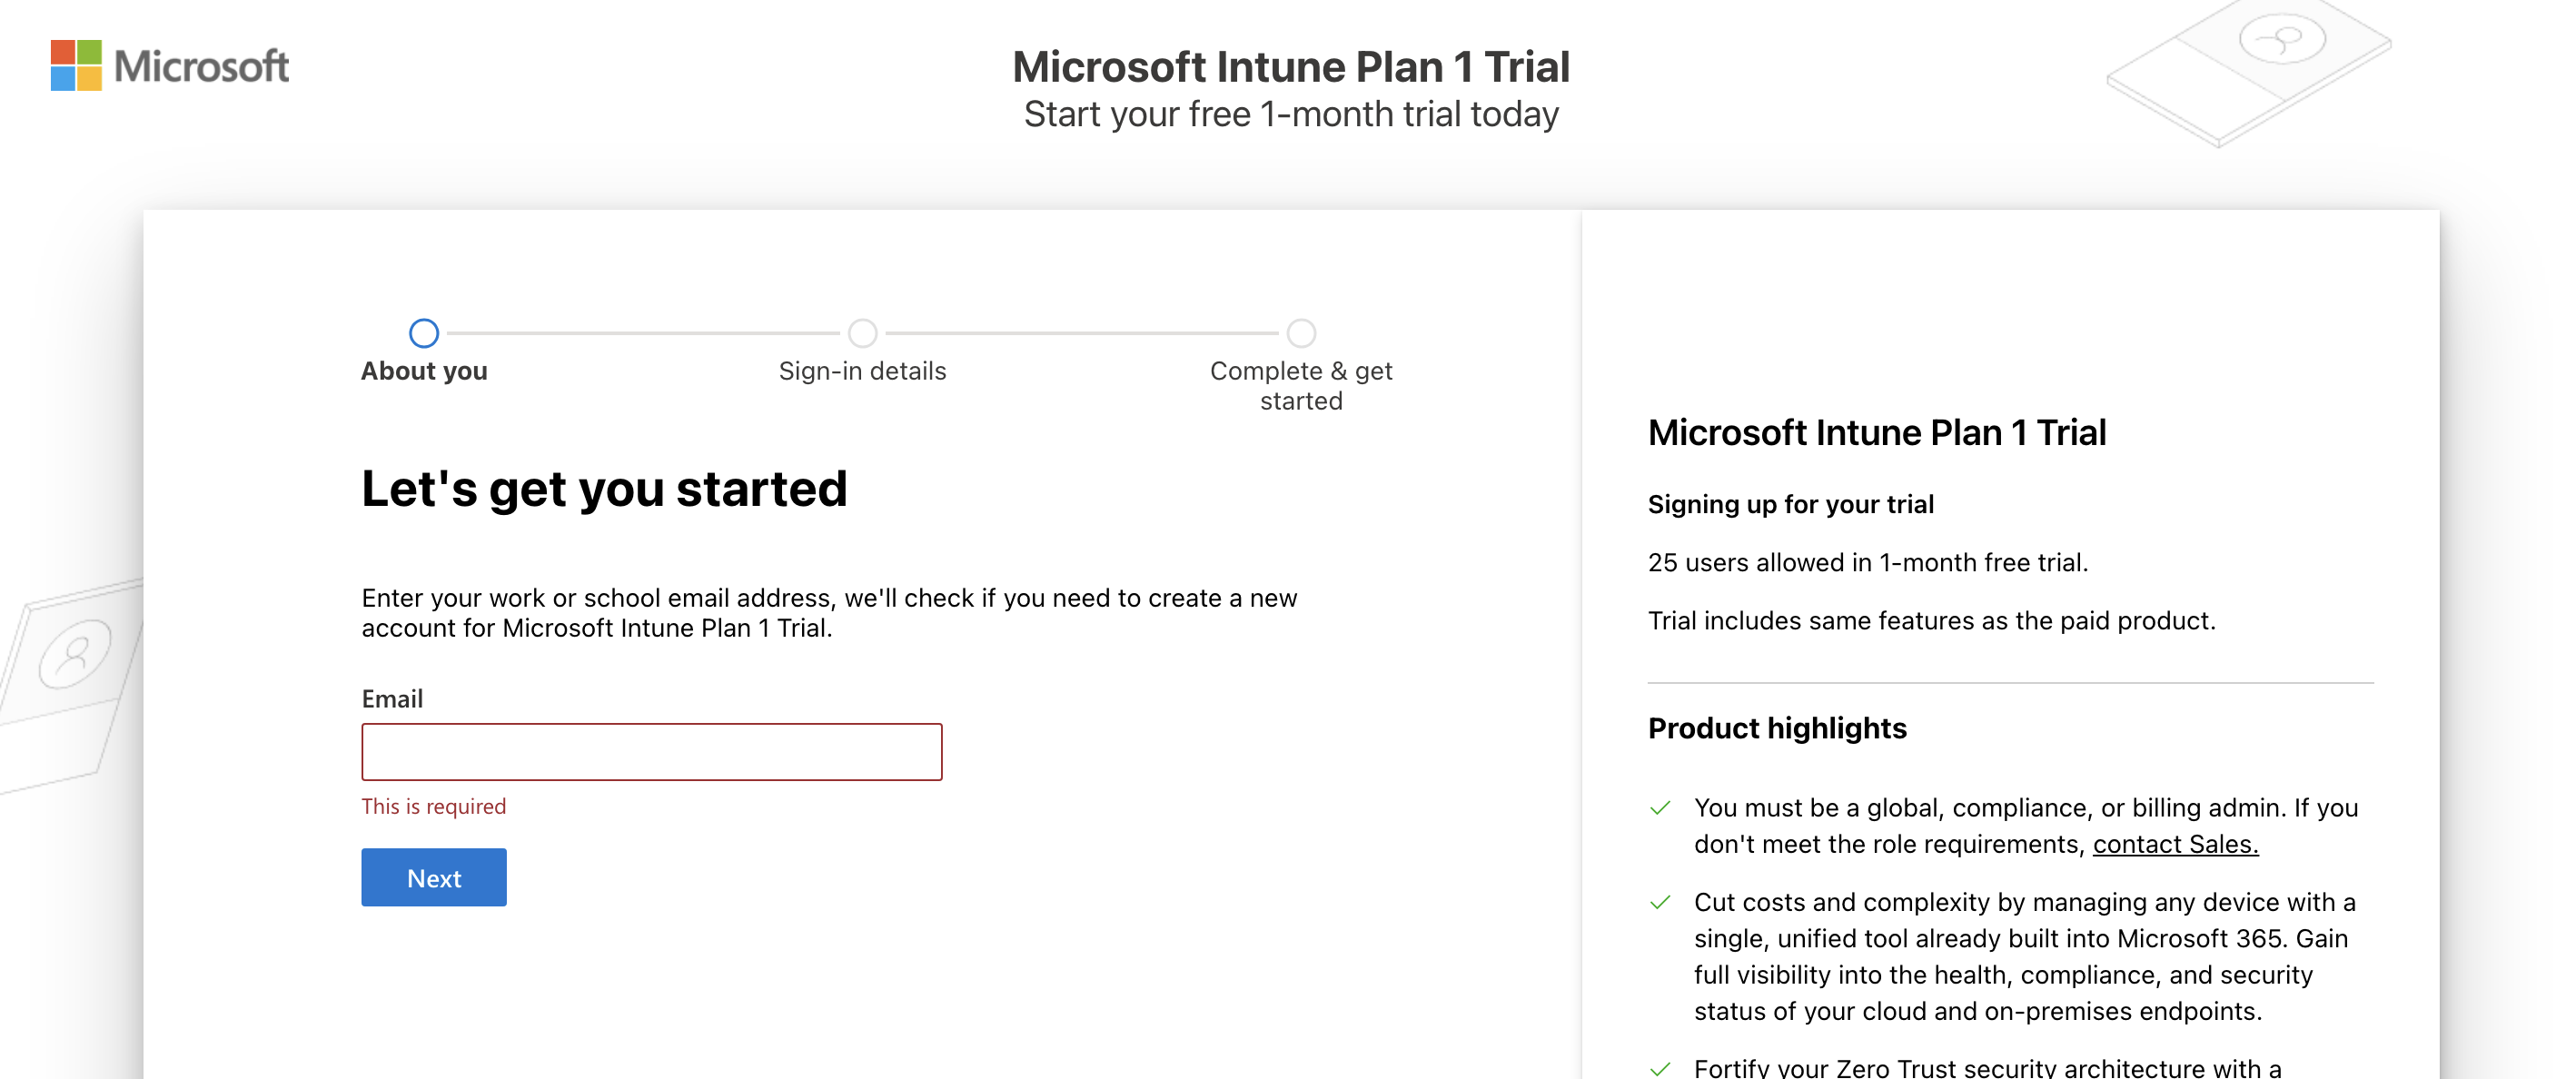
First things first, I had to sign up for the Intune Free Trial, provided an email address and a few other pieces of info.
The trial allows for 25 users but we get all the same features as the paid version of the environment.
Nuke The Security Defaults
Next up I needed to turn off the Entra security defaults so theres room for my conditional access policies to take effect without conflict. To do this I went to Entra > Overview > Properties > Manage security defaults and set it to Disabled (not recommended).

When asked for the reason, I selected "My organization plans to use Conditional Access".
Signing Up for Entra ID
You will need to use this page to sign up for Entra ID and use the same Microsoft account as you used for the Intune trial. Once this is complete you will be able to use Entra in your environment.
Before you begin you may need to assign a license to your user. If this happens go to Microsoft 365 Admin Center > Billing > Licenses and ensure there is a license assigned to your user. If not, assign one manually from this page by clicking Microsoft Entra Suite > Users > Assign Licenses and choose yourself.
Next we will move on to adding more users for our organization and ensure they have licenses.
Uploading Corporate Workforce
Every good organization needs at least a few users, so to make things seem more real I'm going to upload to Entra a CSV file of simulated User data that makes up my fake company workforce.
To get to the user upload I went to Entra > Users > Bulk Operations > Bulk Create and selected my file in the search field.
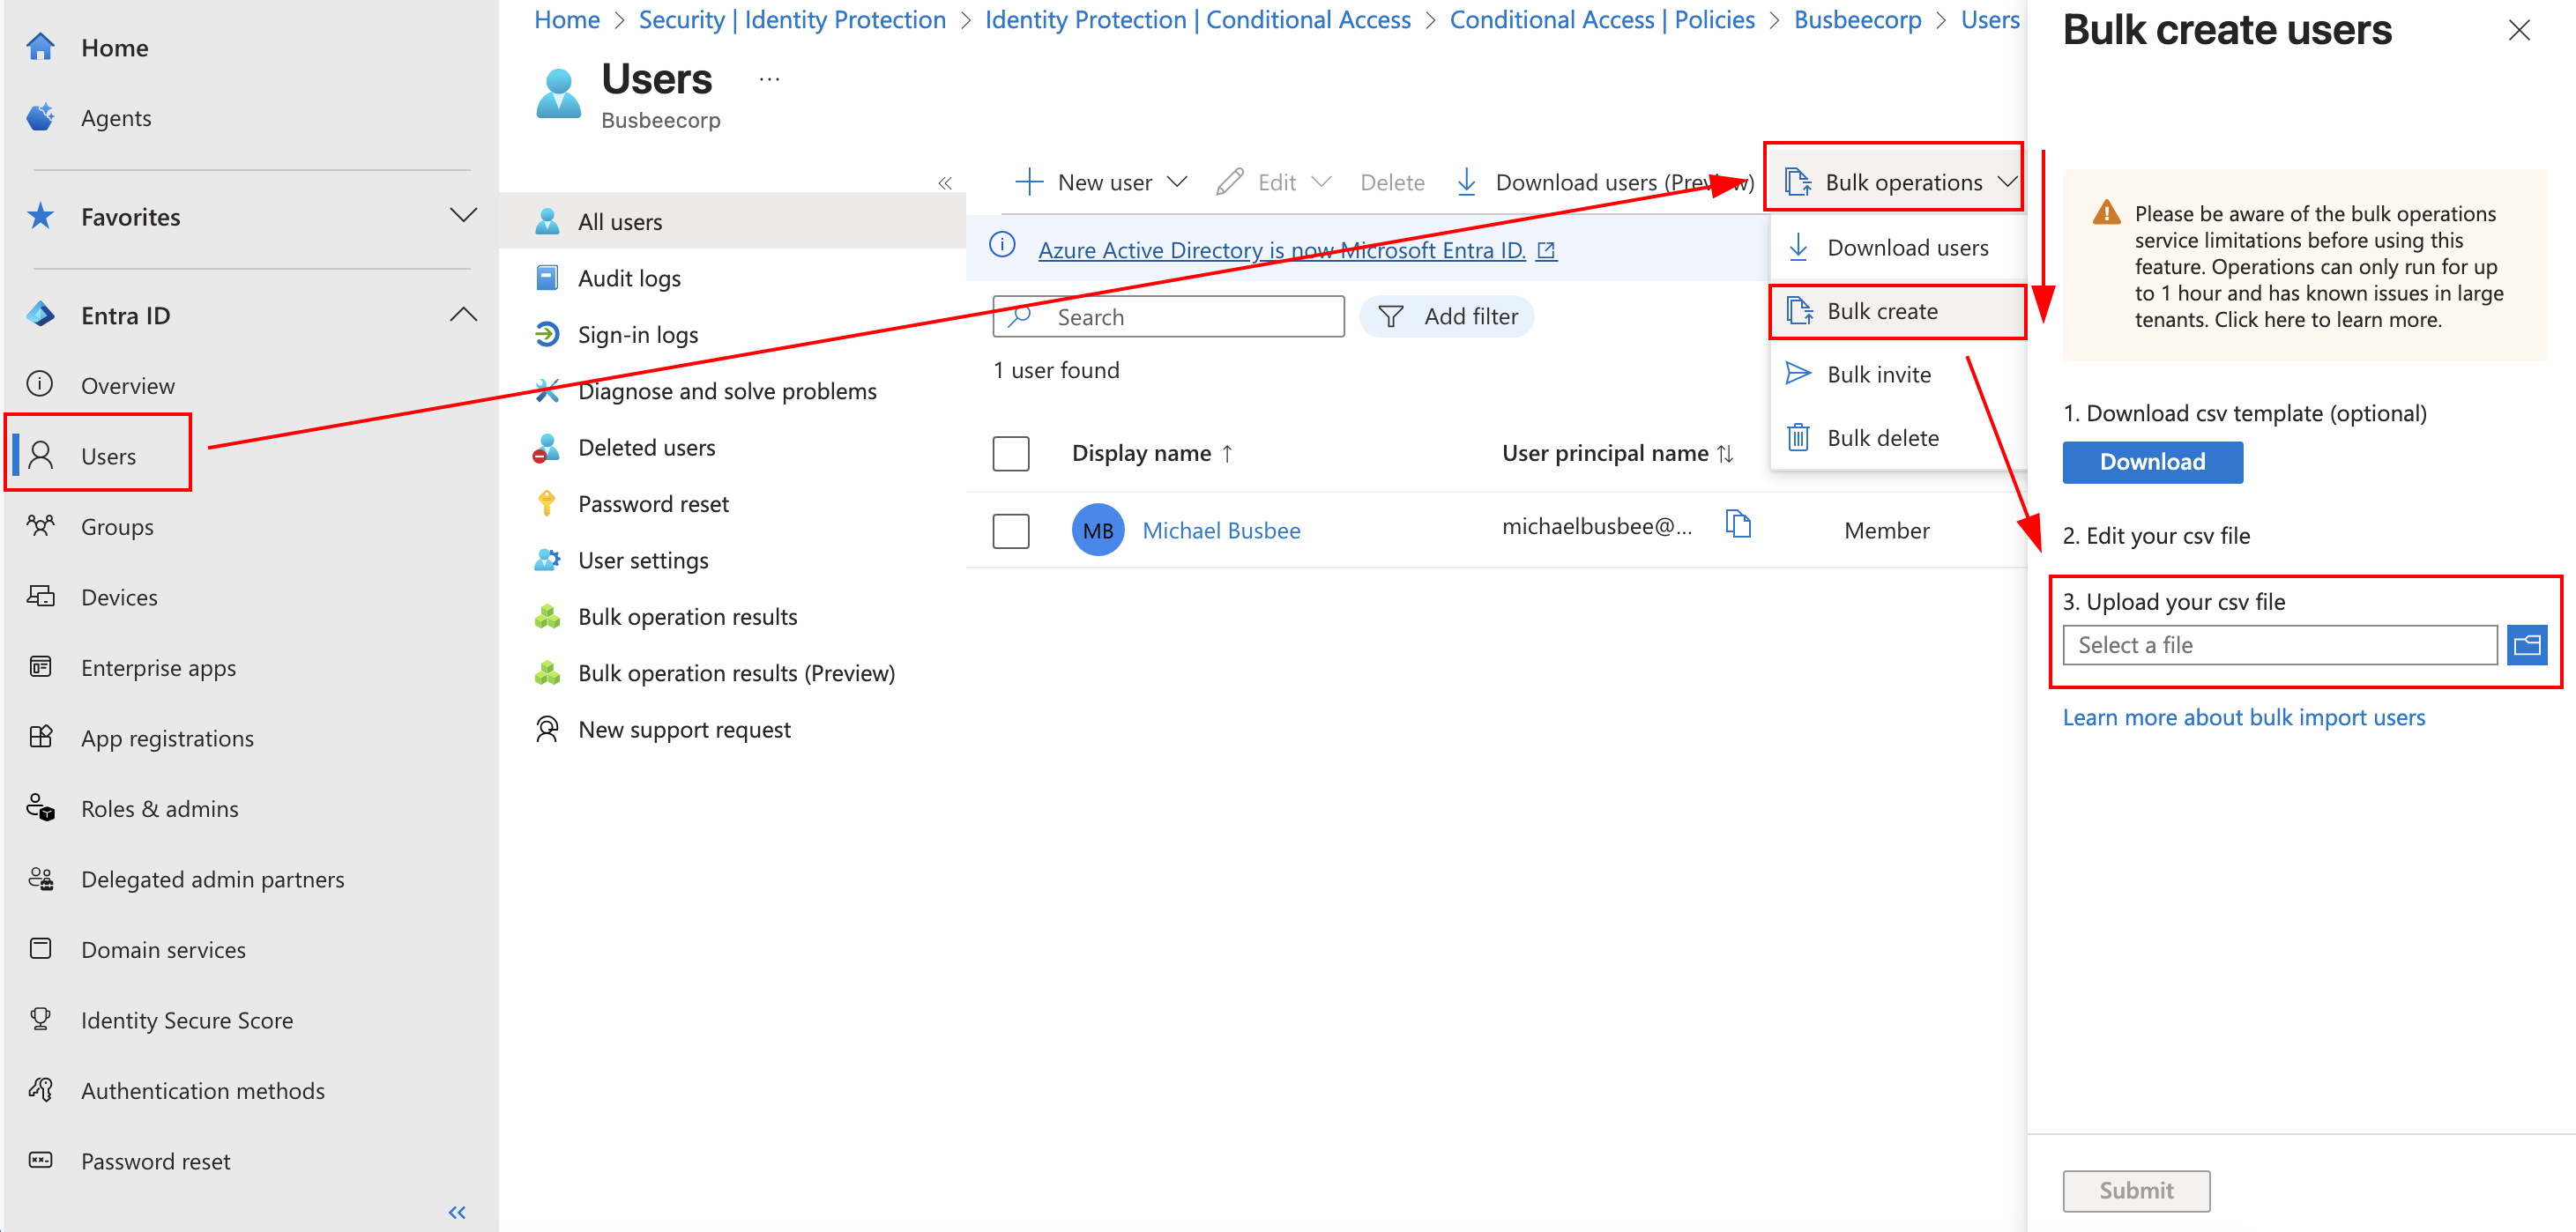
If you need a fresh template for new users you can download one provided by Microsoft here as well.
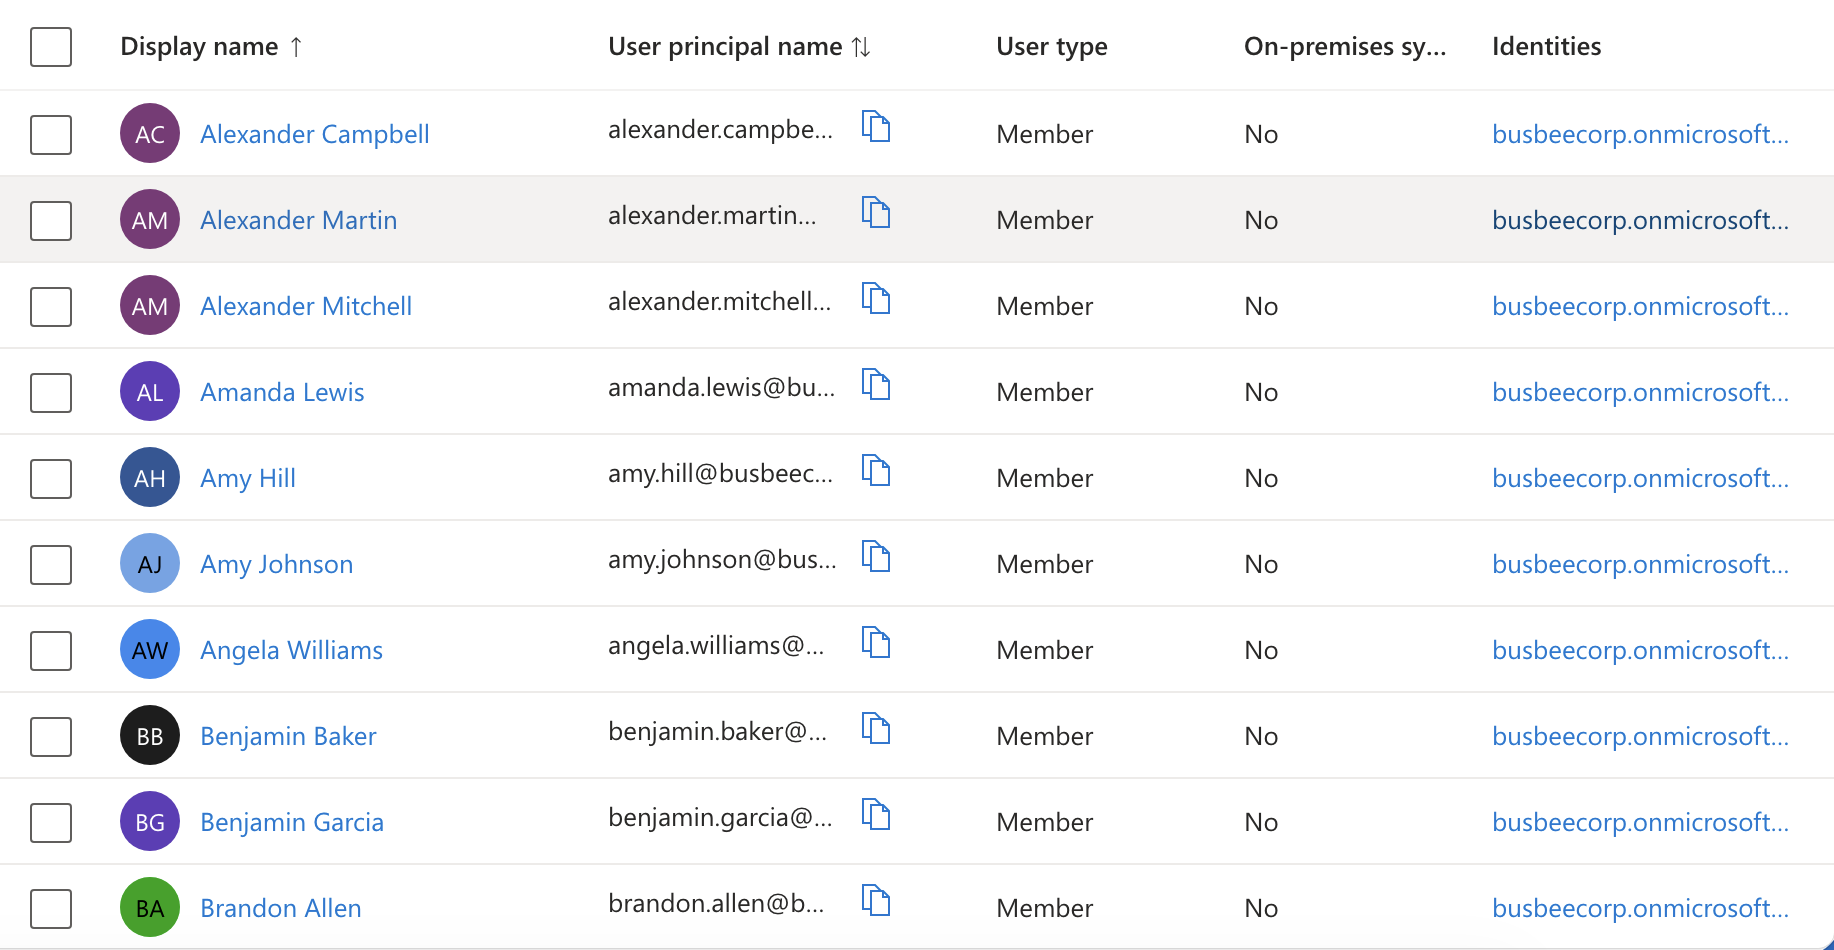
To see that it worked I refreshed the page and went to the All Users section.
Setting Up Security Groups
With Microsoft Azure you can do most things through the web portal online or using PowerShell. When you want to solve problems at scale or do something in an automated way its sometimes better to use PowerShell. I wanted a way to automate the group creation in this way so I tried with a PowerShell command.
First make sure you have Microsoft Graph installed.
Install-Module Microsoft.Graph -Scope CurrentUser
Then connect to your tenant:
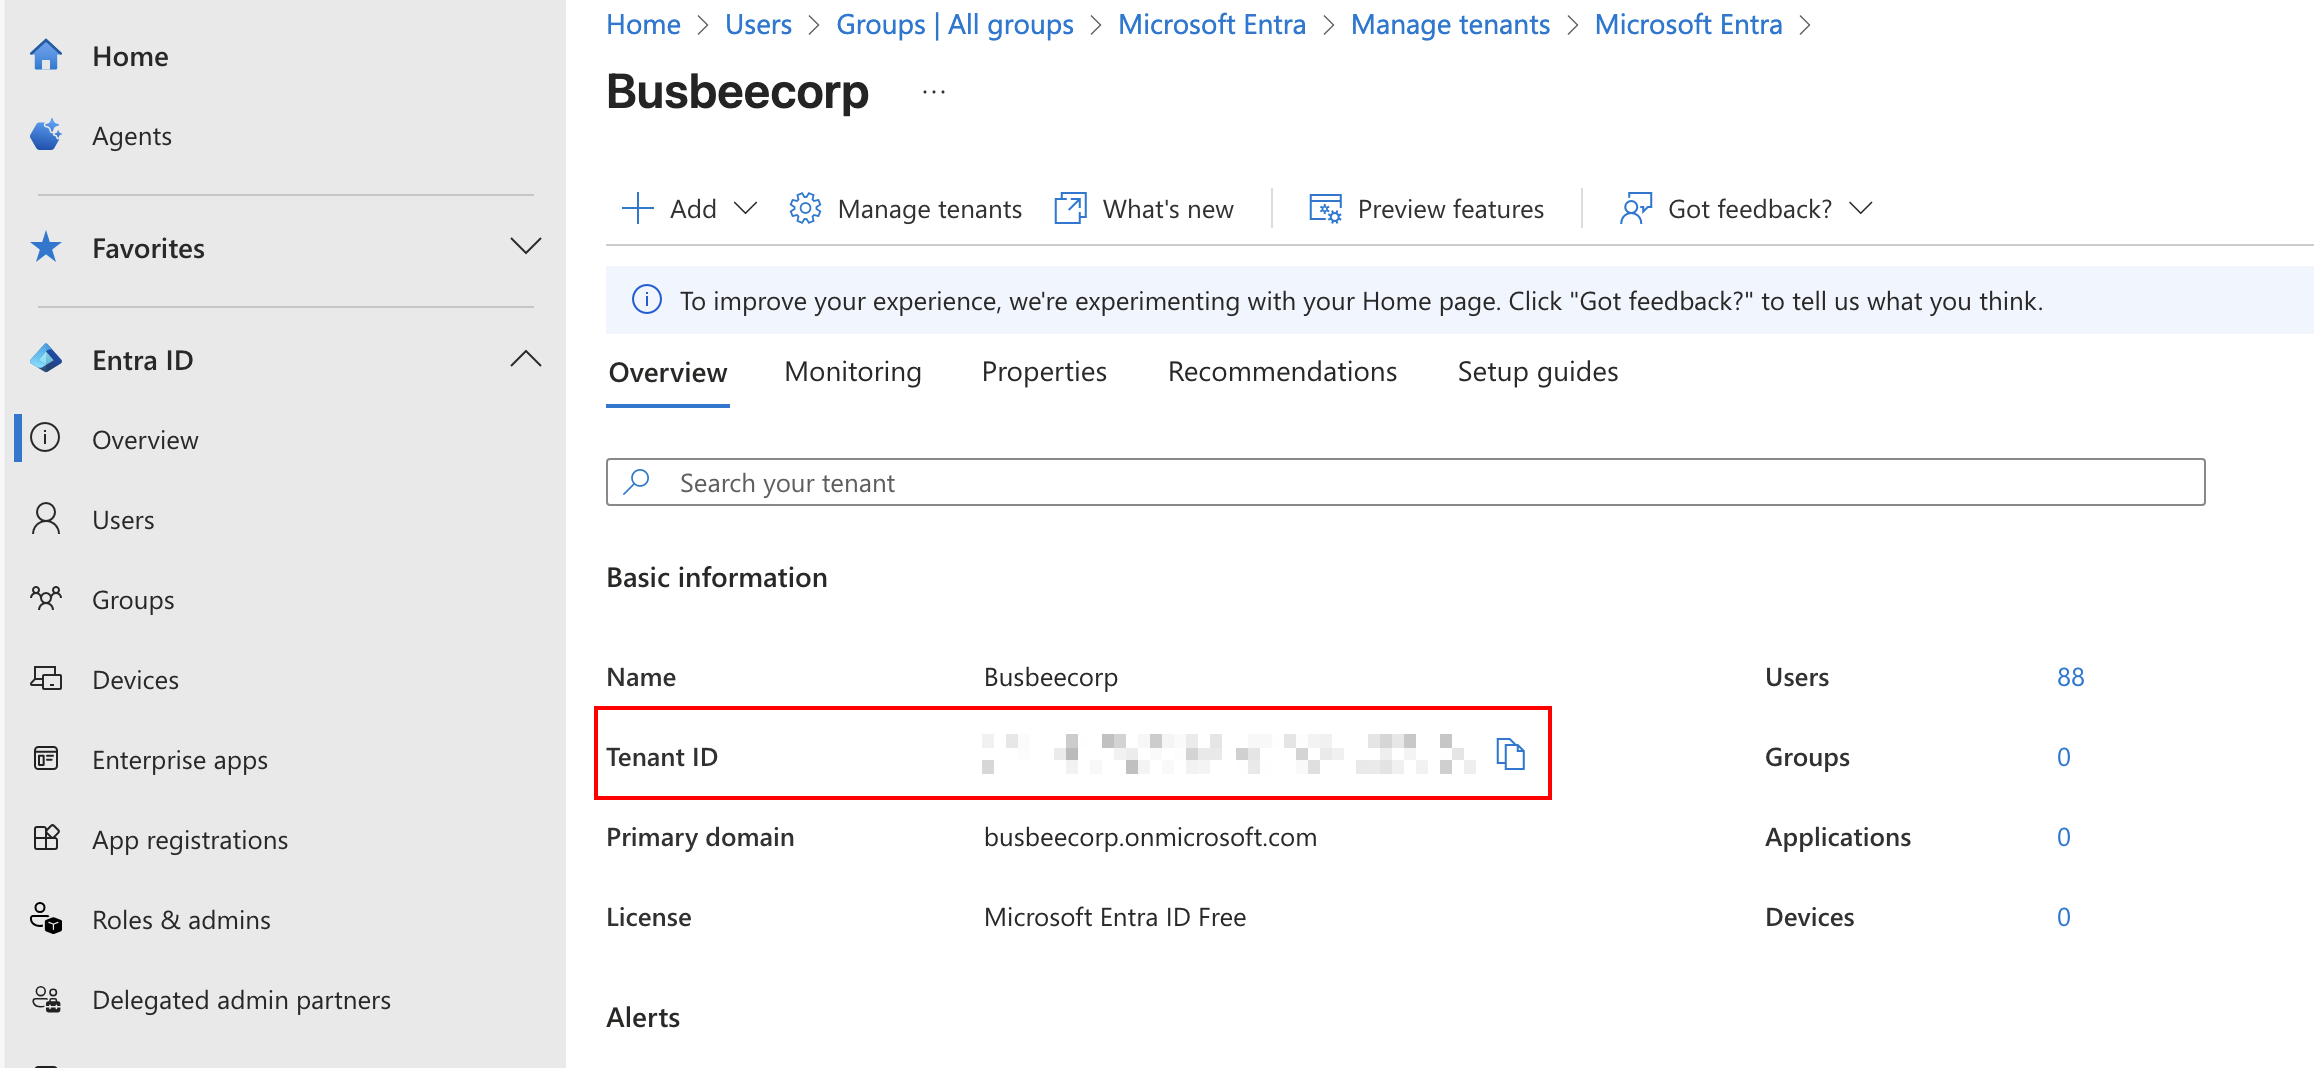
Connect-MgGraph -Scopes "Group.ReadWrite.All" -TenantID "<Your Tenant ID>"
The Tenant ID can be found by going to Entra > Overview
After running this command for the first time like I was, you may have a pop-up browser window asking for permission to connect. Make sure to give it the access so you can continue running commands.
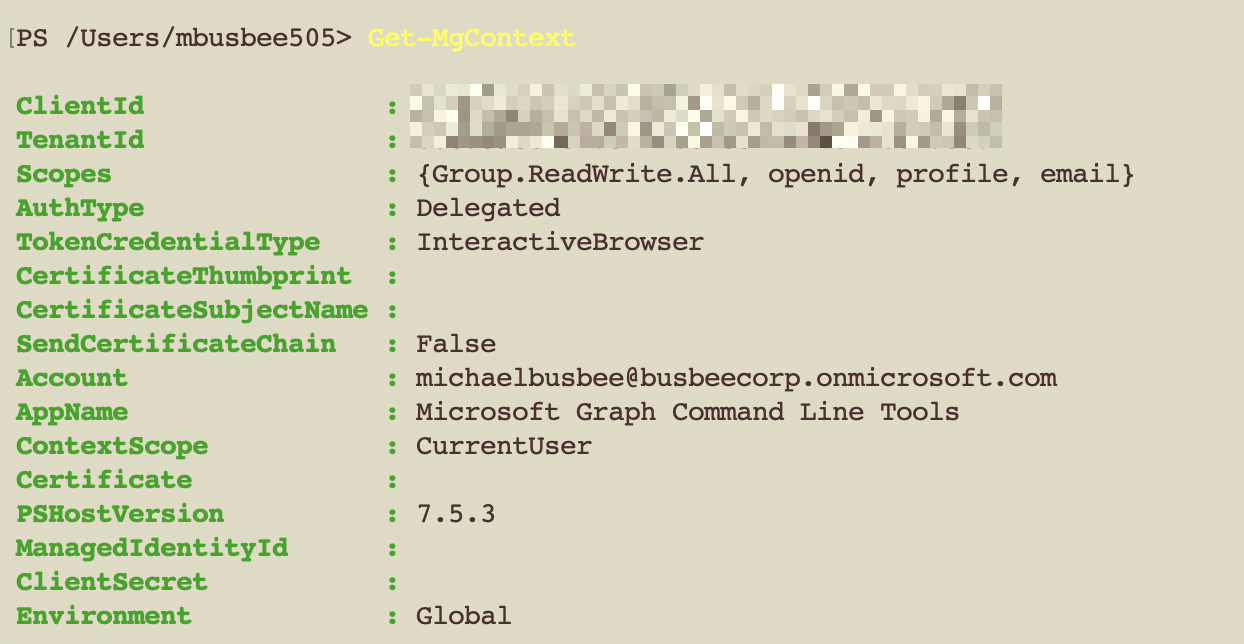
To test that the connection works run
Get-MgContext
It should output some info about your Tenant like below. If this doesn't work you will need to check your connect command again and ensure you are using the right Tenant ID.
Once I confirmed connection I ran the command below which added the following security groups to Entra. Since its a dynamic group, users and devices will be added to them automatically based on their properties.
- Exec
- HR
- Finance
- IT
- Sales
- Marketing
- Eng
- Support
- All-Devices
- All-iOS
- All-Android
# Map each DisplayName to its dynamic rule
$dynamicMap = @{
    'Executive'     = '(user.jobTitle -contains "Chief")'
    'Human Resources'       = '(user.department -eq "Human Resources")'
    'Finance'  = '(user.department -eq "Finance")'
    'IT'       = '(user.department -eq "IT")'
    'Security'       = '(user.department -eq "Security")'
    'Research'       = '(user.department -eq "Research")'
    'Sales'    = '(user.department -eq "Sales")'
    'Marketing'= '(user.department -eq "Marketing")'
    'Engineering'      = '(user.department -eq "Engineering")'
    'Support'  = '(user.department -eq "Support")'
    'All-Devices' = '(device.deviceId -ne null)'      # dynamic **device** group
    'All-iOS'     = '(device.deviceOSType -contains "iOS")'
    'All-Android' = '(device.deviceOSType -contains "Android")'
}

foreach ($kv in $dynamicMap.GetEnumerator()) {
    $name = $kv.Key
    $rule = $kv.Value

    $params = @{
        DisplayName                 =  $name
        MailNickname                = ($name -replace '\s','')
        Description                 = "$name dynamic security group"
        SecurityEnabled             = $true          # keeps it a security group
        MailEnabled                 = $false
        GroupTypes                  = @('DynamicMembership')
        MembershipRule              = $rule
        MembershipRuleProcessingState = 'On'
    }

    New-MgGroup @params
}
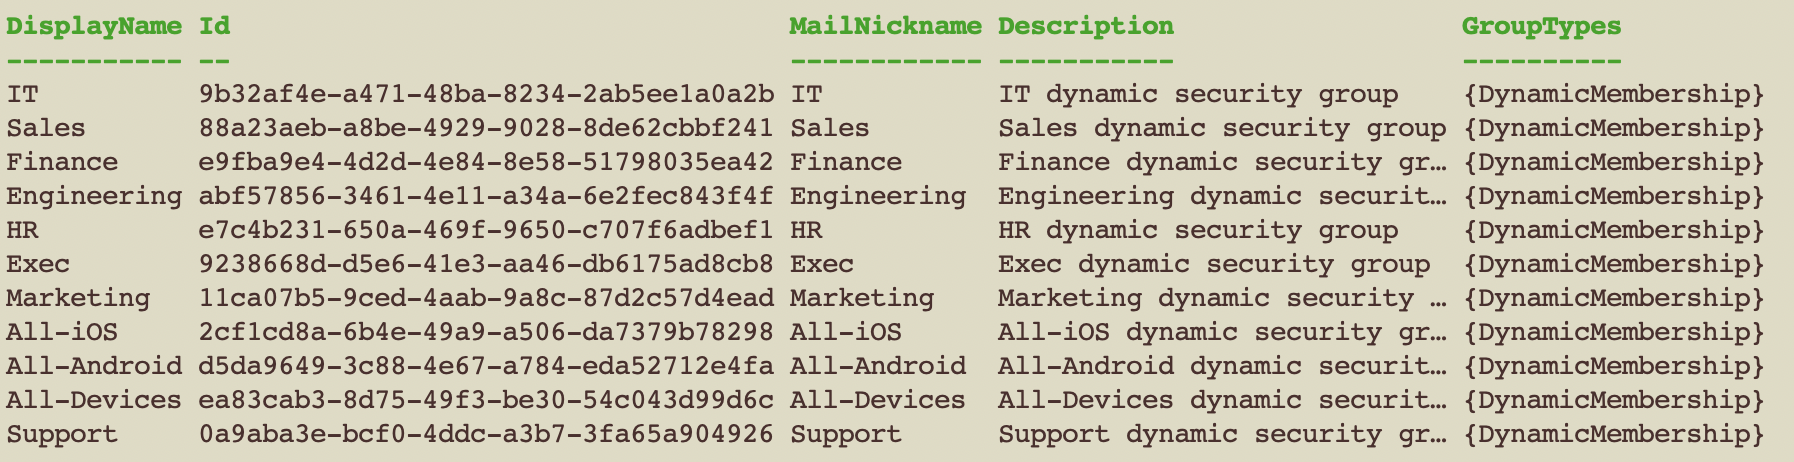
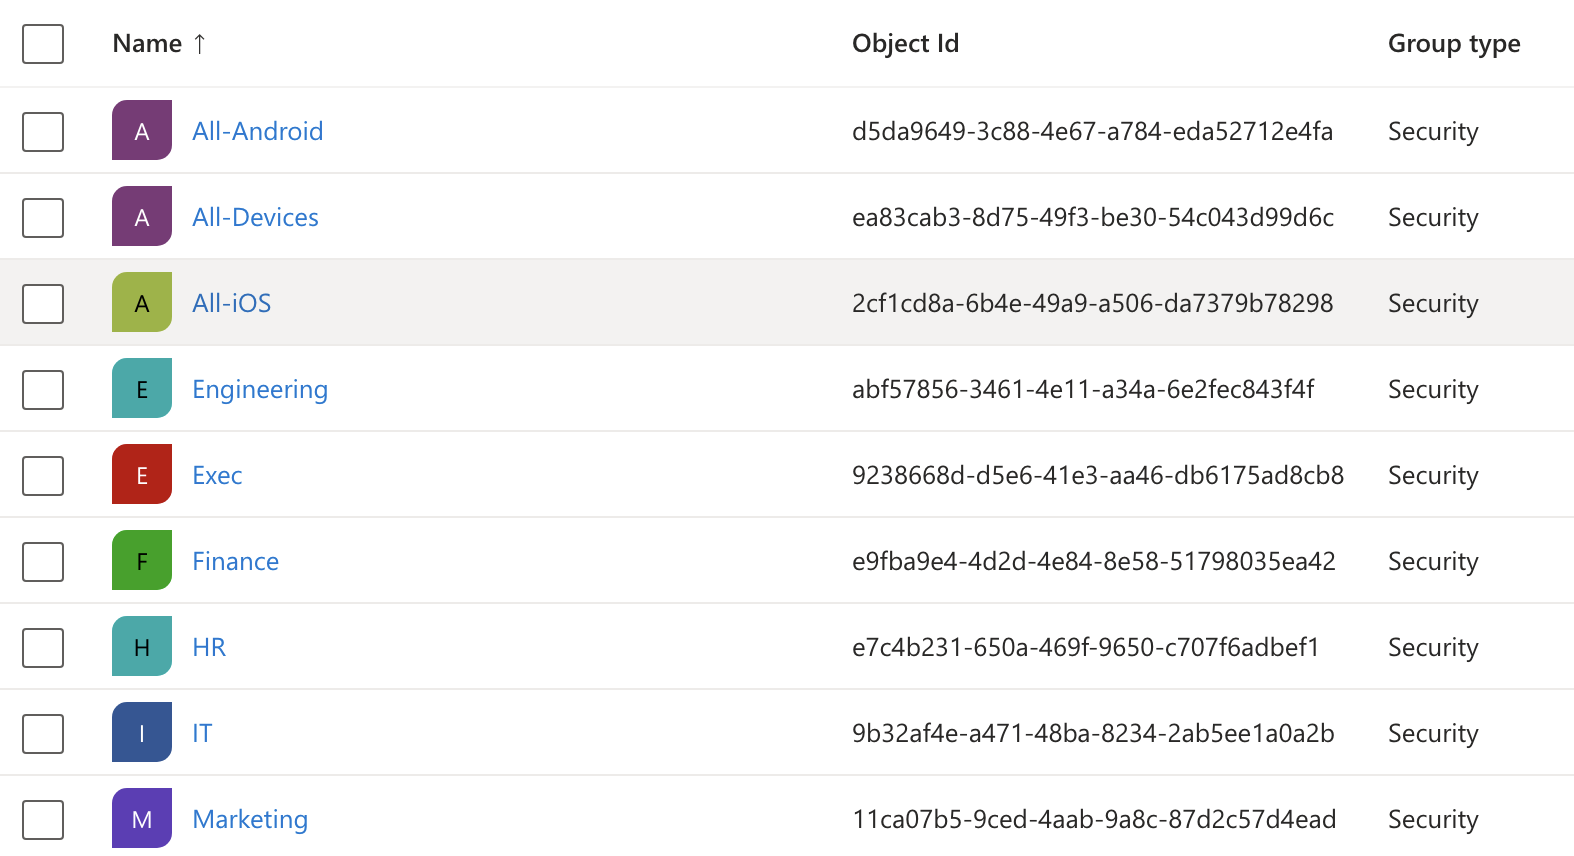
Once I saw the success screen come through I went to Entra > Groups > All Groups and found the groups added via PowerShell.
According to Microsoft, it can take up to 24 hours for these groups to apply to users. While I waited for this to end I moved on to setting up a dynamic device group for Windows 11 devices.
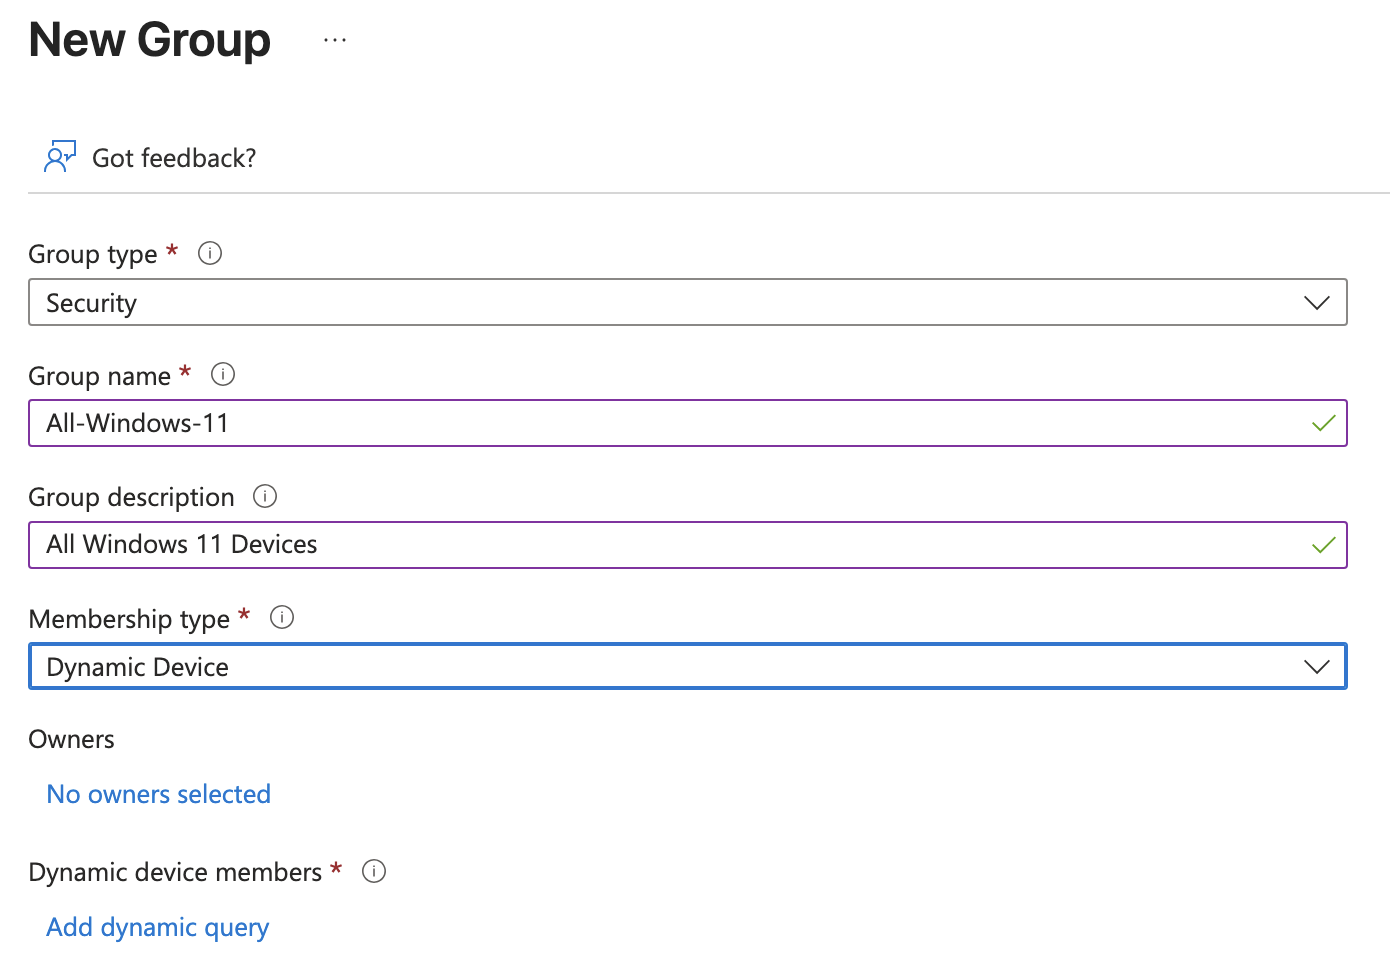
In the Add dynamic query page I added the following settings:

Assigning Entra+Intune Licenses
I discovered in order to get the Automatic Enrollment to work on Intune during the OOBE setup I needed each user to have an Entra and Intune license assigned. Since I had only signed up for the Intune Trial so far, I had to go back and make sure to sign up for an Entra ID Free Trial as well under the same Microsoft account.
The Free Trials for Entra and Intune both came with 25 users each so I decided to cull my workforce down to 25 users (including myself), then apply the licenses to each user. I did not want to apply to all users, just those that are employees of the company. The smartest way to do this seemed to be by creating a dynamic group based on the user's Company Name property and assign licenses to members of that group.
First I needed to set the Company Name property correctly for all 25 of my current users, since I know these are all employees. The following PowerShell commands set the Company Name for all users.
$CompanyName = "BusbeeCorp"
$domain      = "@busbeecorp.onmicrosoft.com"

Get-MgUser `
    -Filter "endswith(userPrincipalName,'$domain')" `
    -ConsistencyLevel eventual `
    -All |
ForEach-Object {
    Update-MgUser -UserId $_.Id -CompanyName $CompanyName
}
In the real world I would want to make sure data entry for each new user is happening correctly.
With the Company Name set I just needed to create a dynamic group for All-Employees based on the Company Name property BusbeeCorp
$rule = 'user.companyName -eq "BusbeeCorp"'

New-MgGroup -DisplayName "All-Employees" `
            -Description "Every Employee of BusbeeCorp" `
            -MailEnabled:$false `
            -SecurityEnabled:$true `
            -MailNickname "all-employees" `
            -GroupTypes "DynamicMembership" `
            -MembershipRule $rule `
            -MembershipRuleProcessingState "On"
I found that to get the Licenses assigned to the All-Employees group I had to first update Microsoft Graph to get a few modules not included by default.The following command will install this and open a new PowerShell session.
Register-PSRepository -Name PSGallery -SourceLocation "https://www.powershellgallery.com/api/v2" -InstallationPolicy Trusted -ErrorAction SilentlyContinue

Install-Module Microsoft.Graph -Scope CurrentUser -Force
pwsh
Once in the new session I ran the commands below to apply the License SKUs to the All-Employees group.
Connect-MgGraph -Scopes "Directory.ReadWrite.All","LicenseAssignment.ReadWrite.All","Group.ReadWrite.All"

$skuIntune  = "061f9ace-7d42-4136-88ac-31dc755f143f"
$skuEntraP2 = "f9602137-2203-447b-9fff-41b36e08ce5d"
$groupId    = (Get-MgGroup -Filter "displayName eq 'All-Employees'").Id

Set-MgGroupLicense -GroupId $groupId `
    -AddLicenses  @(@{SkuId=$skuIntune}, @{SkuId=$skuEntraP2}) `
    -RemoveLicenses @()
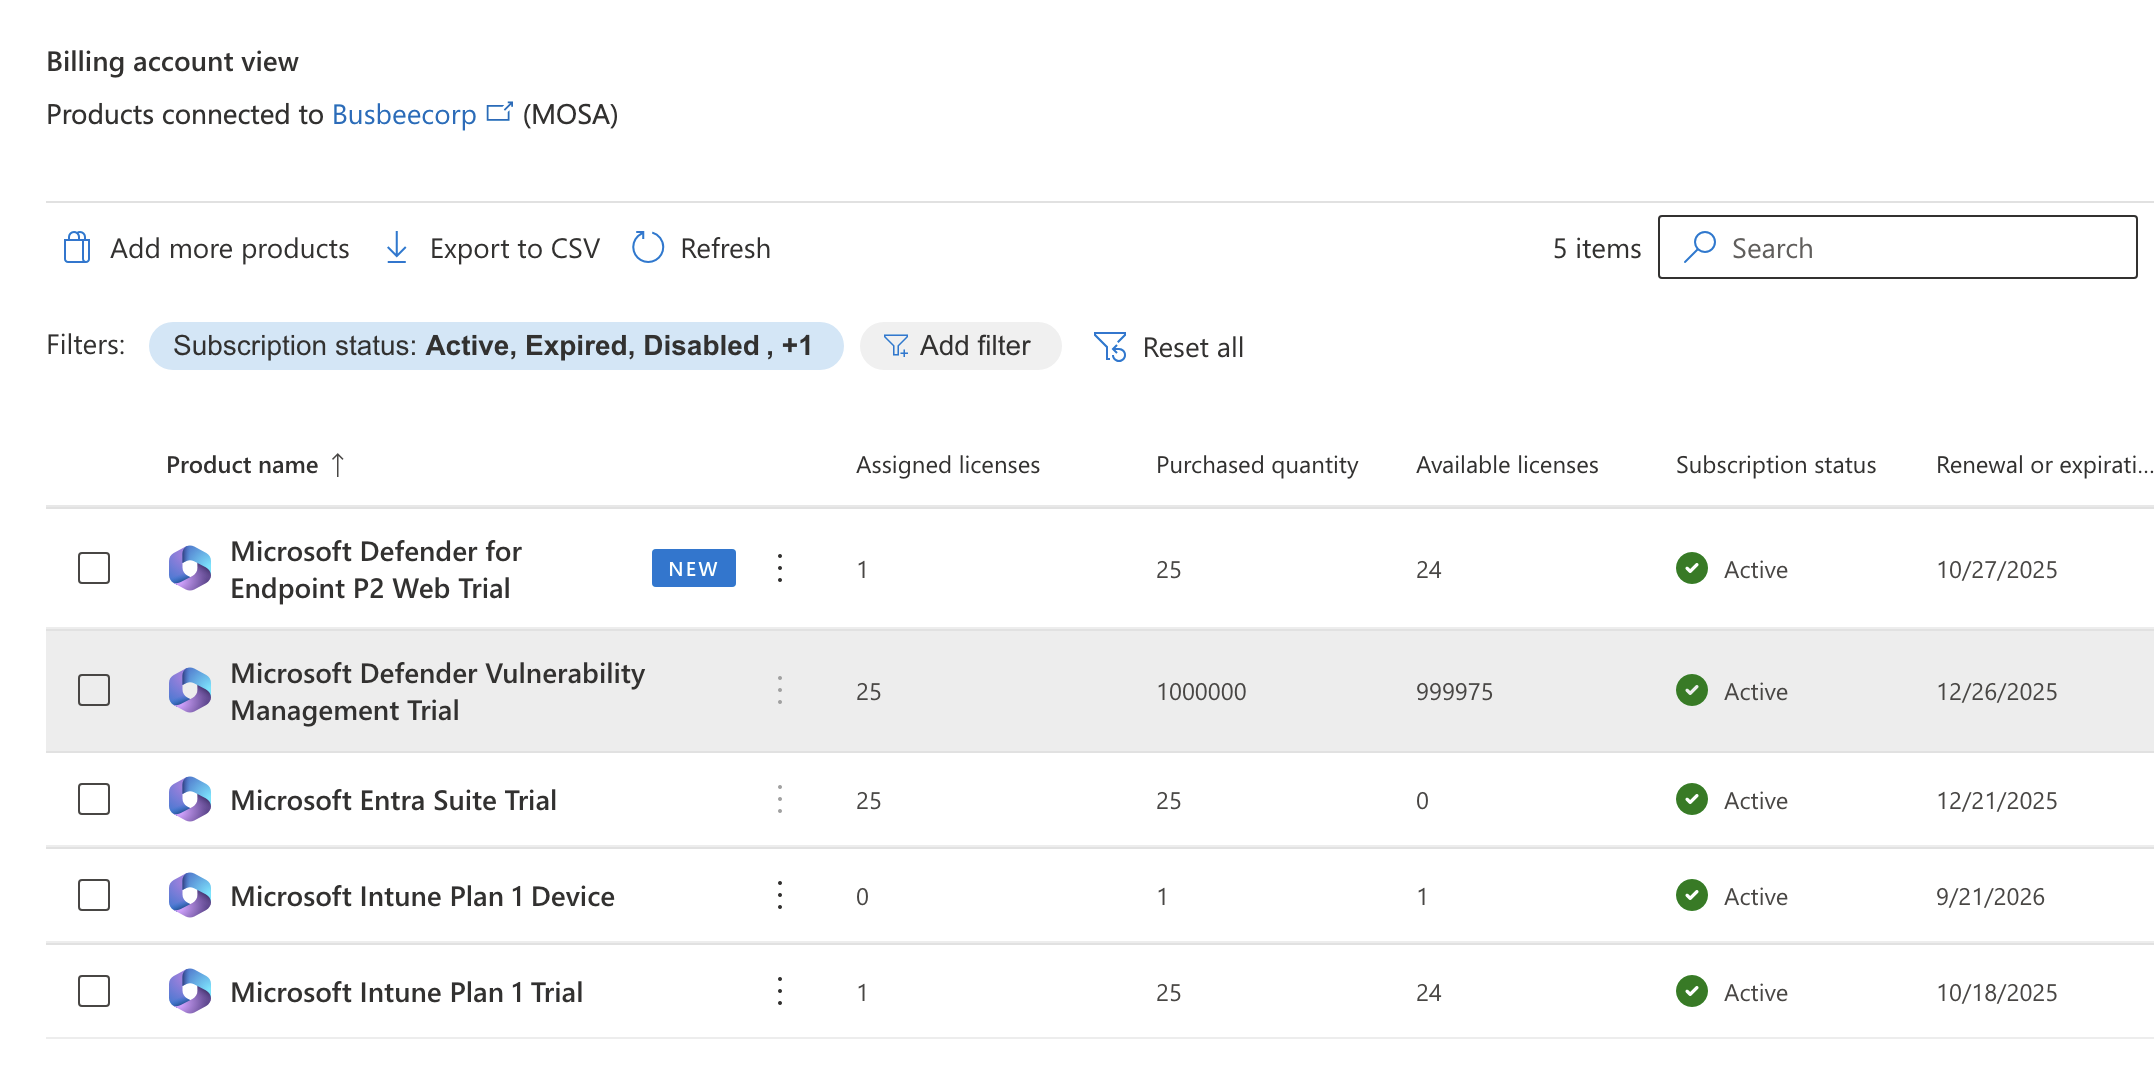
I confirmed this took effect by going to Entra > Billing > Licenses > All Products and saw 25 Assigned licenses for each product.

Signing Up for Defender for Endpoint
First, Go to the sign up page for Microsoft Defender for Endpoint P2 Free Trial and sign up using the same login you used for the rest of the lab. Complete the sign up flow, then go to Microsoft 365 Admin Center > Billing > Licenses page and click Microsoft Defender for Endpoint P2. In this page click Groups > Assign Licenses and assign them to the All-Employees group.
Next we can setup Defender for Endpoint to connect with each of our devices in Intune so we can get visibility over the devices security and compliance status. Defender for Endpoint provides comprehensive protection for endpoint devices to guard users and provide better management capabilities for IT admins.
To configure Defender for Endpoint you must first connect it to the Intune environment. In Intune go to Intune > Endpoint security > Microsoft Defender for Endpoint and set the following setting:
- Allow Microsoft Defender for Endpoint to enforce Endpoint Security Configurations: On
This will let Defender control the configurations within the Intune environment.
You will next need to go to the Defender portal and connect Defender to Intune on the other side. Go to Defender > Settings > Endpoint > Advanced Features > Microsoft Intune Connection and set it to On.
On the Intune side you will need to go to Intune > Tenant Administration > Connectors and tokens > Microsoft Defender for Endpoint and make sure all devices are set to connect to MDE.
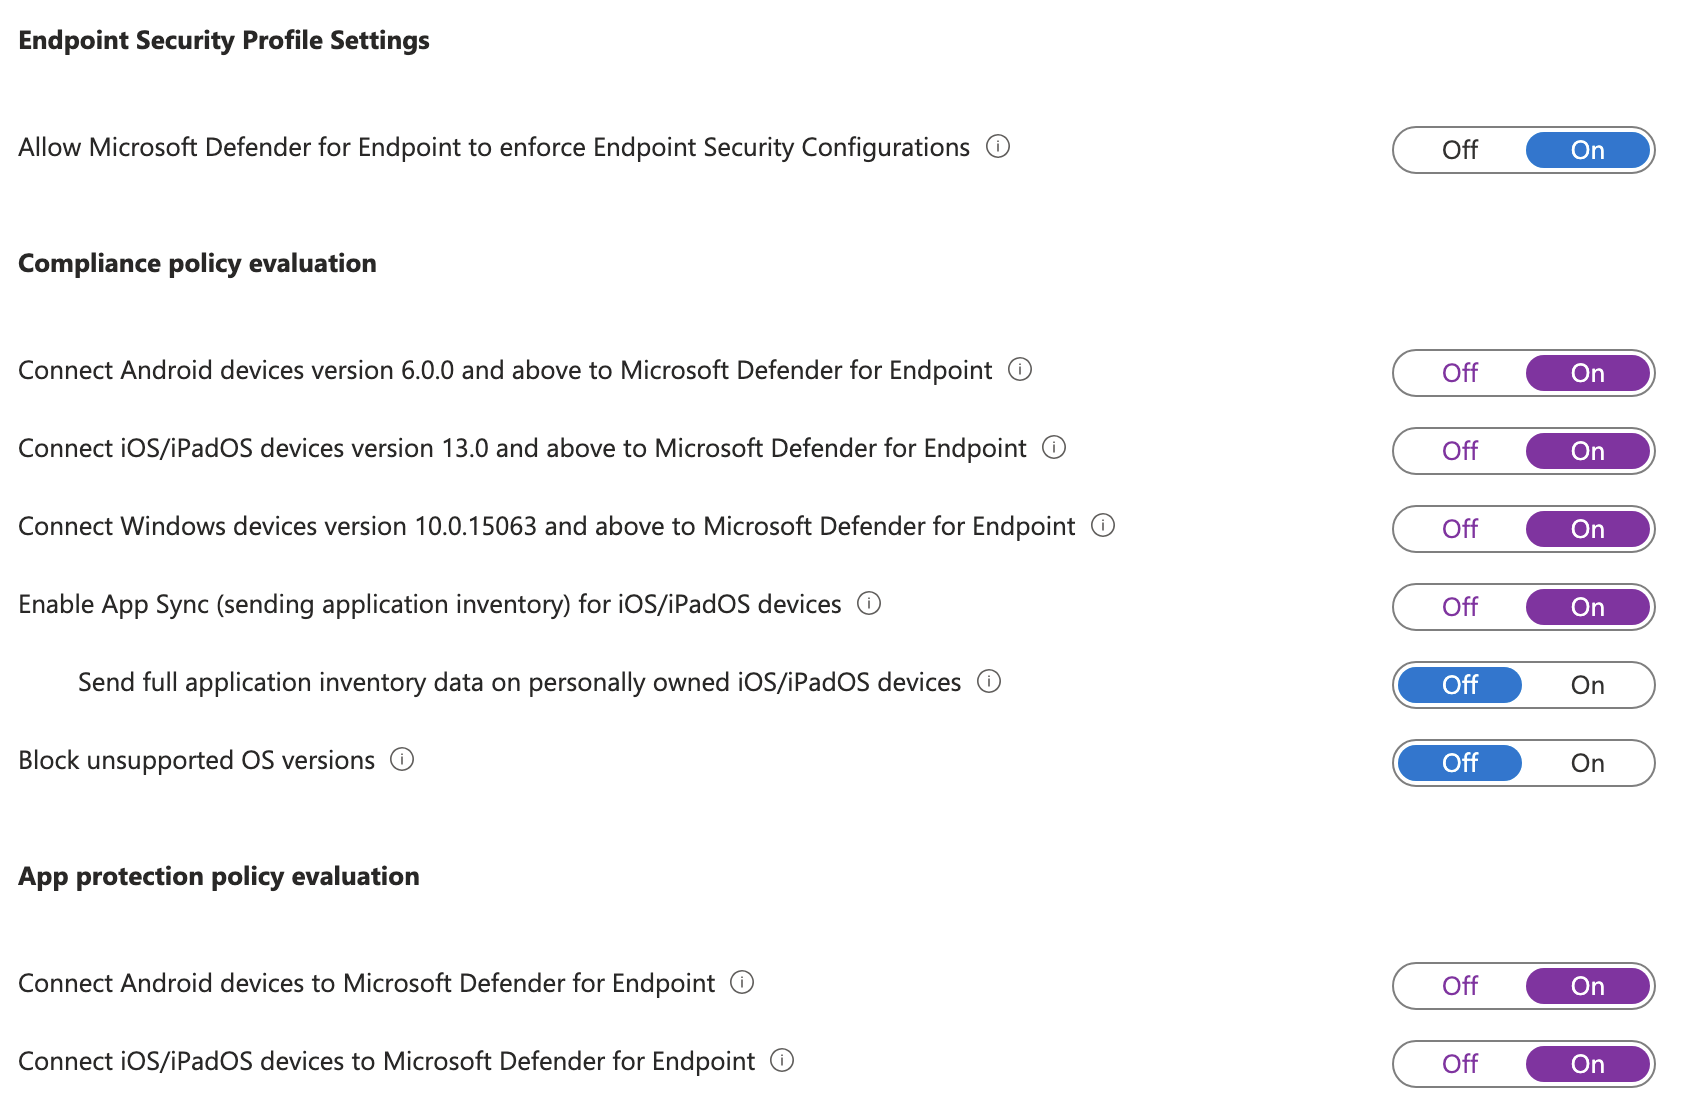
These being connected ensures Defender for Endpoint is able to connect to the Intune devices.
Getting the Hardware Hash
In a real world scenario hardware hashes for each device would be provided to the organization by the device manufacturer, but since I can't do that I had to fake it a bit.
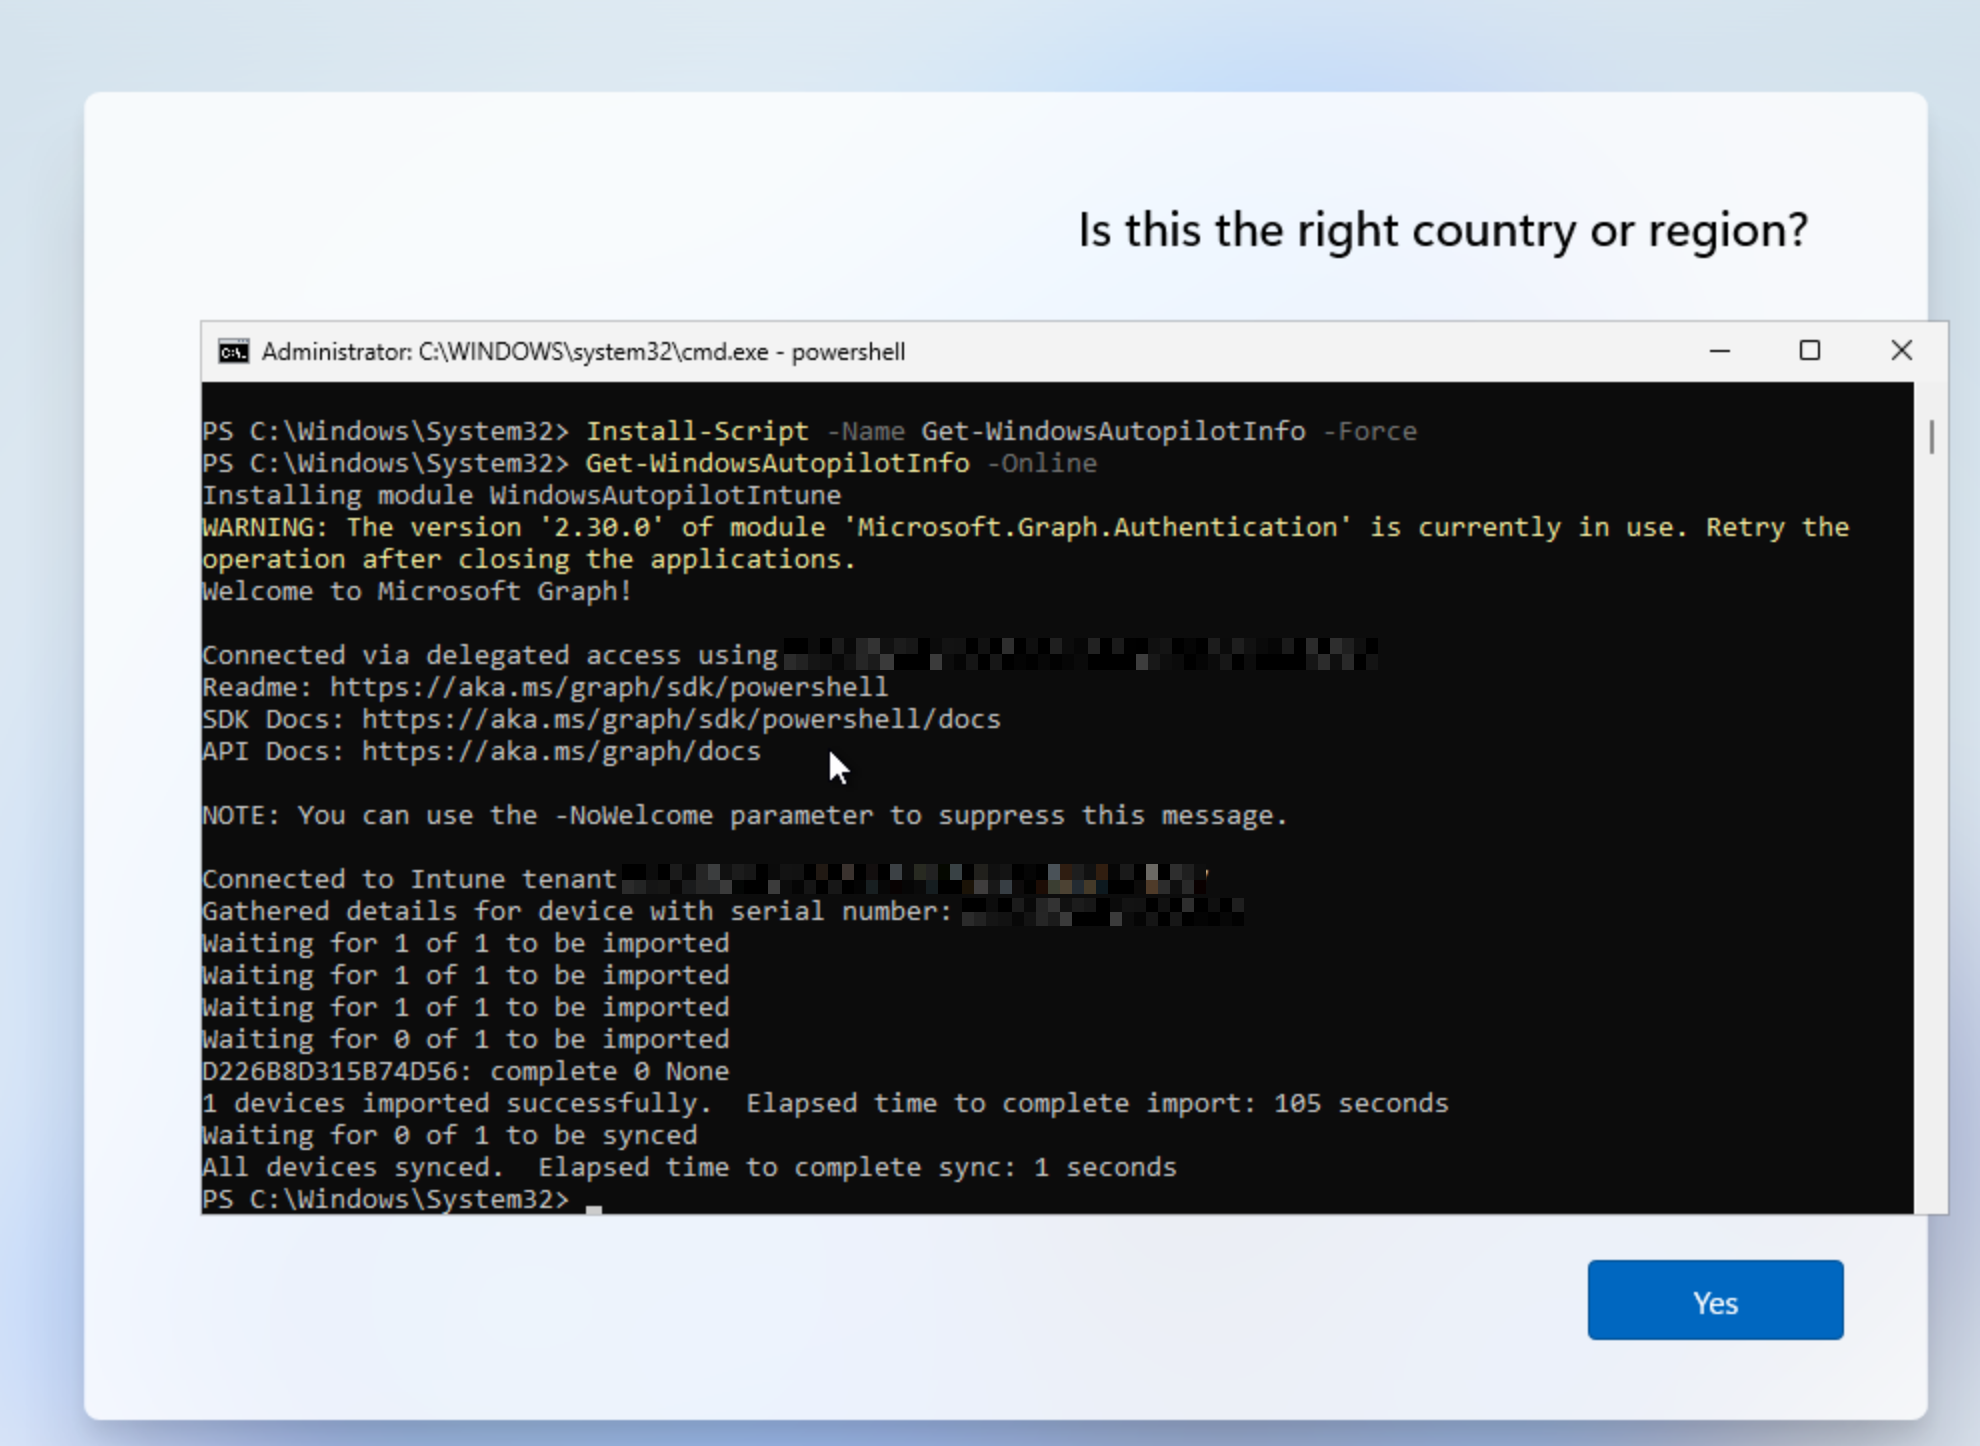
I created a new Windows 11 VM and when it got to the select region screen I pressed Shift+F10 to open command prompt then ran the command powershell to get to open a new PowerShell session.
The commands below do the following things:
- Installs Microsoft Graph
- Connects to Microsoft Graph using the TenantID provided
- Sets Execution Policy to Bypass
- Installs Windows Autopilot Info module
- Generates the device hardware hash and uploads it to the tenant
Set-ExecutionPolicy -Scope Process Bypass -Force
Install-Module Microsoft.Graph -Scope CurrentUser
Connect-MgGraph -Scopes "Group.ReadWrite.All" -TenantID "<Your Tenant ID>"
Install-Script -Name Get-WindowsAutopilotInfo -Force
Get-WindowsAutopilotInfo -Online
To confirm this was successful you can go to Intune > Devices > Enrollment > Windows Autopilot > Devices
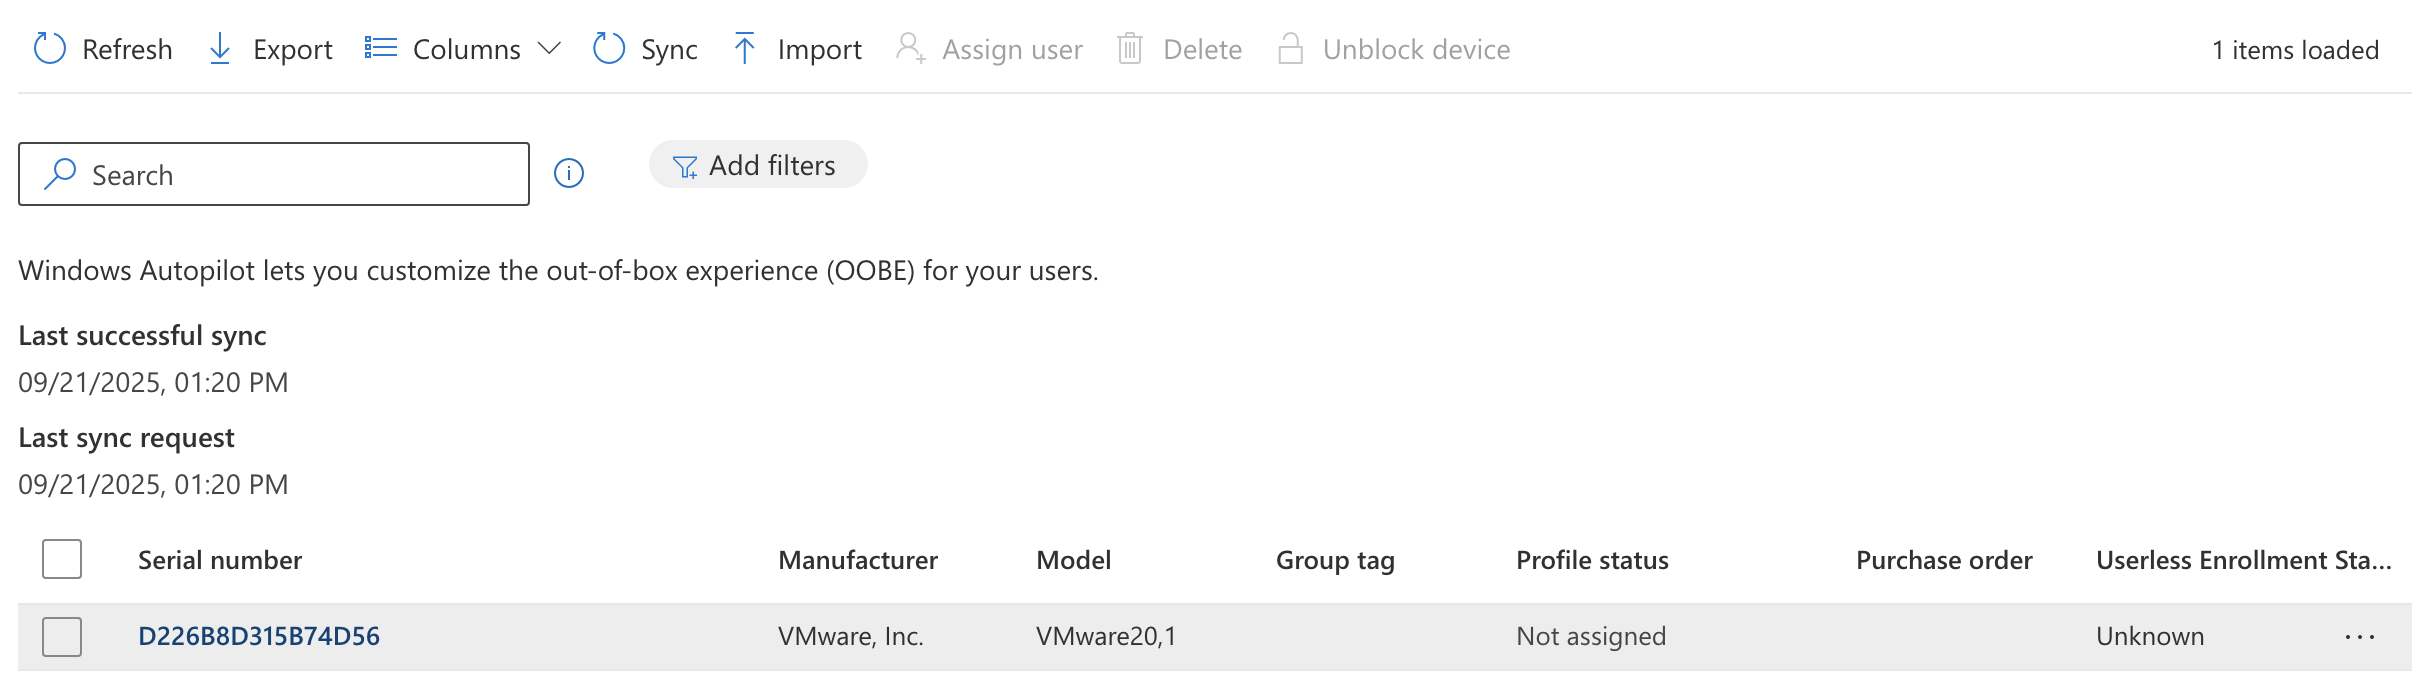
Here I can see my VM running on VMware "hardware". With this in place I'm ready to move on.
Creating Autopilot Device Group
I created a Dynamic Security group called All-Registered-Autopilot that will grab all devices registered to Autopilot. This will be the group I assign the Deployment Profile and Enrollment Status Page to.
Intune > Groups > New Group
- Name: All-Registered-Autopilot
- Description: All Devices registered to Autopilot
- Membership Type: Dynamic Device
Edit Dynamic Query > Configuration Rules
(device.devicePhysicalIds -any (_ -startsWith "[ZTDId]"))
Creating The Deployment Profile
My goal is to get a Windows 11 device to the point it could be purchased from the manufacturer, sent to a new employee, then the employee can use their corporate login credentials to sign in and set up the laptop. The configuration should take care of all setup and installs and leave as little as possible to the user.
I went to Intune > Devices > Enrollment > Windows > Deployment Profiles > Create Profile
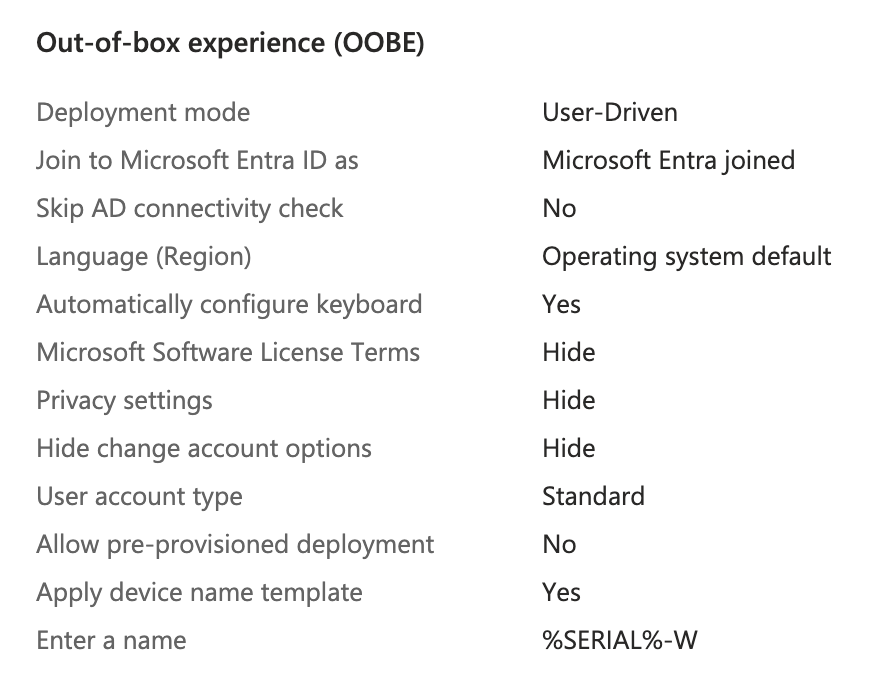
I gave the following settings to create the profile:
- Name: Employee New Device
- Description: Windows 11 Employee Config
- Deployment Mode: User-Driven
- Joint to Microsoft Entra ID as: Microsoft Entra Joined
- Apply a device name template: Yes -
%SERIAL%-W - Add Groups: All-Registered-Autopilot
Summary of the Out-of-box experience (OOBE) settings
Creating an Enrollment Status Page (ESP)
Next I needed to create an Enrollment Status Page to prevent the user from affecting the device setup and also provide them visibility into the setup status.
To access the ESP settings I went to Intune > Devices > Enrollment > Windows > Enrollment Status Page > Create
I gave it a name to match the Configuration Profile and set Show app and profile configuration progress to Yes and left all other settings as default on this page. I also assigned it to apply to the All-Windows-11 group.
Summary of ESP Settings below:
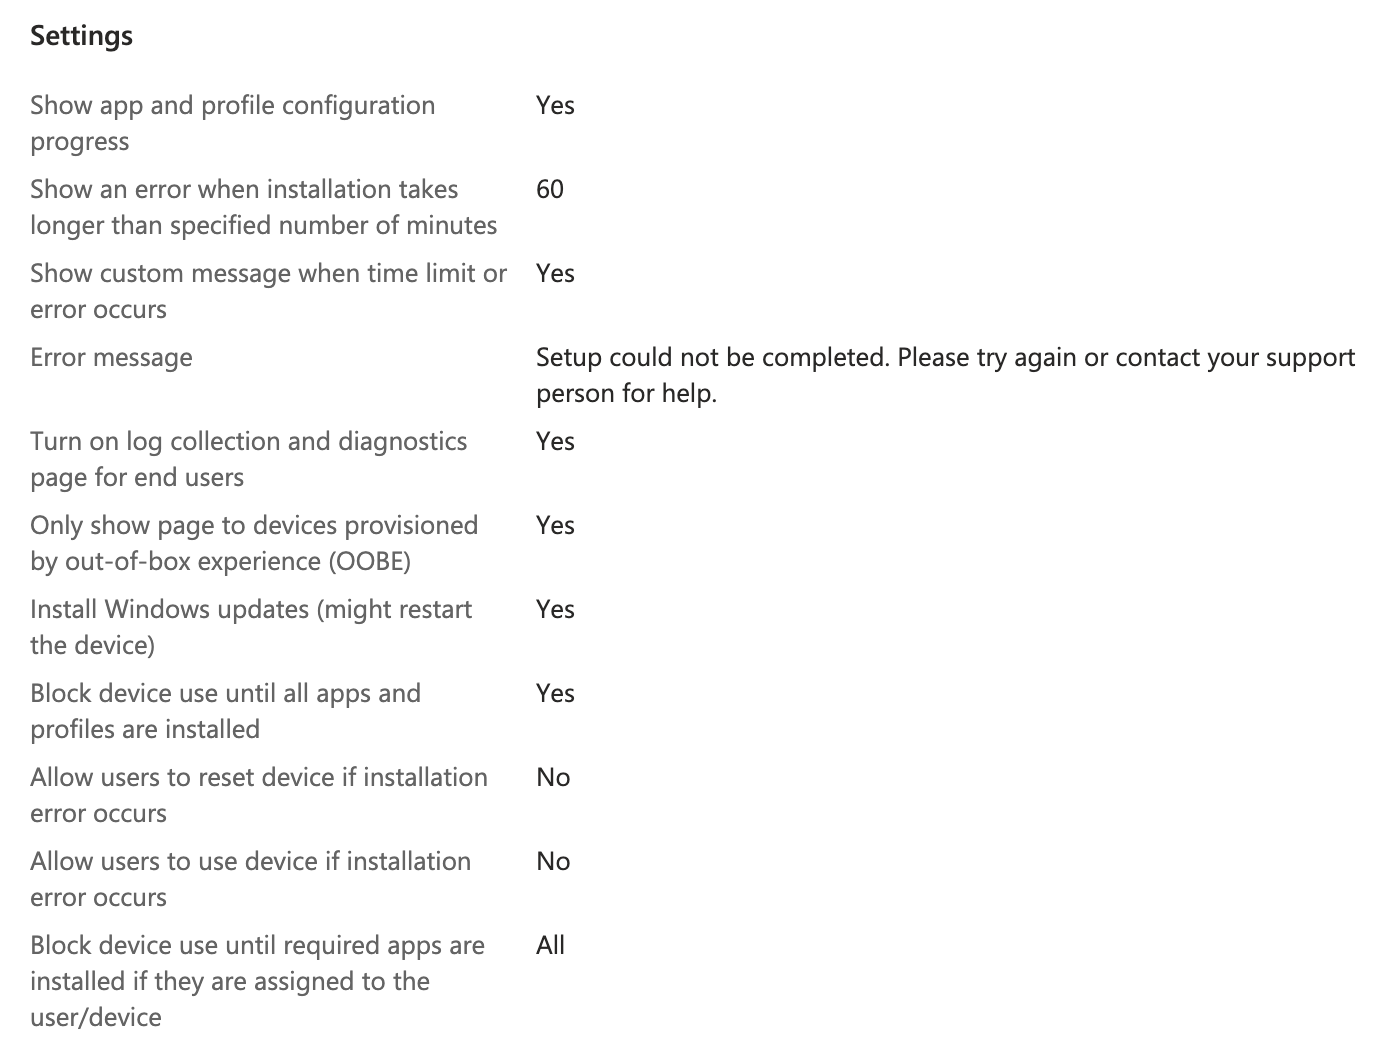
The following settings are important here to make sure apps we install during setup finish before the computer is released to the user:
- Block device use until all apps and profiles are installed: Yes
- Block device use until required apps are installed if they are assigned to the user/device: All
Testing Out-of-box experience (OOBE)
With the command prompt still open on the Windows VM, I ran the command below to shutdown the device and set it back to OOBE mode.
%SystemRoot%\System32\Sysprep\Sysprep.exe /oobe /shutdown
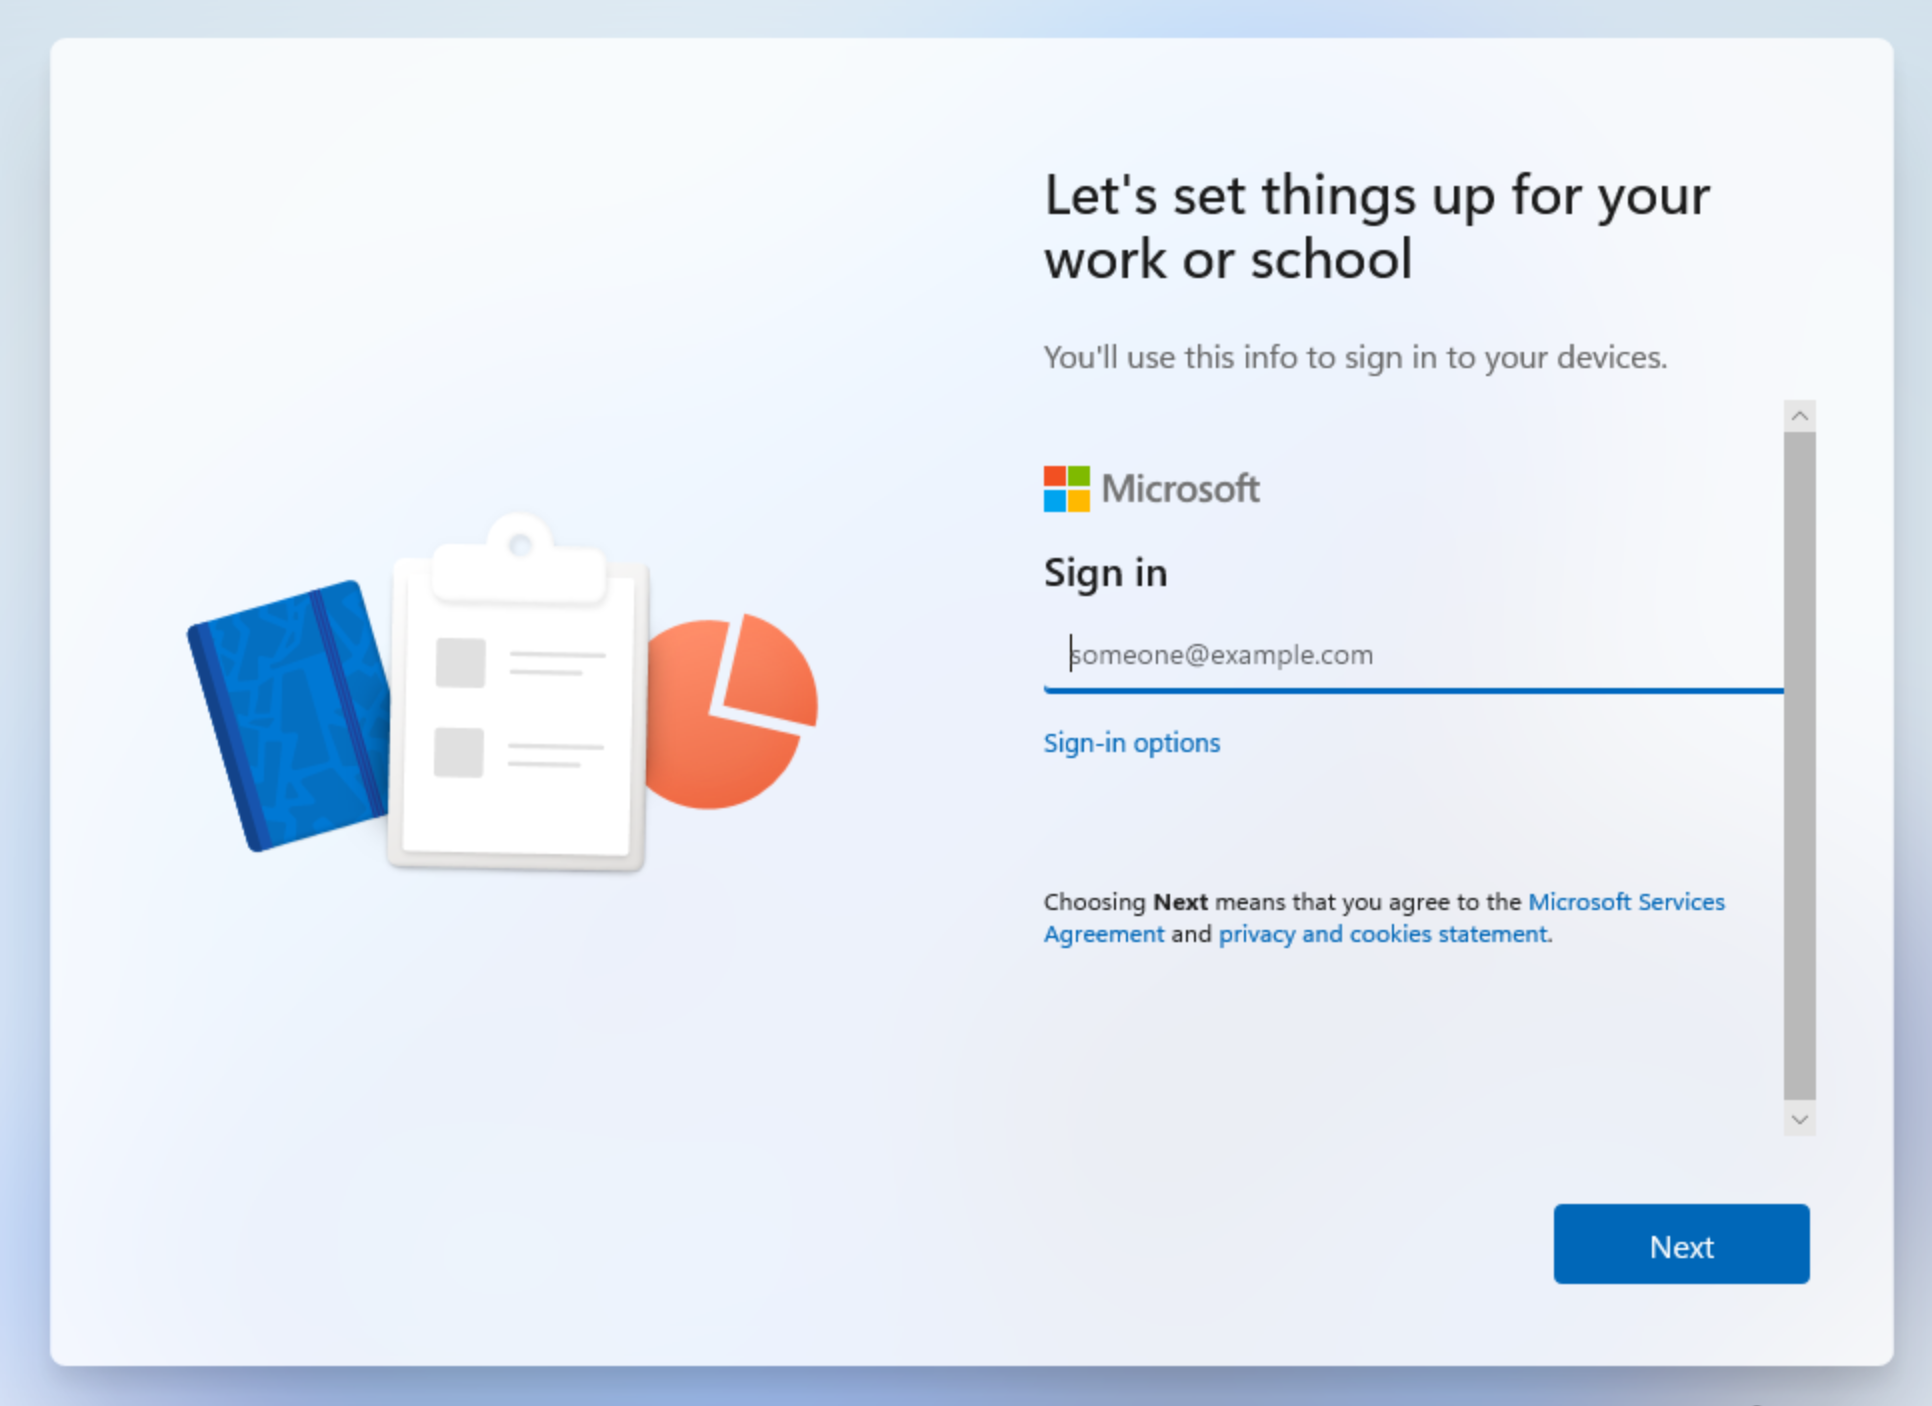
Once it turned back on I noticed the setup was different. It was now asking for a Microsoft Work/School account immediately. I chose one of the accounts from my organization at random and used their email address and password to login.
I noticed there were a few things I did not like about the OOBE setup. It asked the user to change their password as soon as they logged in. This may have been due to this being the first time they have ever logged in, or it could be set by Autopilot. I will need to look into this.
I also noticed it pushed the user into setting up a Windows Hello pin and then used that for login. I would instead prefer the user to have to use a domain user and password for login.
Lastly, I noticed it asked if the user wanted Microsoft 365 Copilot added to taskbar. I do not want my users to have this, or the question asking about it so I want to look into how to remove it.
Removing Windows Hello
When I ran my first OOBE test my user was prompted with the requirement to setup Windows Hello. I want to turn this off entirely so I found going to Intune > Devices > Enrollment > Windows Hello for Business and set Configure Windows Hello for Business to Disabled and clicked Save.
Removing 365 Copilot Pin Prompt
Another thing I noticed on the last OOBE test was a prompt asking the user to pin Microsoft 365 Copilot to their taskbar. I do not want users to have to worry about this so I looked into how to disable it in the portal.
Turns out you can go to Microsoft 365 > Copilot > Settings > User Access and set Pin Microsoft 365 Copilot App to the Windows Taskbar setting to Do Not Pin and click save.

While I was in here I also went through and disabled Copilot across most of the tenant settings.
Testing Setup
Now comes the time to reboot/startup the VM and see if the changes too effect. I started it up and instead of the initial questions where setup asks me to choose a region and language, it instead immediately asked me to sign in with a Microsoft account. Here this should let my user log in with their corporate account that was made for them.
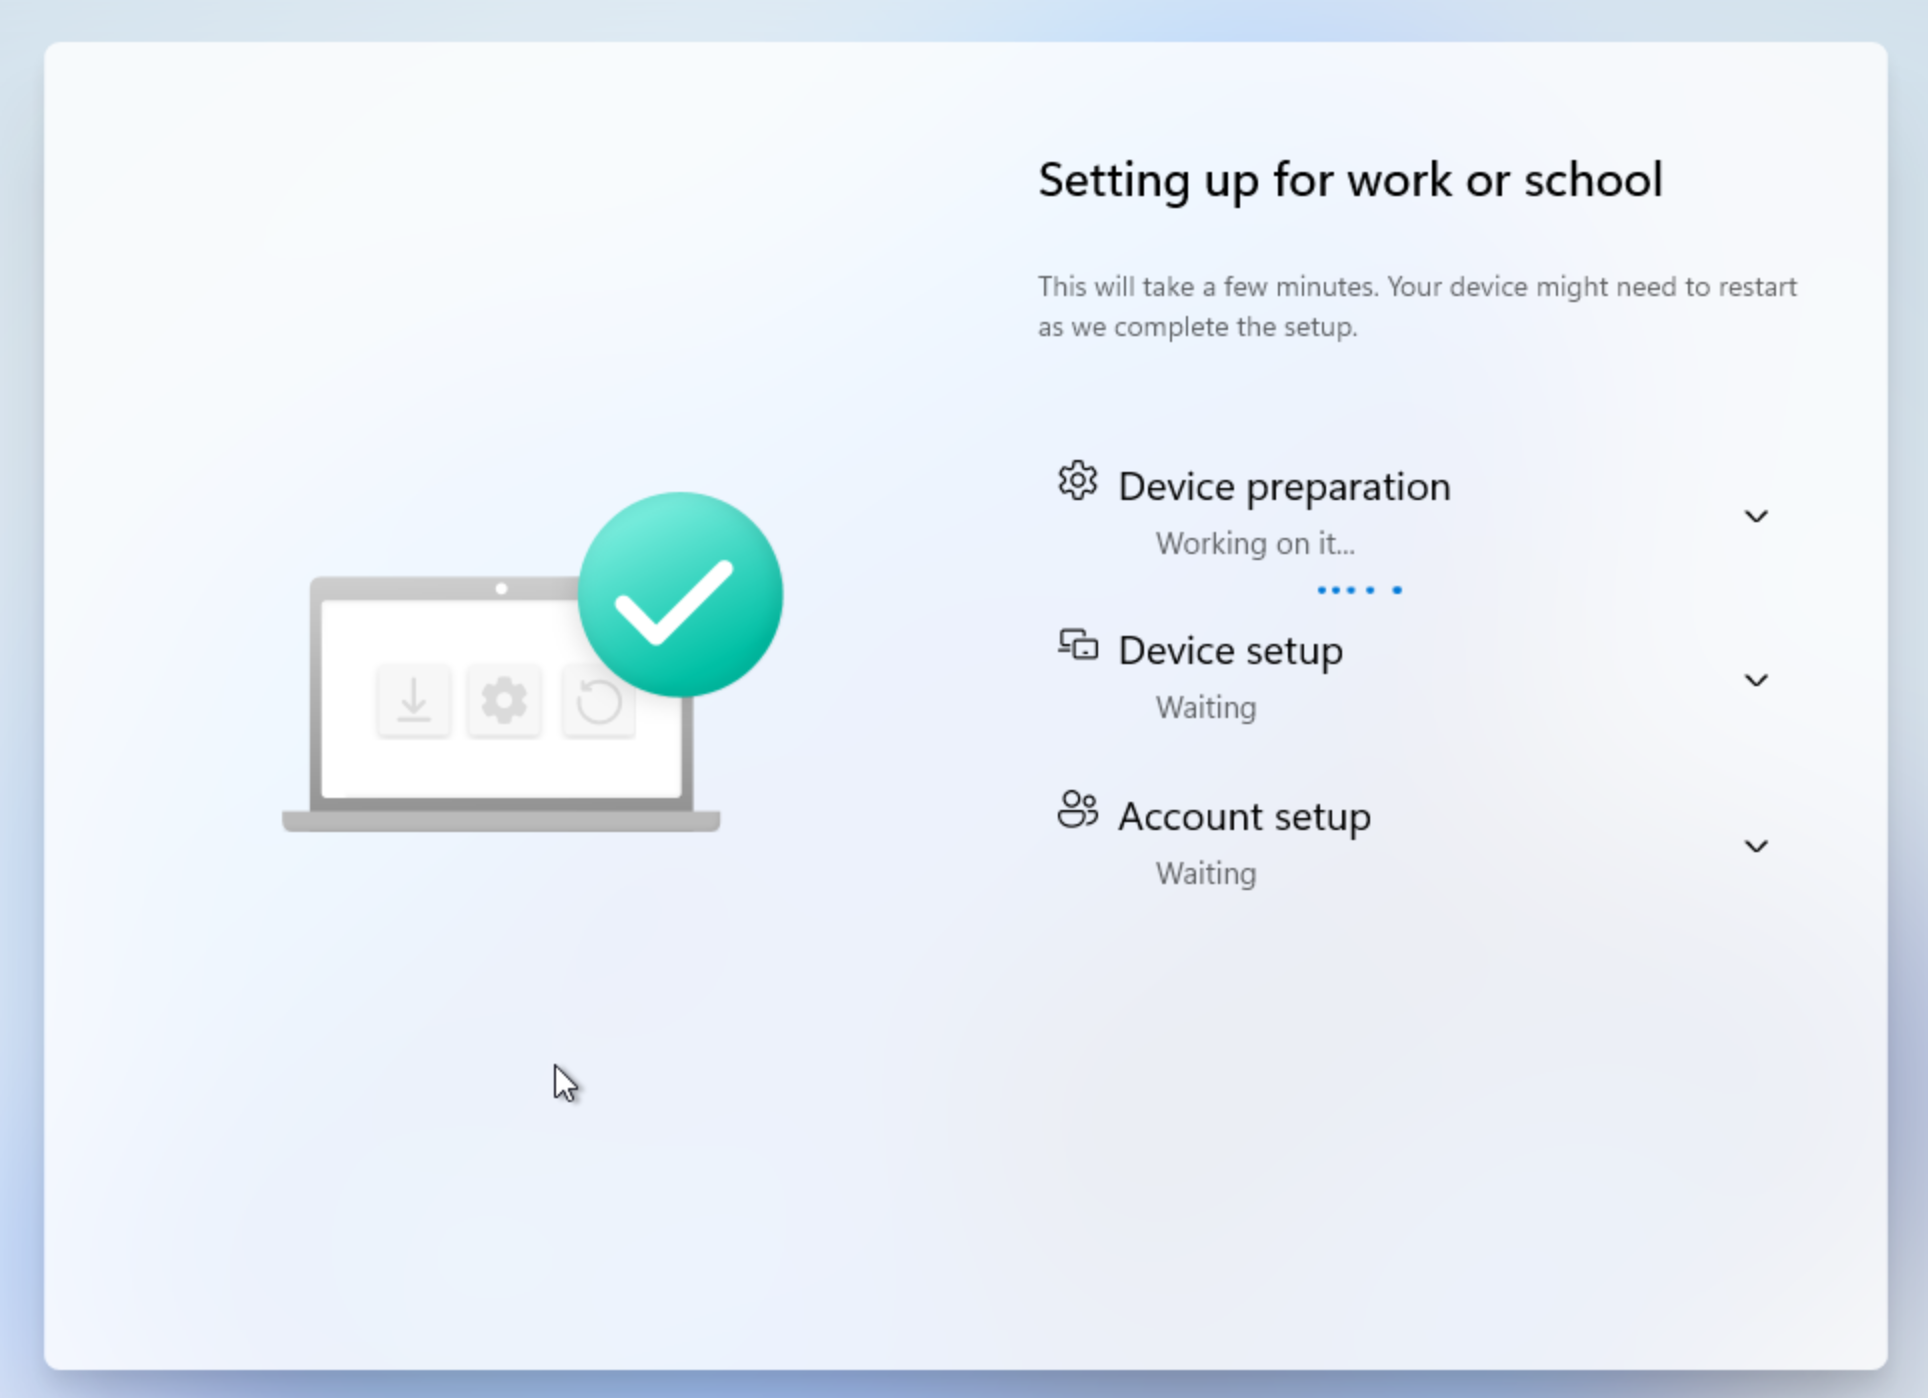
After logging in I got a screen that says "Please wait while we set up your device..."
Once set up completed it logged me into my account and showed me the desktop. I was not prompted with any Windows Hello or 365 Copilot questions.
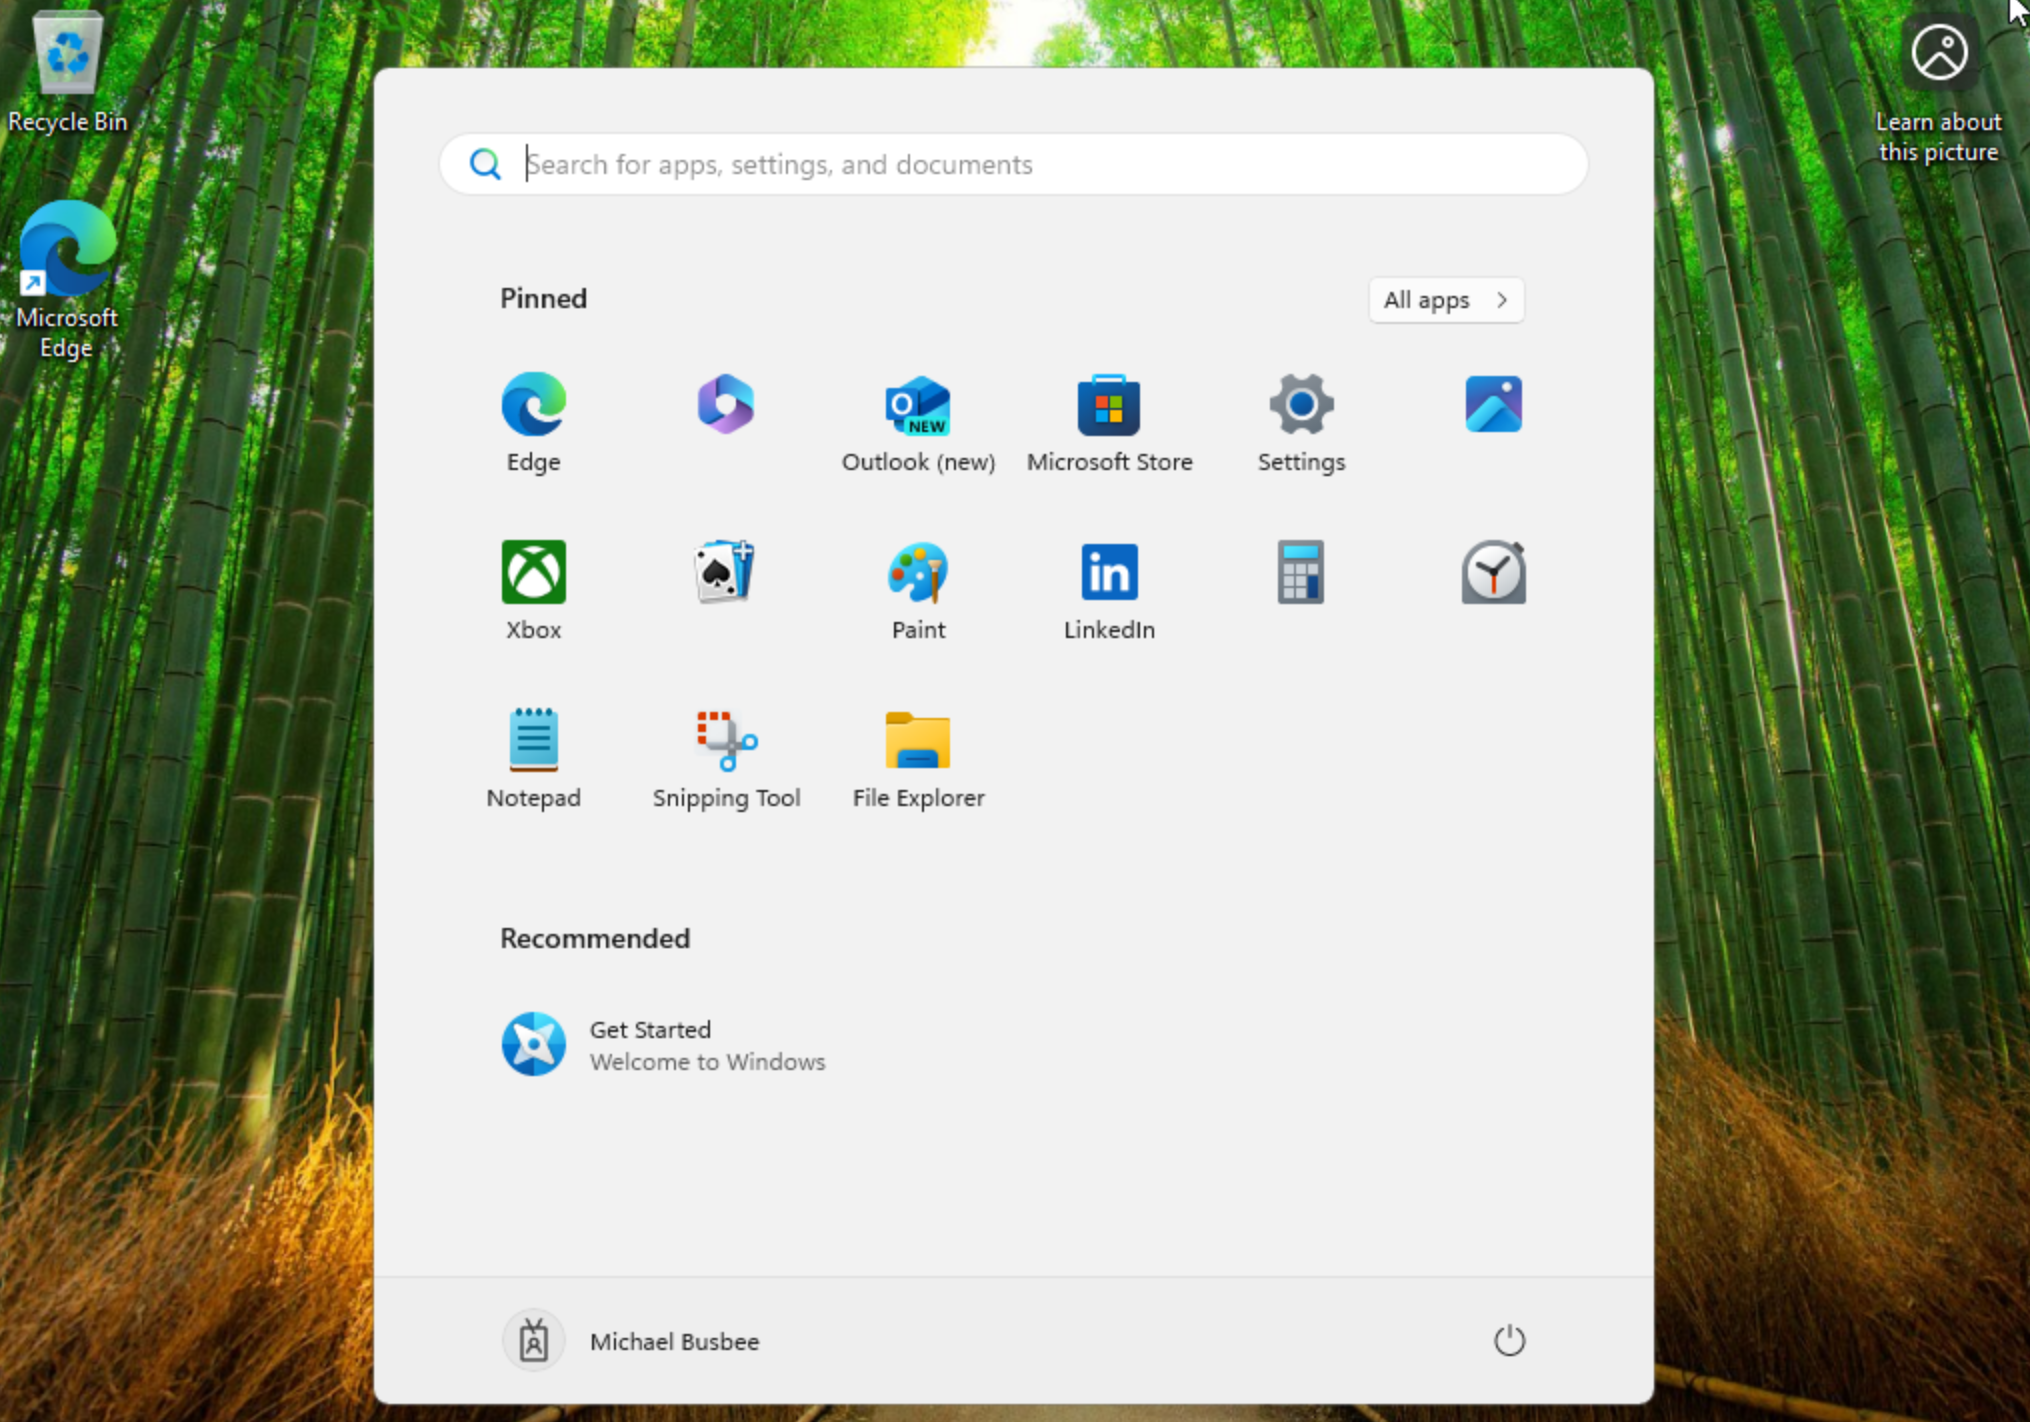
I checked settings and it shows I'm logged in with my corporate account and the name scheme took effect labeling the device as [Serial Number]-W. It looks like the initial run was successful. Next I want to test installing apps on the device.
Installation Methods
I wanted to test a few commonly used apps that also showcase the different methods of installing apps with Intune. I decided on the following:
- Line-of-business (LOB) - Zoom Workplace
- Win32 App - Google Chrome
- Microsoft Store app - GlobalProtect VPN
- Microsoft 365 Apps for Windows 11
I will also need to make sure my [[2. Enrolling Devices#Creating an Enrollment Status Page (ESP)|Enrollment Status Page]] settings block the user from accessing the device until the installations are complete.
Line-of-business (LOB) - Zoom Workplace
To create a LOB app you basically just need to find the .msi version of the app's installer and load it into Intune. Just go to Intune > Apps > All apps > Create > App type > Line-of-business app.
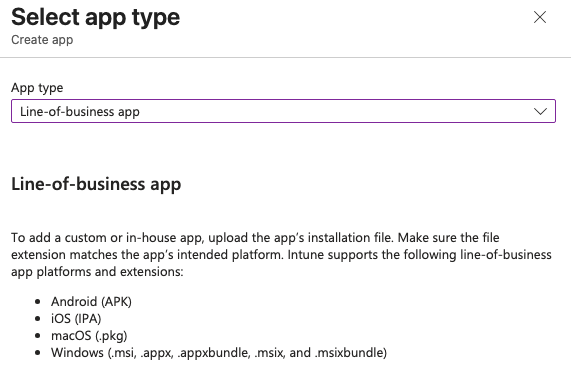
Next it will ask to upload the file you can select it from your computer locally after downloading it from the internet or wherever else.

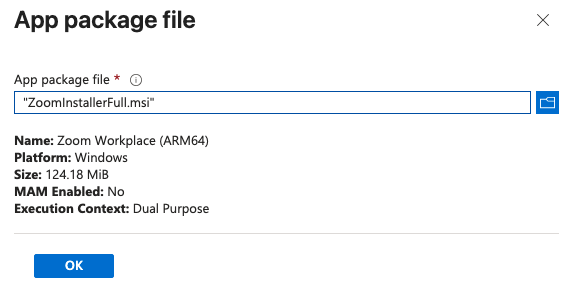
In my case I went to Zoom's Downloads for IT Admins, selected the Download (ARM64), and downloaded it to my computer. I then went back to Intune and selected this file for the upload.
Keep in mind I only chose ARM due to the VM used for testing. In another environment you would want to consider the architecture and OS requirements for your app/device compatibility.
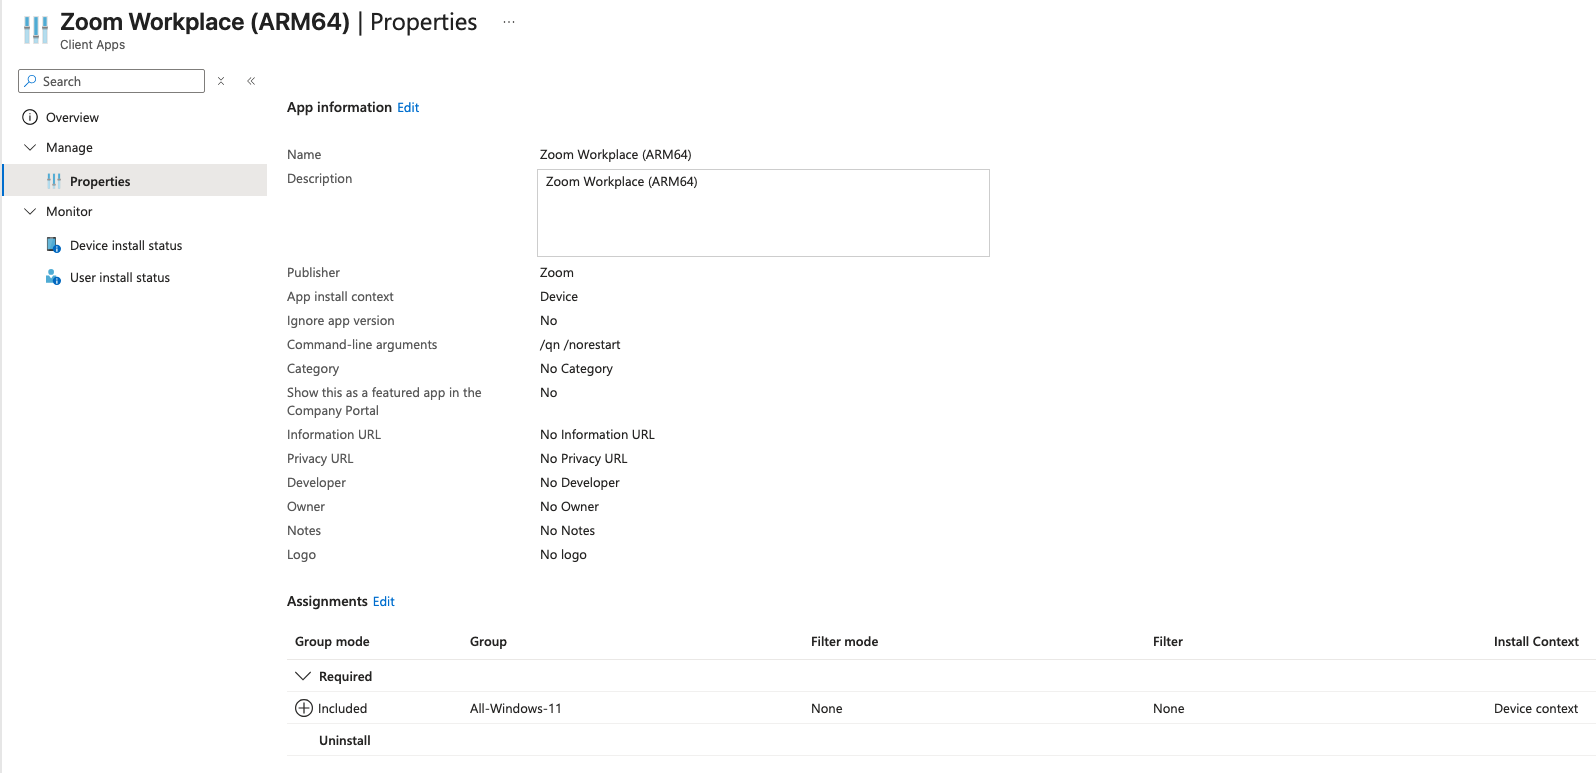
Luckily for me the Intune LOB App Wizard pre-populated a lot of the information to set up the app including the Name and Description. It labeled it as (ARM64) so if I needed to also provision the AMD64 version it would be easy to tell them apart.
For the Command-line arguments section I added the following:
/qn /norestart
This will prevent the device from restarting after the Zoom install is complete.
I also needed to set the App install context to Device so that it automatically installs it during OOBE setup. If you keep it as the default User it will only install it after the user logs in, and it is only available for that user on the machine. I found it made more sense to keep it device-wide.
On the Assignments page I chose the All-Windows-11 group to receive this install. This is where I could consider separating app availability by group membership but for now I will allow it on all Windows 11 devices.
Win32 App - Google Chrome
If the app developer does not provide an MSI version of the installer and you are forced to use an EXE or some form of script, you can wrap it in a Win32 App to make it usable within Intune. This can be done by using Microsoft's Content-Prep-Tool which is a Windows only tool for creating Win32 Apps.
Since I had to use Windows, I downloaded the tool on my Windows machine, calling the file "Win32Prep" and created the following file structure:
C:/
├─ Source/
│  ├─ Chrome/
│  │  ├─ ChromeSetup.exe
├─ Tools/
│  ├─ Win32Prep/
│  │  ├─ IntuneWinAppUtil.exe
├─ Output/
I then used the following command in a Windows machine to turn the Google Chrome:
C:\Tools\Win32Prep\IntuneWinAppUtil.exe `
  -c "C:\Source\Chrome" `
  -s "ChromeSetup.exe" `
  -o "C:\Output"
Once this process completes you should see a ChromeSetup.intunewin file in the Win32Oput folder. Next is uploading this to Intune and creating an App for it.
Back in Intune I went to Intune > Apps > All Apps > Create > App Type > Windows app (Win32) and when it asked for the file I gave it the .intunewin I just made. I gave it the name Google Chrome (ARM64) to be consistent with the Zoom App.
I then entered the following settings:
- Install command:
ChromeSetup.exe /silent /install - Uninstall command:
"%ProgramFiles%\Google\Chrome\Application\chrome.exe" --uninstall --system-level --force-uninstall - Allow available uninstall: No
- Install Behavior: System
- Device restart behavior: No specific action
This will make sure Chrome installs for all users, the users are not allowed to uninstall the app, and the app will not restart the device after installation.
On the Requirements page I selected the following:
- Check operating system architecture: Yes - Install on ARM64 system
- Minimum operating system: Windows 11 21H2
This ensures this app can only install on ARM64 devices with any version of Windows 11. Since this is a fairly small app install I did not make any hardware requirements.
Detection Rule settings:
- Rule type: File
- Path: C:\Program Files\Google\Chrome\
- File or folder: chrome.exe
- Detection Method: File or folder exists
For Assignments I selected this app be required for the All-Windows-11 group to be available for all Windows-11 users.
With all of that in place I hit Create and let Intune build the app for me and everything seemed good to go.
Microsoft Store app - GlobalProtect VPN
To create a Microsoft Store app you just need to go to Intune > Apps > All Apps > Create > App type > Microsoft Store app (new) and searched for "GlobalProtect" in the search bar.

When I selected this it auto-populated most of the information for me in the App Information settings. I did however change the Install behavior to system to ensure this would apply to all users on the device.
On the next page I assigned this to be required for the All-Windows-11 group then hit Create to let Intune build this for me.
Microsoft 365 Apps for Windows 11
Microsoft Office 365 Apps are another install that will often be requested in corporate enterprise environments. Microsoft makes it easy to install this by offering the Office 365 installer as a built in option in the Intune Apps Create menu. Just go to Intune > Apps > All Apps > Create > App Type > Microsoft 365 Apps > Windows 10 and later to start the creation wizard.
For the App Setup Information I kept the defaults, feel free to tweak as needed. On the Configure App Suite page I made the following changes:
- Select Office Apps:
- Excel
- Outlook
- PowerPoint
- Teams
- Word
- Architecture: 64-bit
- Default file format: Office Open XML Format
- Update Channel: Monthly Enterprise
- Remove Other Versions: Yes
- Use shared computer activation: Yes
On the assignments page I set the install to run for all devices in the All-Windows-11 group and clicked Create so Intune could start building the app.
Testing
After all the apps were set up in the portal I restarted my VM OOBE snapshot to start fresh. I let it run for a few minutes and saw the Enrollment Status Page say Installed Apps: 4 out of 4. I was then taken to the device desktop where I confirmed all apps installed.
You can also confirm the apps were installed from the Intune portal by going to Intune > Devices > Windows > [Device Name] > Managed Apps.

Bonus: VMware Tools (Win32 App)
I decided it would be easier on me if I could have my test devices automatically install VMware Tools. Since the installer only comes in the form of an EXE I had to do it as a Win32 App.
First I needed to get the EXE file and create the wrapper file. I found the file setup.exe by finding the ARM version of the windows.iso and mounting it to my system and looking inside. The method of doing this will be different depending on your version of VMware and the OS of your hypervisor host.
Once you have the EXE you can perform a similar step as above with Chrome:
C:\Tools\Win32Prep\IntuneWinAppUtil.exe `
  -c "C:\Source\VMwareTools" `
  -s "setup.exe" `
  -o "C:\Output"
This created a file called setup.intunewin which I could then upload to Intune.
Before I did that I needed to create a new dynamic group that only applies to VMware VMs. I created one in Entra using the following dynamic rule and called it All-VMware
(device.deviceModel -contains "VMware")
     or (device.deviceManufacturer -contains "VMware")
For the Win32 App I used the following settings:
- Name: VMwareTools (ARM64)
- Description: VMwareTools (ARM64)
- Publisher: VMware
- Install Command: setup.exe /S /v "/qn REBOOT=R ADDLOCAL=ALL"
- Uninstall Command: setup.exe /S /v "/qn REMOVE=ALL REBOOT=R"
- Allow available uninstall: No
- Install Behavior: System
- Device restart behavior: App install may force a device restart
- Minimum Operation System: Windows 11 21H2
- Detection Rule:
- Rule Type: File
- Path: C:\Program Files\VMware\VMware Tools\
- File or folder: vmtoolsd.exe
- Detection method: File or folder exists
- Associated with a 32-bit app on 64-bit clients: Yes
- Assignment: All-VMware
What is an Update Ring?
An Update Ring is a policy setting within Intune that controls how and when the connected devices are able to run Windows updates. You can set different options like number of deferral days, update deadlines, reboot behavior, etc. You can develop different Update Rings and apply each to a different device group in what ever configuration makes the most sense for your environment. Its also important to know that Update Ring only affects Windows OS and Microsoft First Party updates which means custom LOB/Win32 apps will need to be kept up-to-date separately.
Wait, I need another one?
For most organizations it makes sense to make at least two Update Rings, one to pilot more risky changes and updates, and a broader ring that controls updates on all devices. The broad ring is a slower, less update ring that you can trust in production across all devices. You will want to fill the pilot ring with more tech-savvy users and those who are less impactful on production if they shutdown unexpectedly. There is a wide range of issues that can be caused by a bad update, from bad drivers, broken network connections, other bugs etc. Having a pilot group protects the rest of the organization from experiencing these disruptions. I decided for my environment I would make all members of the IT team the pilot group and everyone else is in the broad group.
The Update of The Rings
To create the update rings you need to go to Intune > Devices > Windows > Windows Updates > Update Rings > Create Profile
Pilot Ring
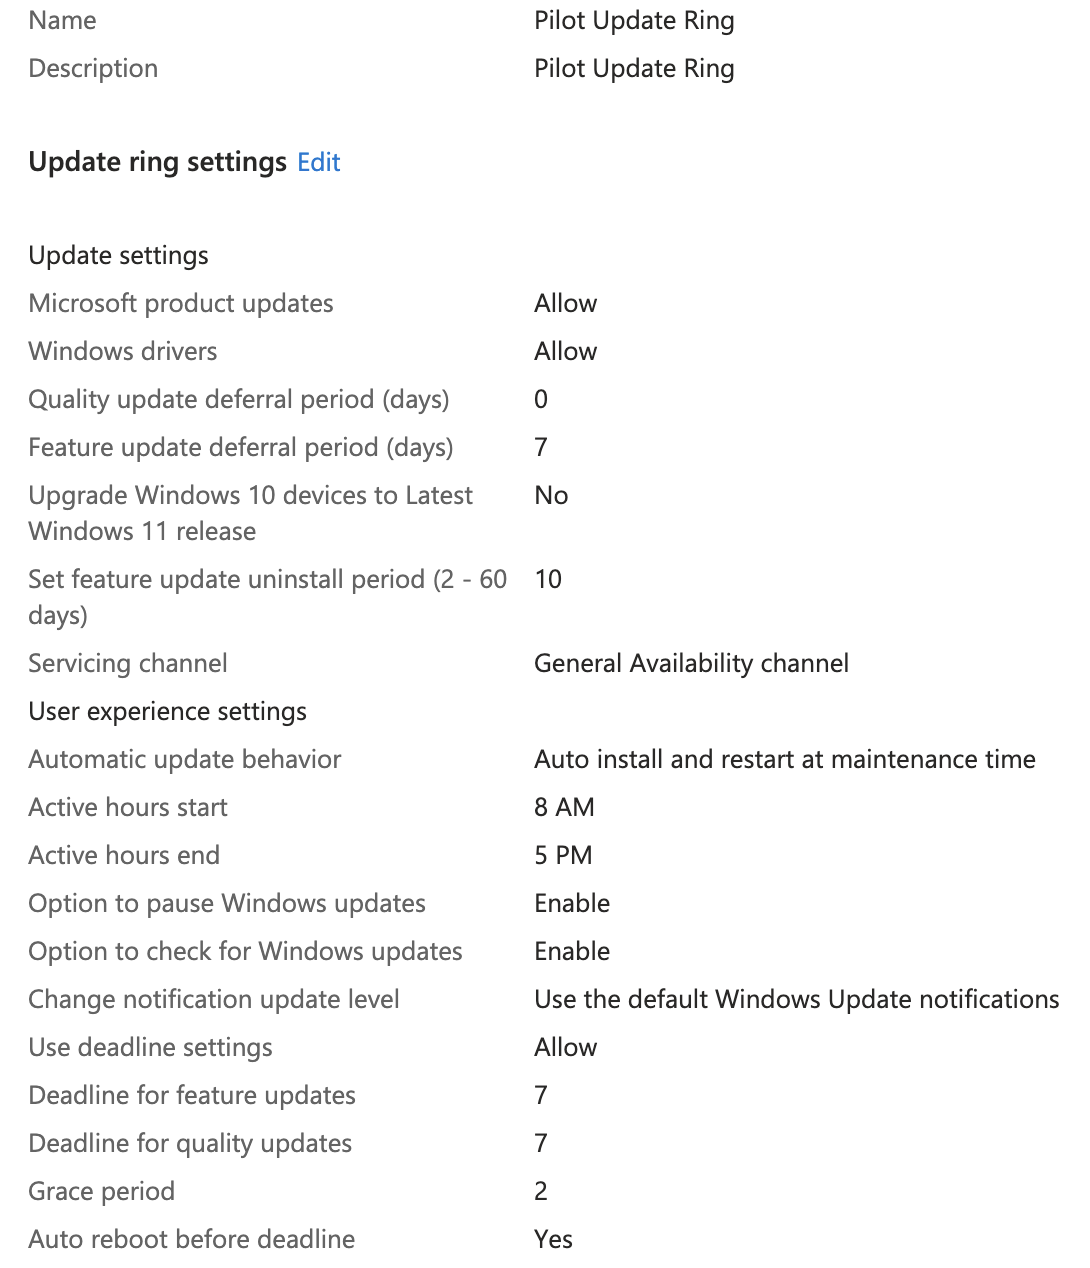
The following settings will create an update ring that allows pilot users to defer feature updates for 7 days but does not let them defer quality updates. It also creates a 7 day deadline with a 2 day grace period. The ring is set to only affect IT users.
- Name: Pilot Update Ring
- Description: Pilot Update Ring
- Quality update deferral period (days): 0
- Feature update deferral period (days): 7
- Automatic update behavior: Auto install & restart at maintenance time
- Use deadline settings: Allow
- Deadline for feature updates: 7
- Deadline for quality updates: 7
- Grace period: 2
- Included Groups: IT
Broad Ring
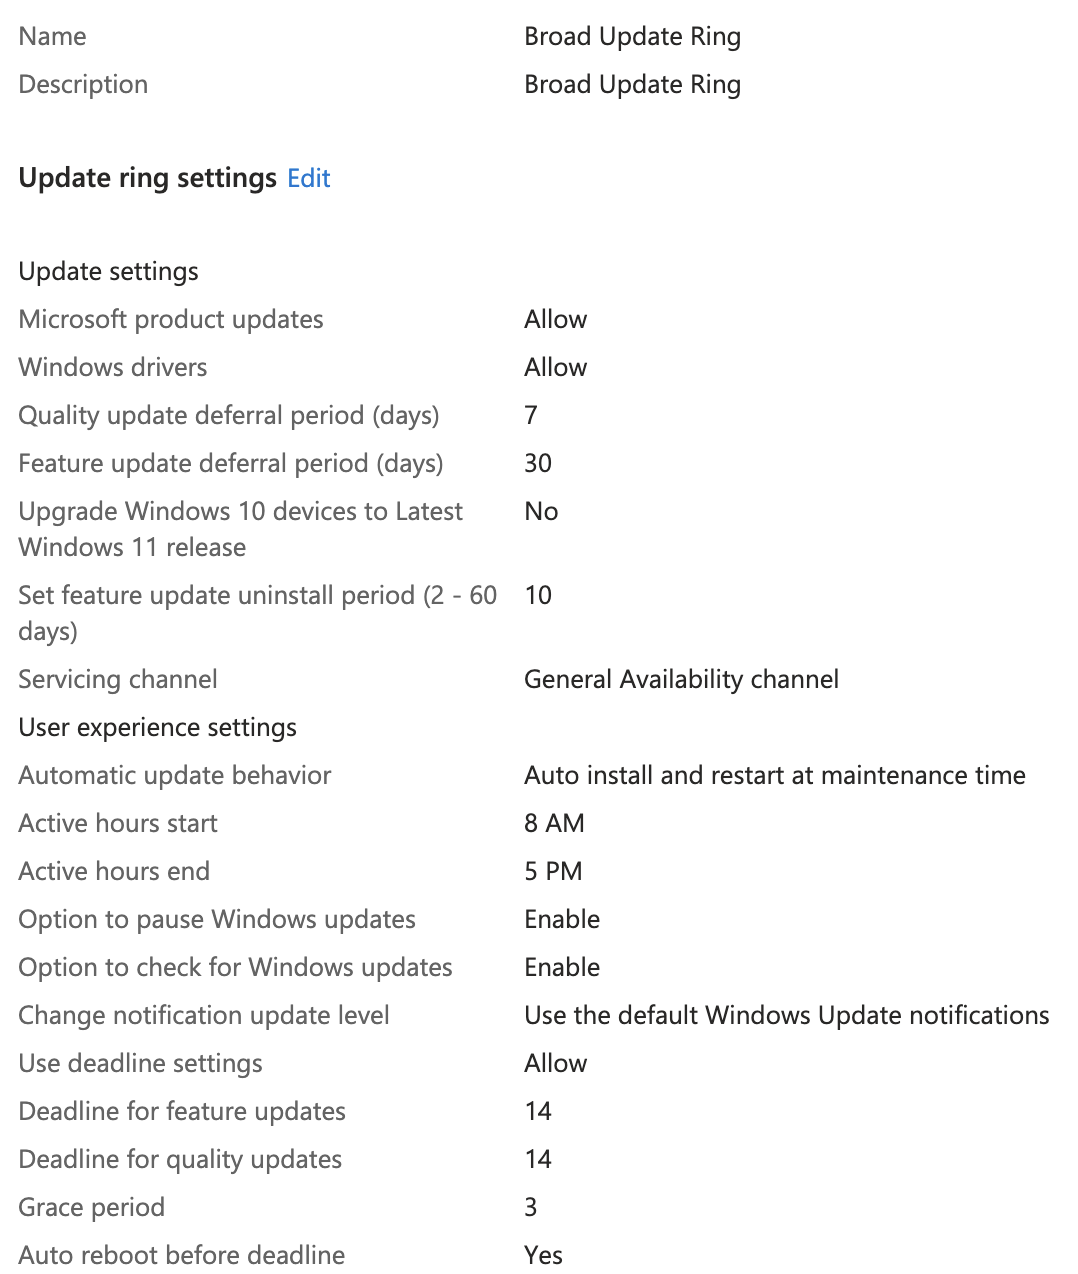
The following settings will create an update ring for the remaining users in the tenant. They are allowed to defer feature updates for 30 days and quality updates for 7 days. This setup also gives them a 14 day deadline with a 3 day grace period. This will apply to all users that are not in the IT department.
- Name: Broad Update Ring
- Description: Broad Update Ring
- Quality update deferral period (days): 7
- Feature update deferral period (days): 30
- Automatic update behavior: Auto install & restart at maintenance time
- Use deadline settings: Allow
- Deadline for feature updates: 14
- Deadline for quality updates: 14
- Grace period: 3
- Included Groups: All-Employees
- Excluded Groups: IT
When all is said and done you should have something that looks like this.

This one is a little tougher to test since we would have to wait for Microsoft to issue a new update for Windows so we could see how it hit user devices differently. For now however, let's just trust that it's working properly.
Introduction to Security
One benefit of managing devices with Intune is that it gives you control of security features across the devices it manages and allows IT admins the ability to fine-tune their environments to meet their security and compliance needs. There are several methods available such as security baselines, defender for endpoint, compliance policies, conditional access, etc. that can be used to our benefit.
Every organization will have different concerns when it comes to data governance, risk, compliance, regulation, and other requirements make demands on how things can be structured. Since there is no one-size-fits-all solution to security, this section is meant as more of a walkthrough of options available within Intune rather than a comprehensive list of air-tight security measures. As always with security, consider your own threat model and how it applies to the resources available.
Security Baselines
Conveniently, Microsoft created a way for administrators to change granular security settings that can be saved as templates called Security Baselines.
To access Security Baselines just go to Intune > Endpoint security > Security Baselines > Security Baseline for Windows 10 and later > Create policy. Most of the recommended defaults Microsoft gives us are pretty good so generally it is good enough to keep what is already in there but this would be the place to go for granular changes.
- Name: Windows 11 Baseline
- Description: Windows 11 Baseline
- Configuration Settings: Keep Defaults
- Assignments: All-Employees and All-Windows-11
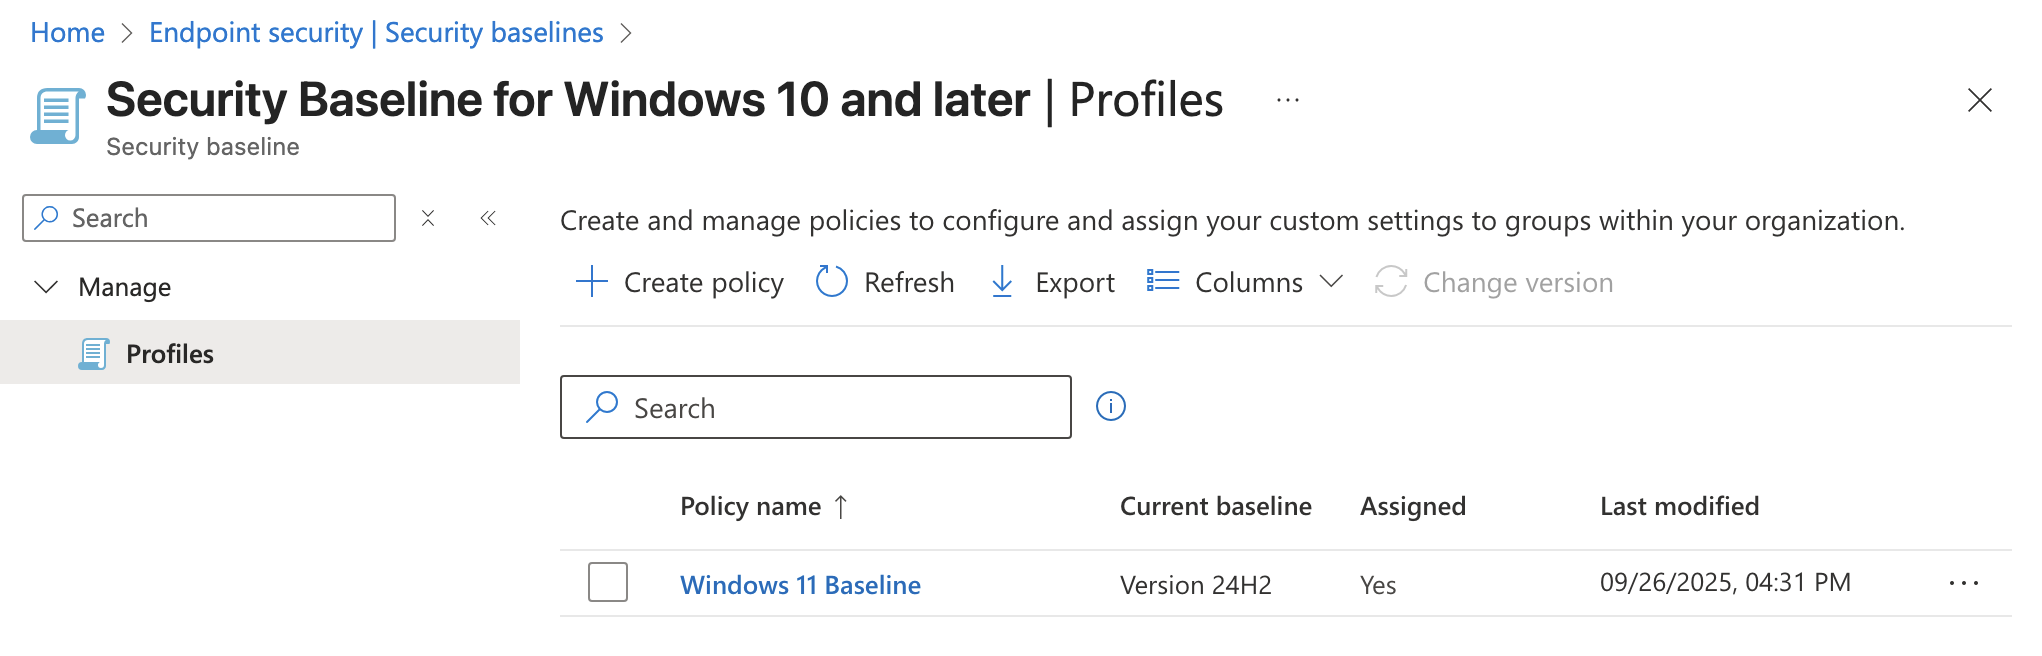
Once you save this baseline the security settings chosen in Configuration Settings will be enforced on all users and Windows 11 devices. If we wanted to tweak these settings later on we could come back and change the settings or possibly create a new baseline and assign it to a different group of users or devices.
We could also consider, for testing purposes, limiting the rollout of this Security Baseline to our IT pilot users similar to howe we did with the Update Rings. This way we could ensure the baseline works correctly for non-critical users before pushing it out to all users.
Defender for Endpoint
Microsoft Defender for Endpoint can be used as an Endpoint Detection and Response solution within your environment. You can create policies with Intune that onboard MDE to each device so you have visibility into the security of your devices.
Now go to Defender > Settings > Endpoints > Onboarding where you can find the download button for the Onboarding package. Make sure to select "Mobile Device Management / Microsoft Intune" from the Deployment method dropdown first.
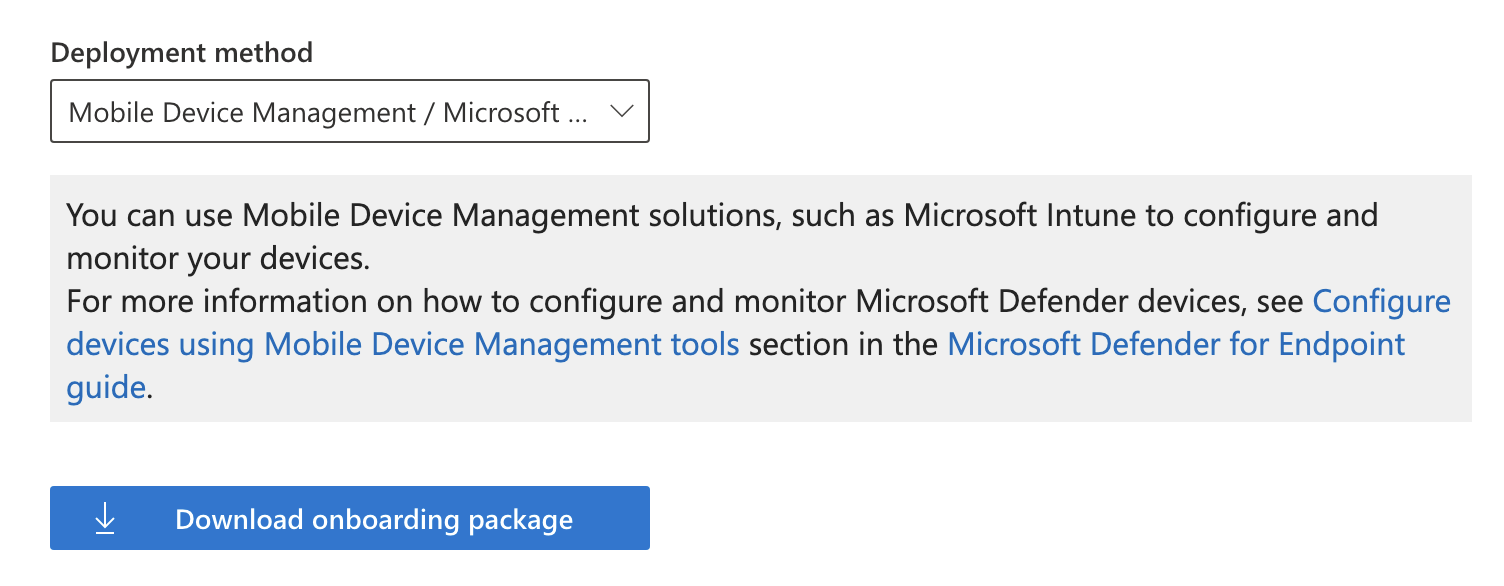
Clicking download will get you a file called WindowsDefenderATP.onboarding that can be uploaded into the Intune Portal.
To create a new onboarding policy go to Intune > Endpoint security > Endpoint detection and response > Create policy
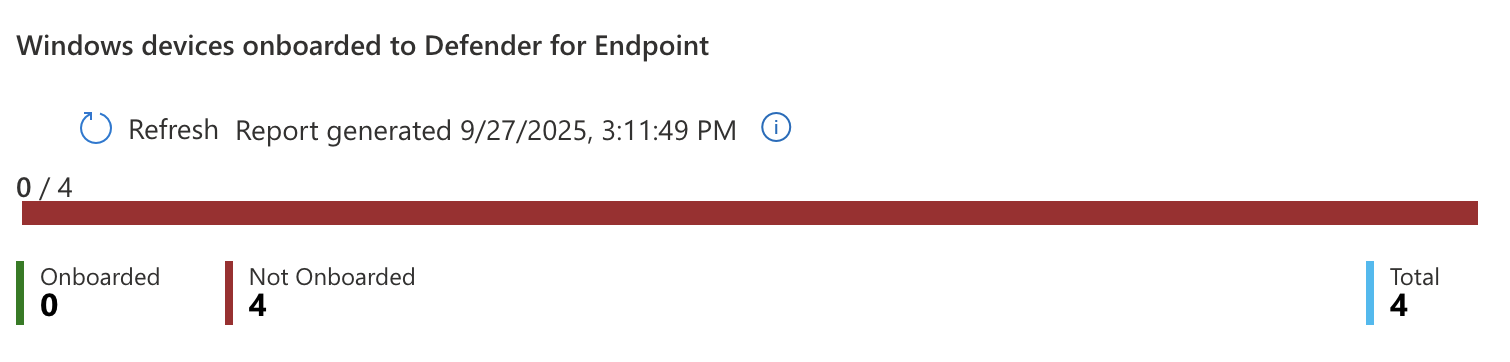
On this page Intune will also show you how many devices you currently do not have onboarded.
Now you will need to get the text from within the WindowsDefenderATP.onboarding file which Microsoft calls the Onboarding blob. You can open it in something standard like Notepad or VSCode and paste the entire thing in the field called Onboarding (Device) below. In the Create Profile wizard I added the following settings:
- Platform: Windows
- Profile: Endpoint Detection and Response
- Name: EDR Onboarding
- Description: EDR Onboarding
- Microsoft Defender for Endpoint client configuration package type: Onboarding
- Onboarding (Device): Onboarding blob
- Sample Sharing: All (Default)
- Assignment: All-Windows-11 Include
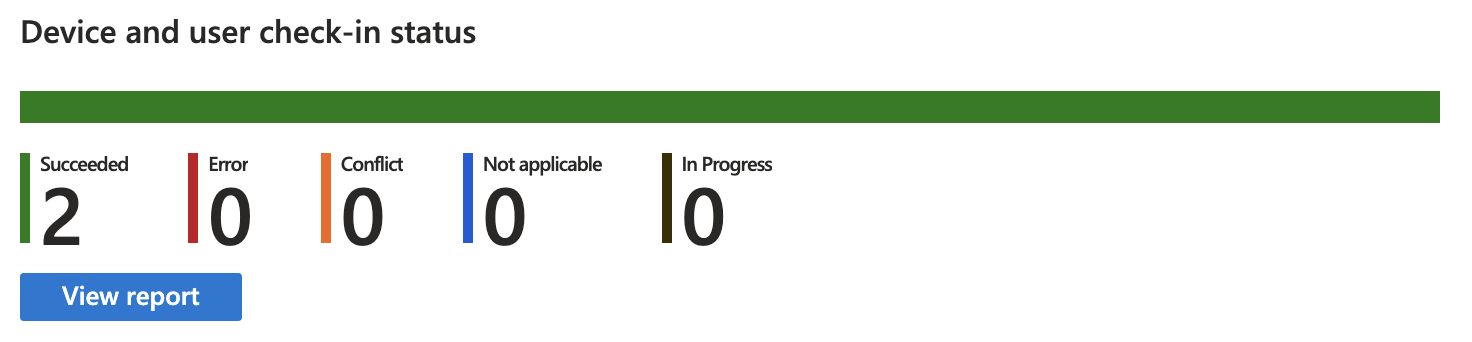
It took some time for the settings to sync but after a bit I came back and saw I had one onboarded device and two successful device checkins.
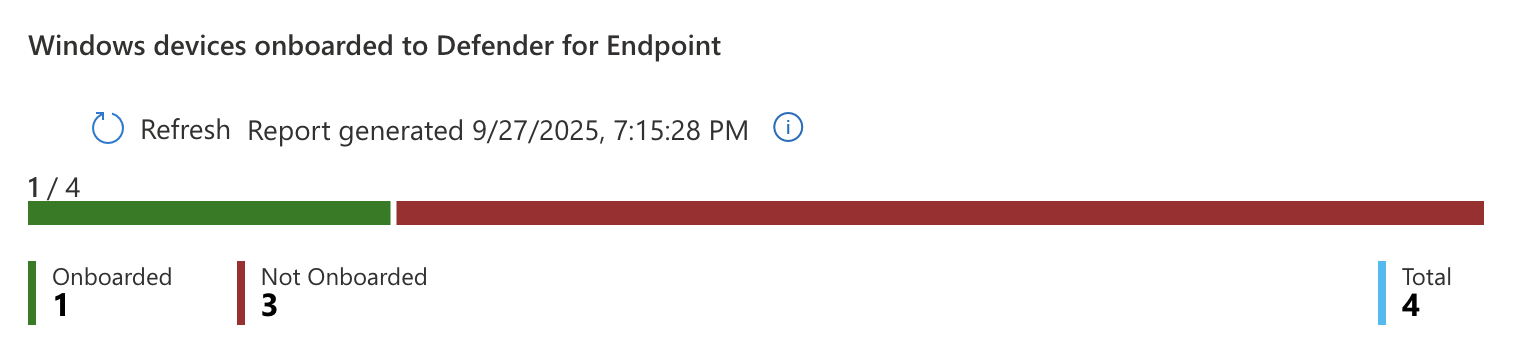
This means that Intune is successfully connected to MDE and onboarded to the EDR. Intune is now able to push security profiles to devices it manages as well as pull status reports from them.
Compliance Policies
Compliance policies in Intune can be used as a way to enforce that certain security features are required on devices assigned to the policy. For instance you can require devices use BitLocker and Secure Boot to be marked compliant. Compliance policies can also send emails to the user that has a device marked non-compliant.
Before we create a policy, let's create a template we can use later for the email we will send to users. To create a new template go to Intune > Devices > Compliance > Notifications > Create Notification. Below are the settings I used:
Name: Non-Compliance Email Show company logo: Enable Show company name: Enable Locale: English (United States) Subject: Device is Noncompliant Message:
Hello,

Your device has been marked noncompliant. Please call the IT department at 555-555-5555 to resolve this issue.
Set to default locale: Toggled On

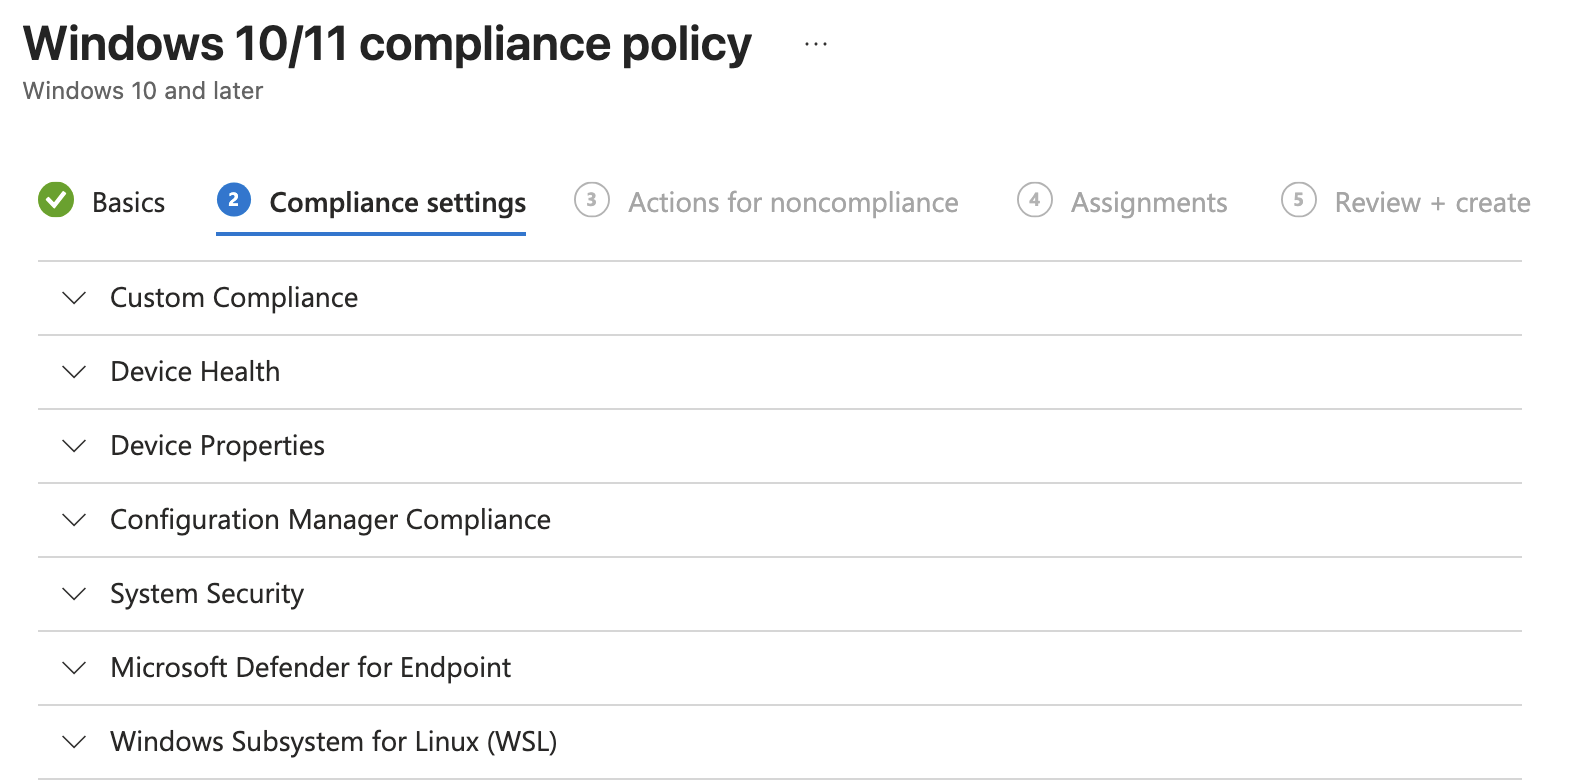
Now that we have an email template to send to users we can create the Compliance Policy by going to Intune > Devices > Compliance > Create Policy and entering the following policy settings:
Platform: Windows 10 and later Profile type: Windows 10/11 compliance policy Name: Win Compliant – BitLocker + Secure Boot + MDE Healthy Description: Marks Windows devices compliant only if disk encryption, secure-boot & Defender for Endpoint health are all good.
On the next page you can choose security settings to be required for compliance at the granular level. Microsoft separates them into categories so you will need to browse through the options.
Under the Device Health header you can find settings to require BitLocker and Secure Boot
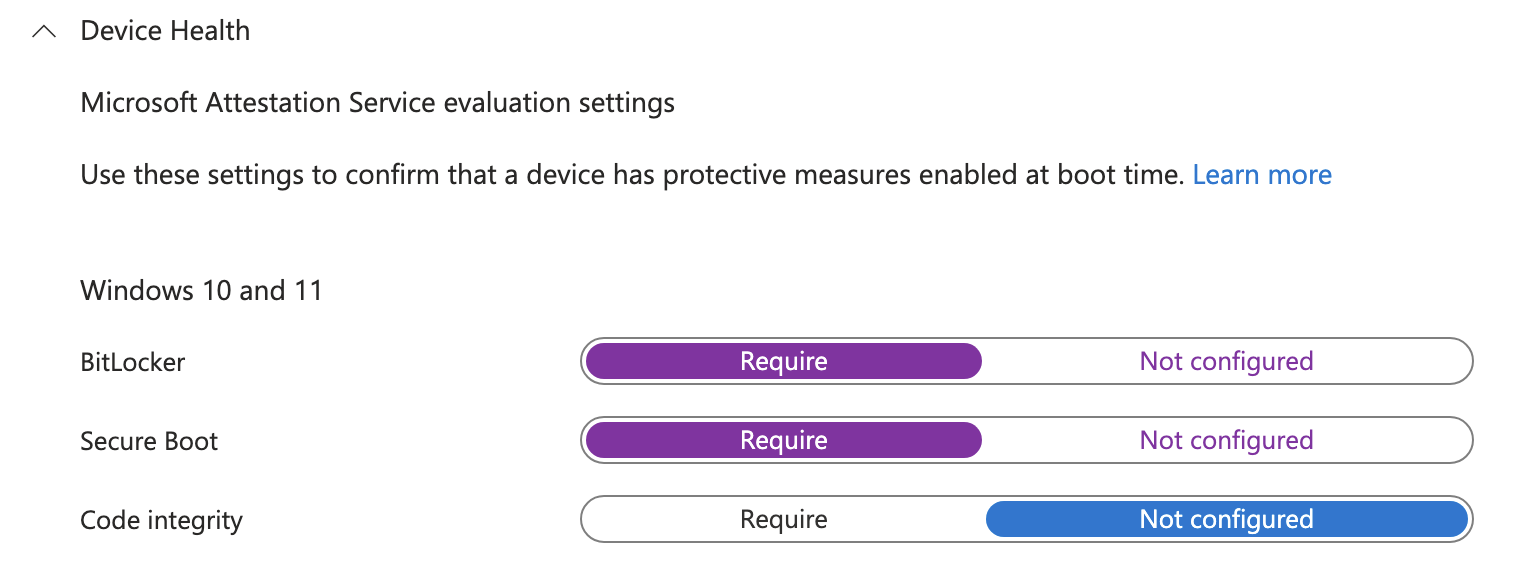
Under the Microsoft Defender for Endpoint section you can find the option that requires devices report all clear on their machine risk score to be considered compliant.

Under the Actions for noncompliance page the policy will automatically set a rule to immediately mark the device as noncompliant but that can be delayed by a number of days. On the line underneath choose send email to end user with 0 days scheduled which will cause the email to send immediately. On the Choose template field, select the Non-Compliance Email template we created earlier.
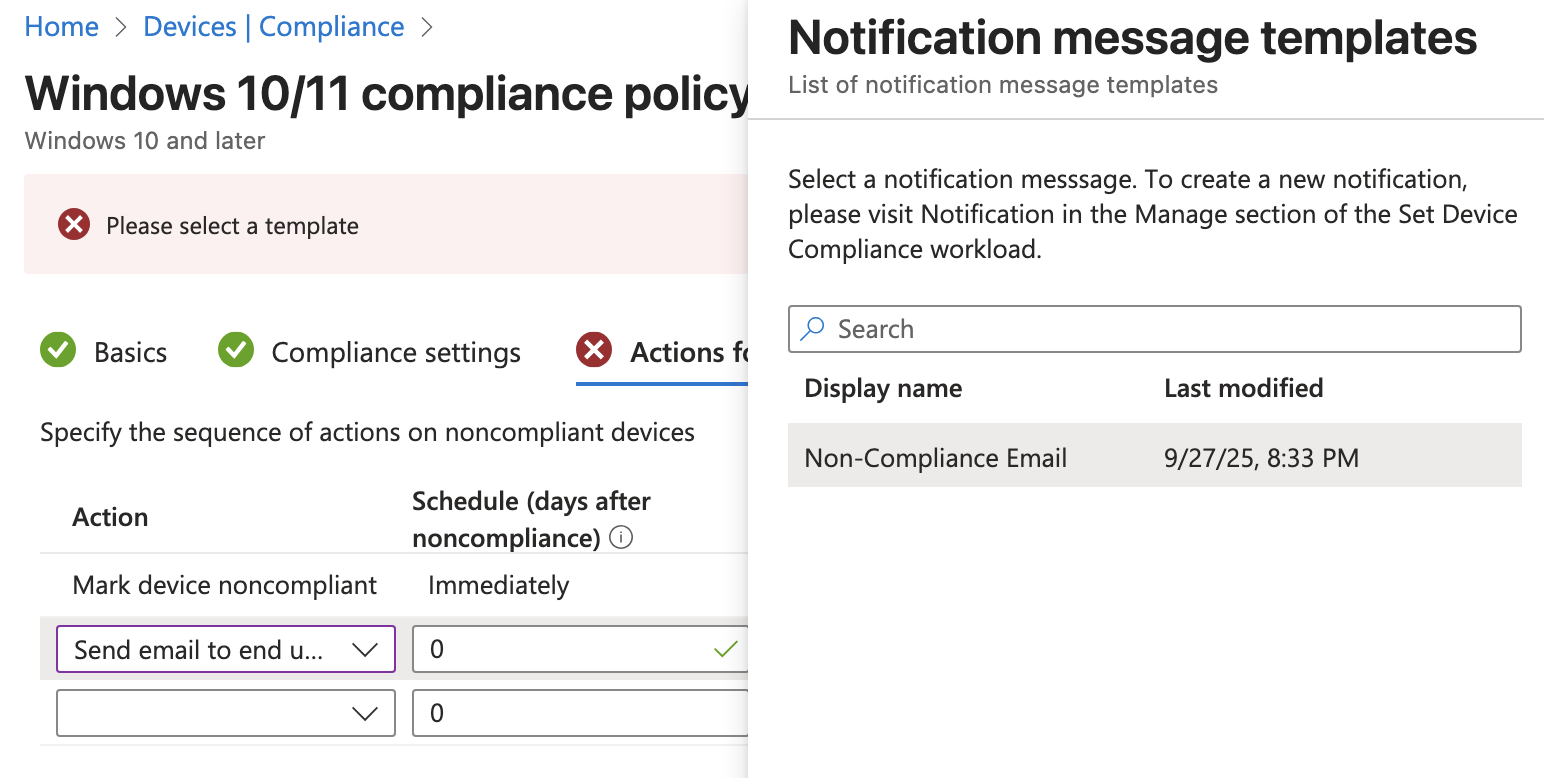
There is also an option to select additional recipients of the email. We could choose to send this to a specific group of users such as the IT team. For now I will leave this blank.
I will assign this policy to the All-Windows-11 group and finish creating the policy. Now if you refresh the page on Compliance Policies it will warn you that we are not using Conditional Access to enforce the policy.
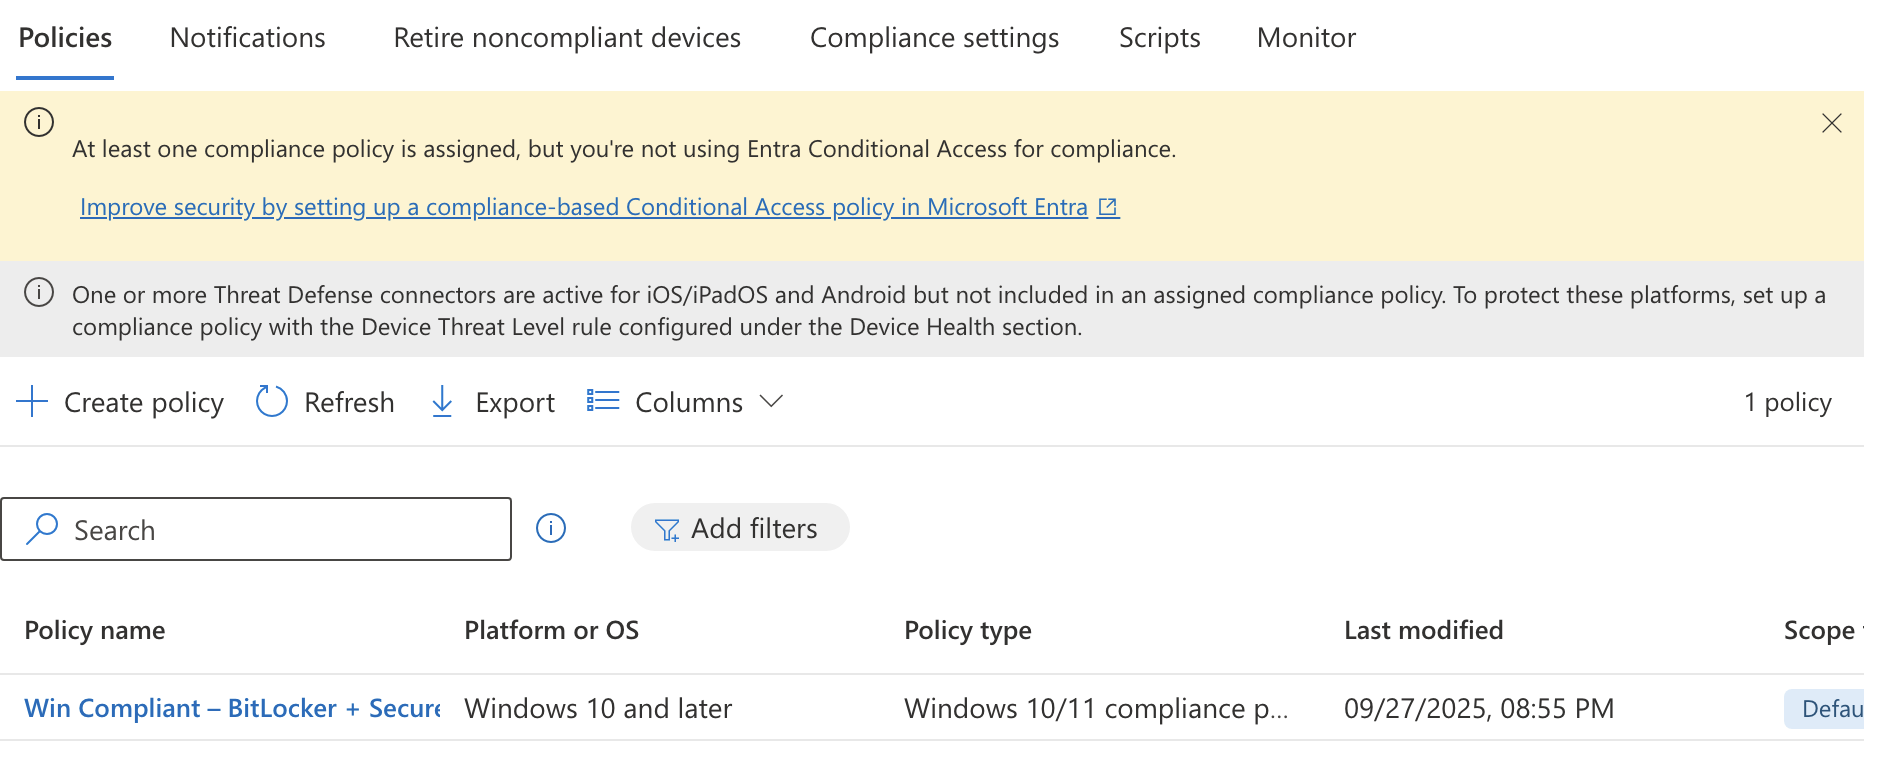
This means we will need to move on to the next section where we will create a Conditional Access policy in Entra and connect it to the compliance policy.
Conditional Access Policy
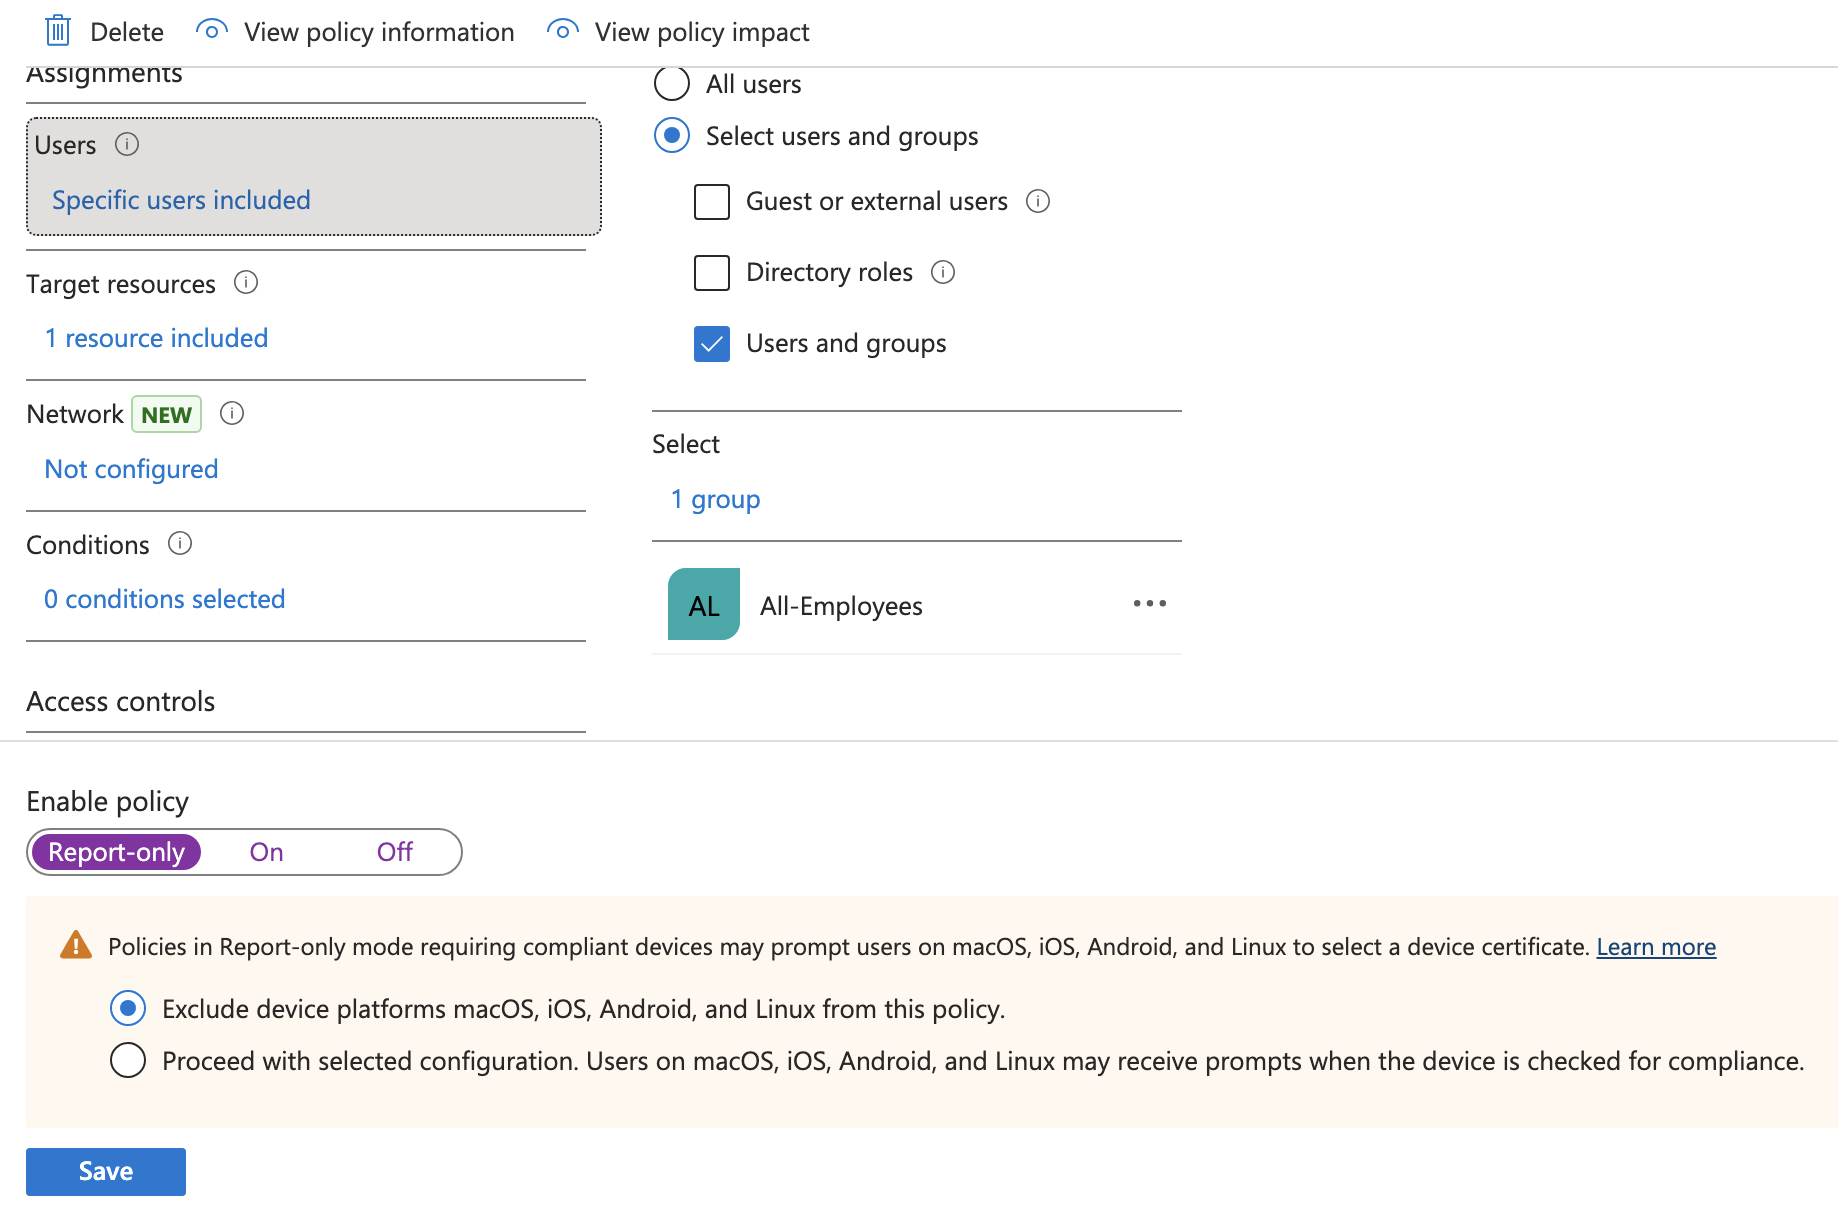
Conditional Access Policies can be set in Entra and be used for enforcing the Compliance Policy we created in the previous step. To create the policy go to Entra > Conditional Access > Create new policy and fill out the fields like below:
- Name: M365 – Require compliant device
- Users: Include > Select users and groups > Users and groups > All-Employees group
- Target Resources:
- Select what this policy applies to: Resources (formerly cloud apps)
- Include > Select resources > Select > Office365
- Network: No but here is where we could block based on network connection details
- Grant: Grant access > Require device to be marked as compliant
- Enable Policy: Report-only (test first before locking yourself out).
Click create to finish out the policy wizard.
Report-only will just create logs but not actually lock you out so you can test for a few times. You can verify the sign-in logs by going to Entra > Monitoring & health > Sign-in logs and take a look at your logs while this policy is in Report-only mode.
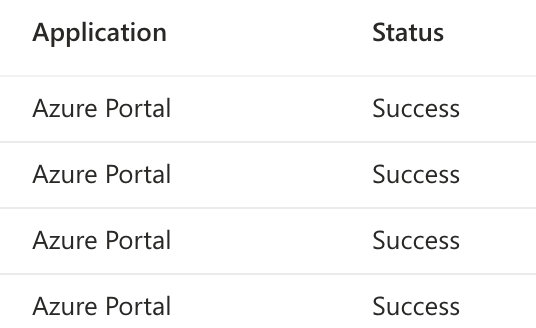
Since my sign-ins though the online portal are showing as a Success it looks like its okay to turn the policy on for real. Your mileage may vary. This is why testing is important.
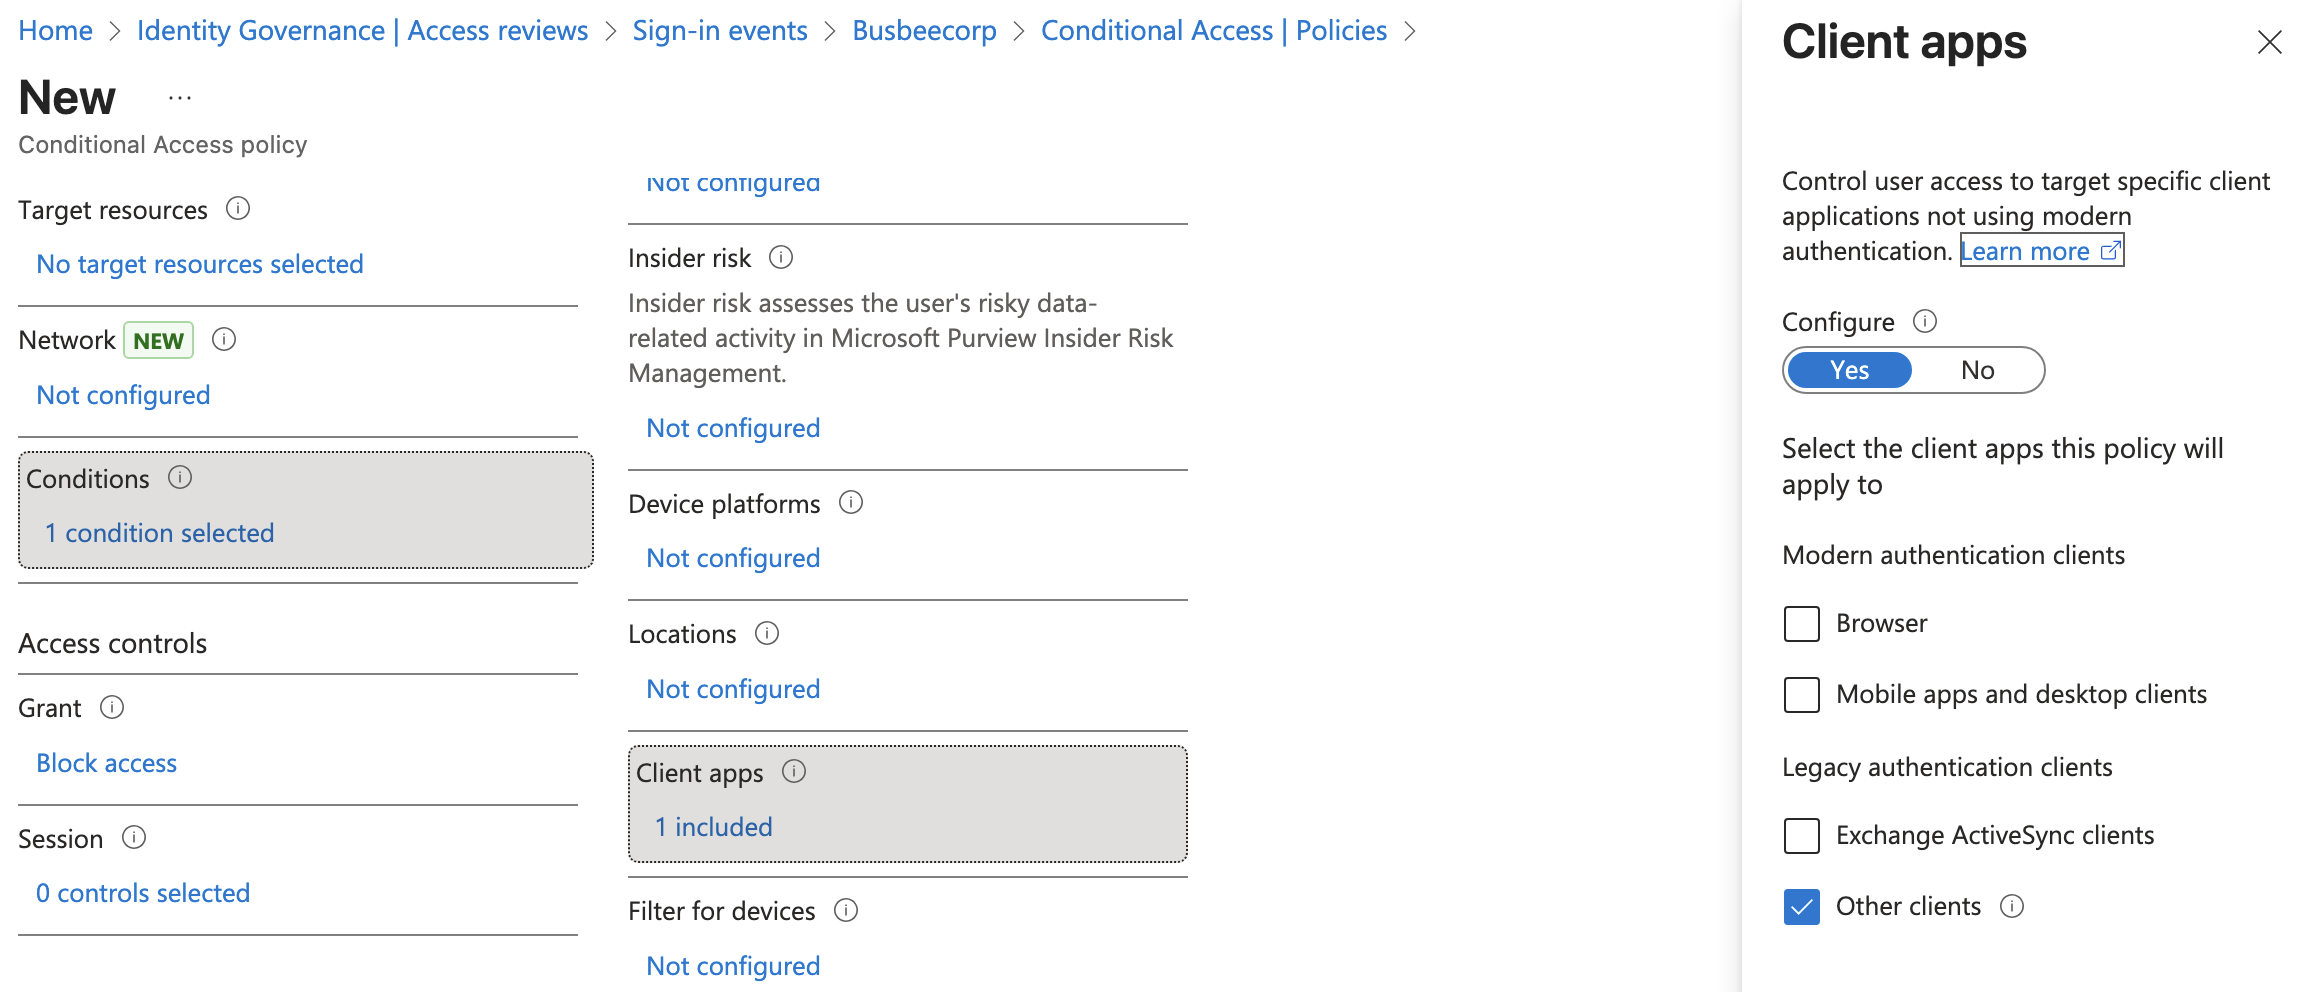
Next up we want to create another policy to block legacy authentication. Go to Entra > Conditional Access > Create new policy and enter the following details:
Name: Block legacy authentication – All users Assignments: All Users Conditions: Client Apps > Yes > Other clients Grant: Block access Enable: Report-only to test then On
In my Intune Devices list I can confirm one of my devices is non-compliant. It is currently not using BitLocker or Secure Boot.
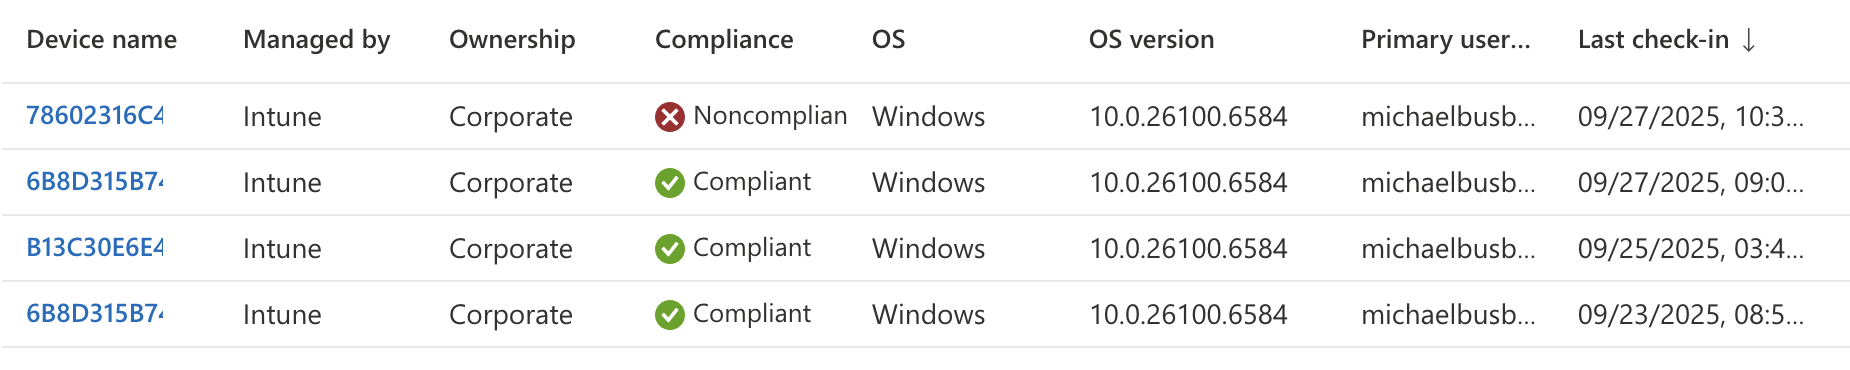
Since these two failure points are things we would want to have setup before we ever ship devices to users I won't worry about fixing this now. It does at least show as a proof-of-concept that we can build compliance policies in Intune and use Entra to apply them with conditional access policies.
Benefits of Managed iPhones
Intune allows you to enroll and manage other devices beyond just Windows 11. With some additional setup, you can connect Apple iPhone and Google Android devices. In this section I will show how to install an Apple Push Certificate so their servers are able to connect with Intune.
When iPhones get enrolled through the Intune Company Portal, IT teams gain visibility into the device setting such as hardware, OS version, jailbreak status, and compliance status. Intune also can control settings on the device like passcode, Wi-Fi, certificate requirements as well as OS update deferral capability. Intune also has the ability to protect apps on the device with a MAM policy to prevent actions such as copy/paste from a managed app to an unmanaged one. Intune can also take action in the event the device is lost or stolen: full/selective wipe, lost-mode, lock-screen PIN reset, etc.
Apple MDM Push Certificate
An Apple MDM Push Certificate is required to create a handshake between Intune and Apple's Push Notification (APN) service. It its what builds the trust relationship between the individual device and the Intune server. Every MDM command we order through Intune must pass through APN to reach the devices.
To sign up for a new Push Certificate you will need to have an apple account. If you want to create a new account you can do so at appleid.apple.com
First you will need to go to Intune and download the Certificate Signing Request (CSR). This contains Intune's public key that will need to be signed by Apple. It can be found by going to Intune > Devices > Enrollment > Apple > Apple MDM Push Certificate.
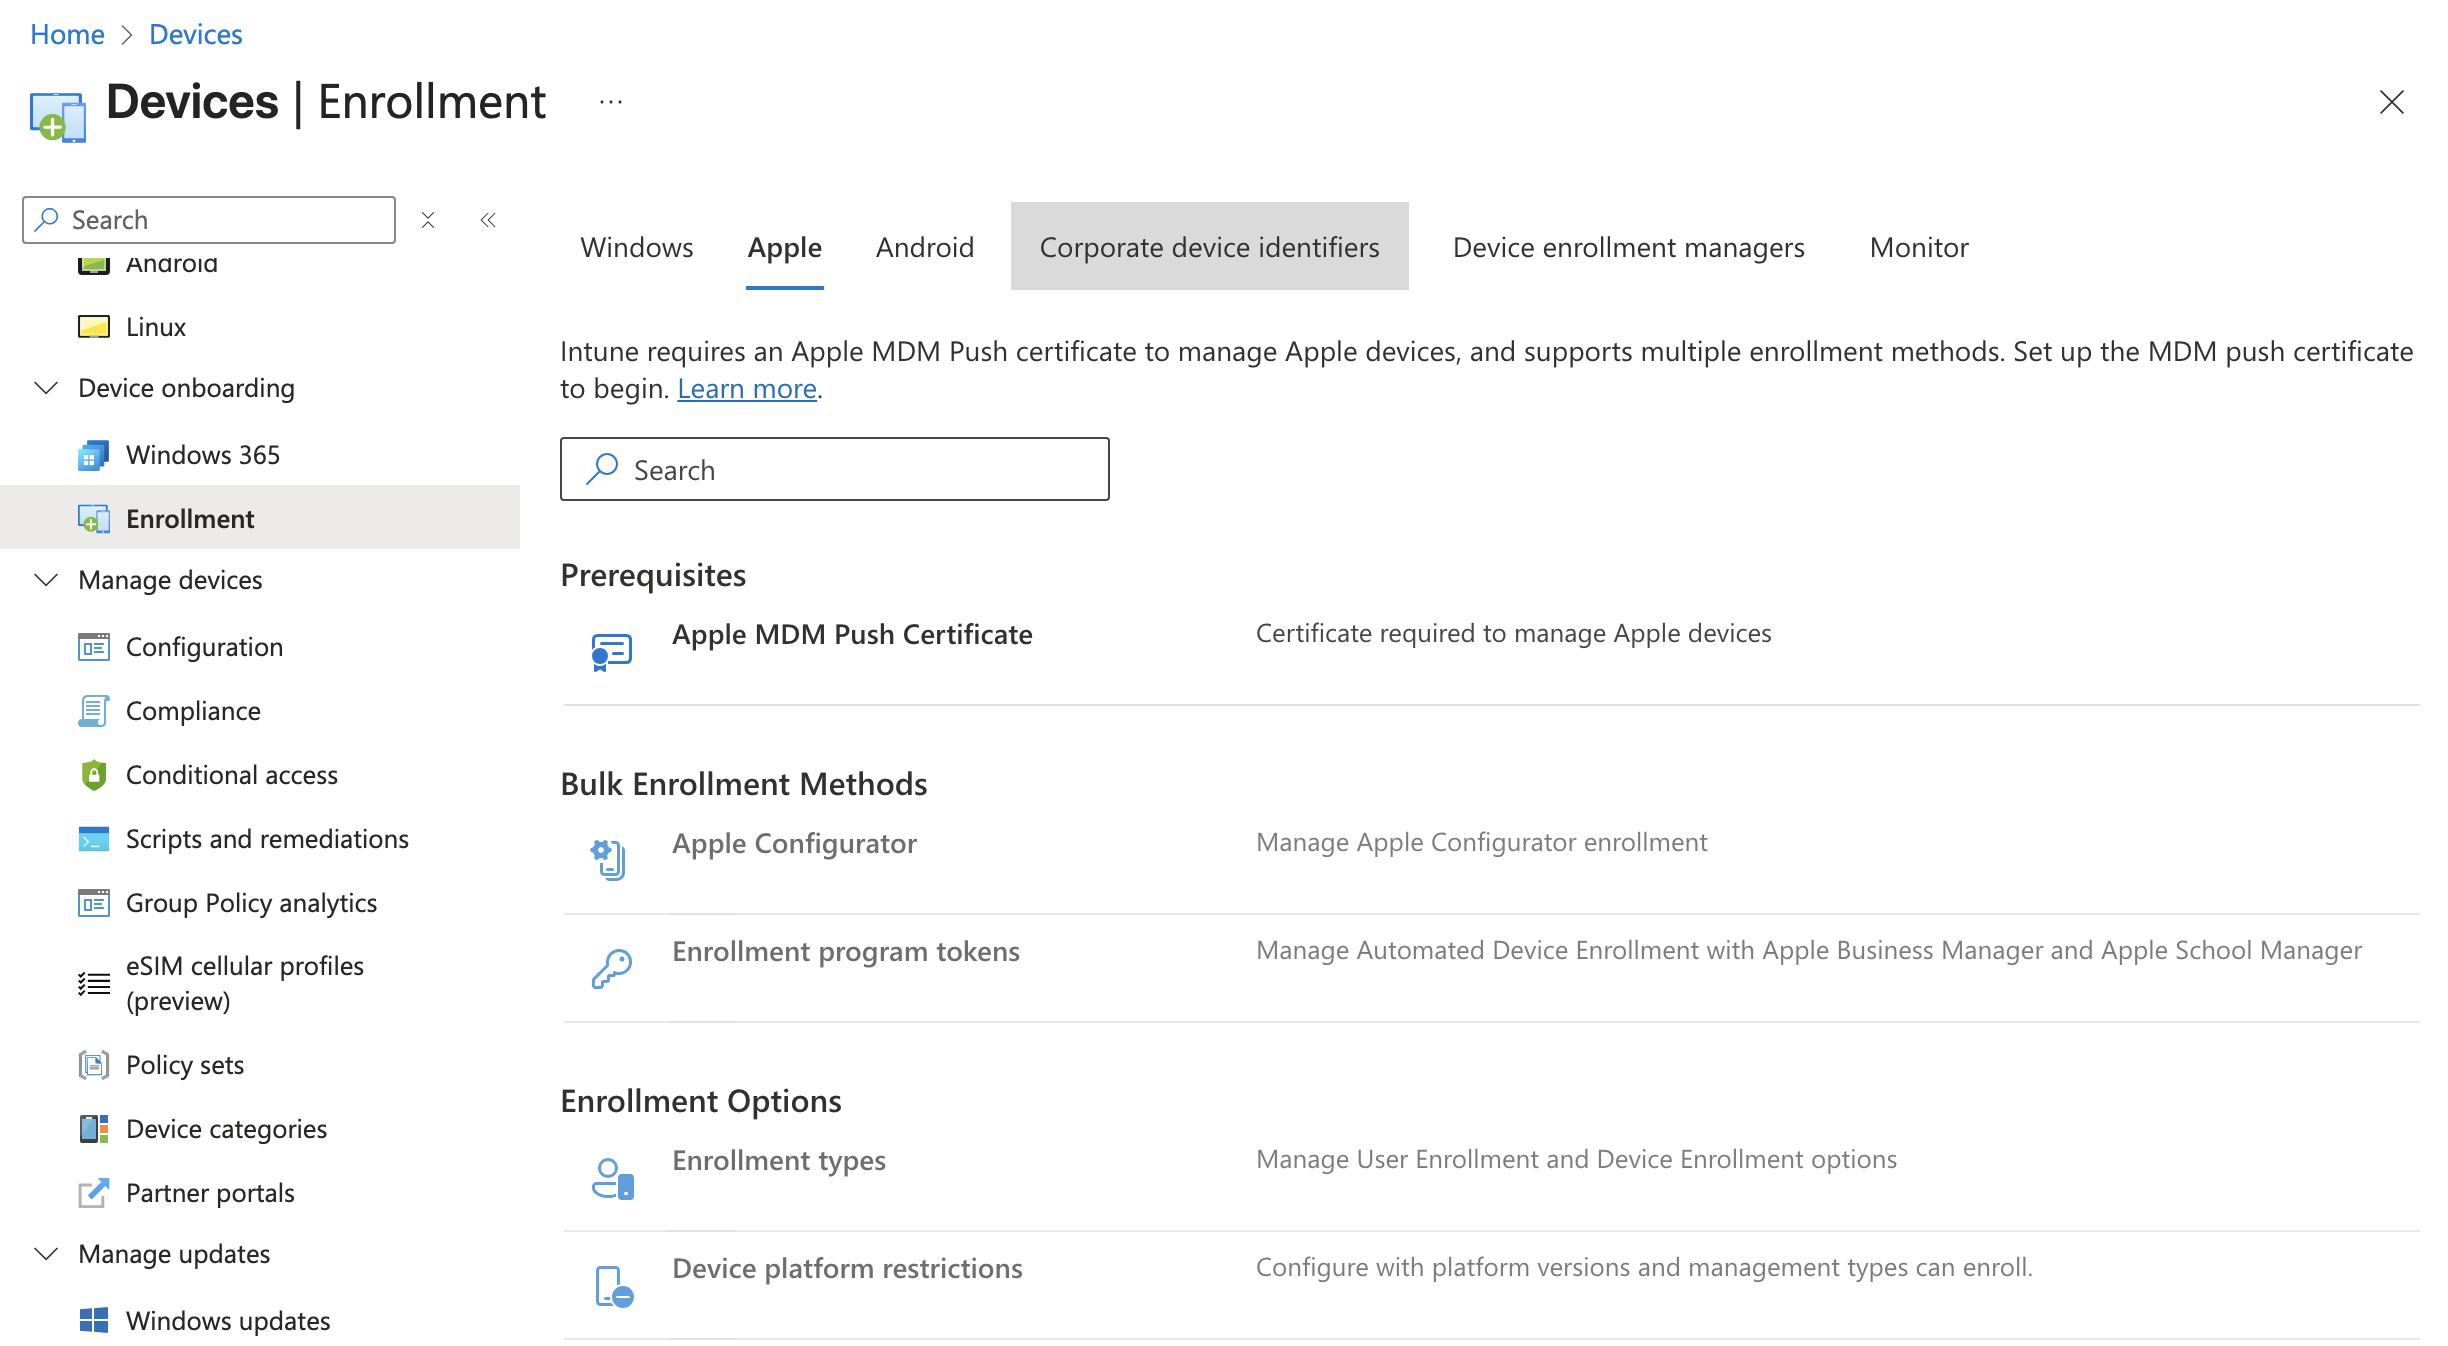
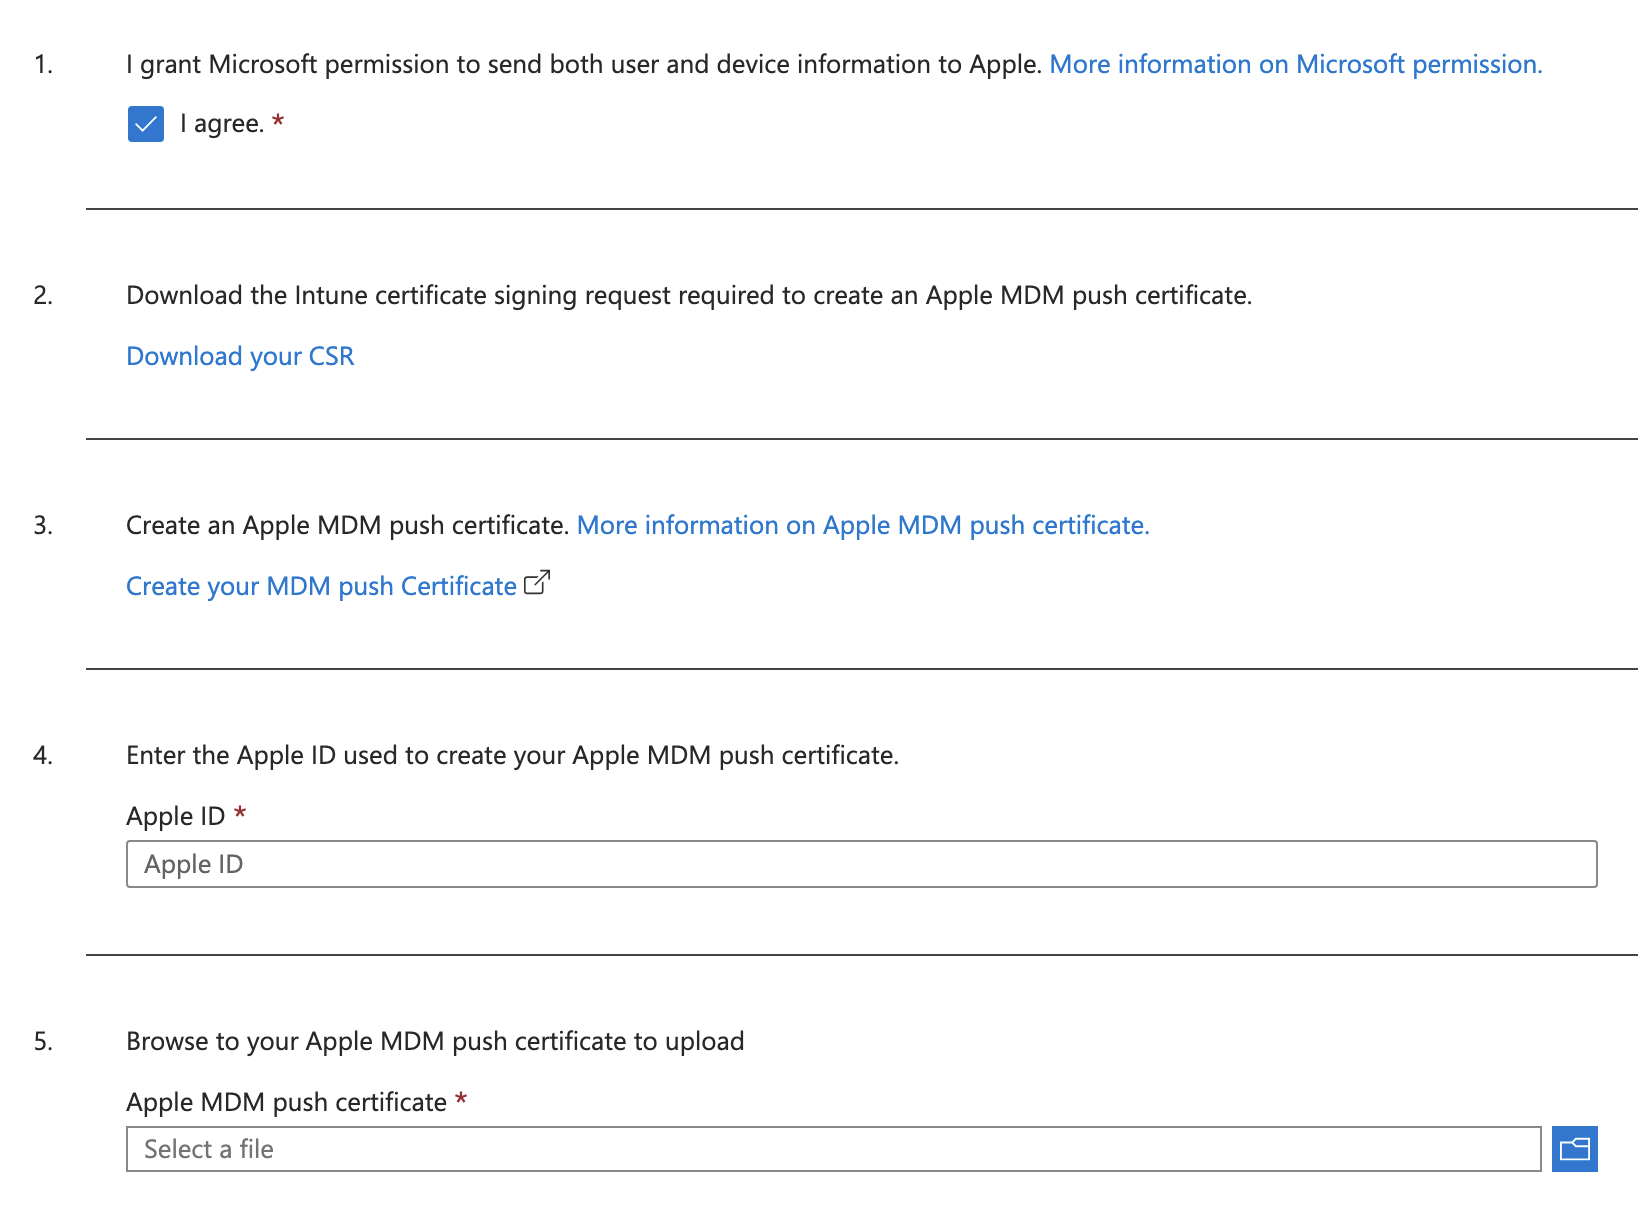
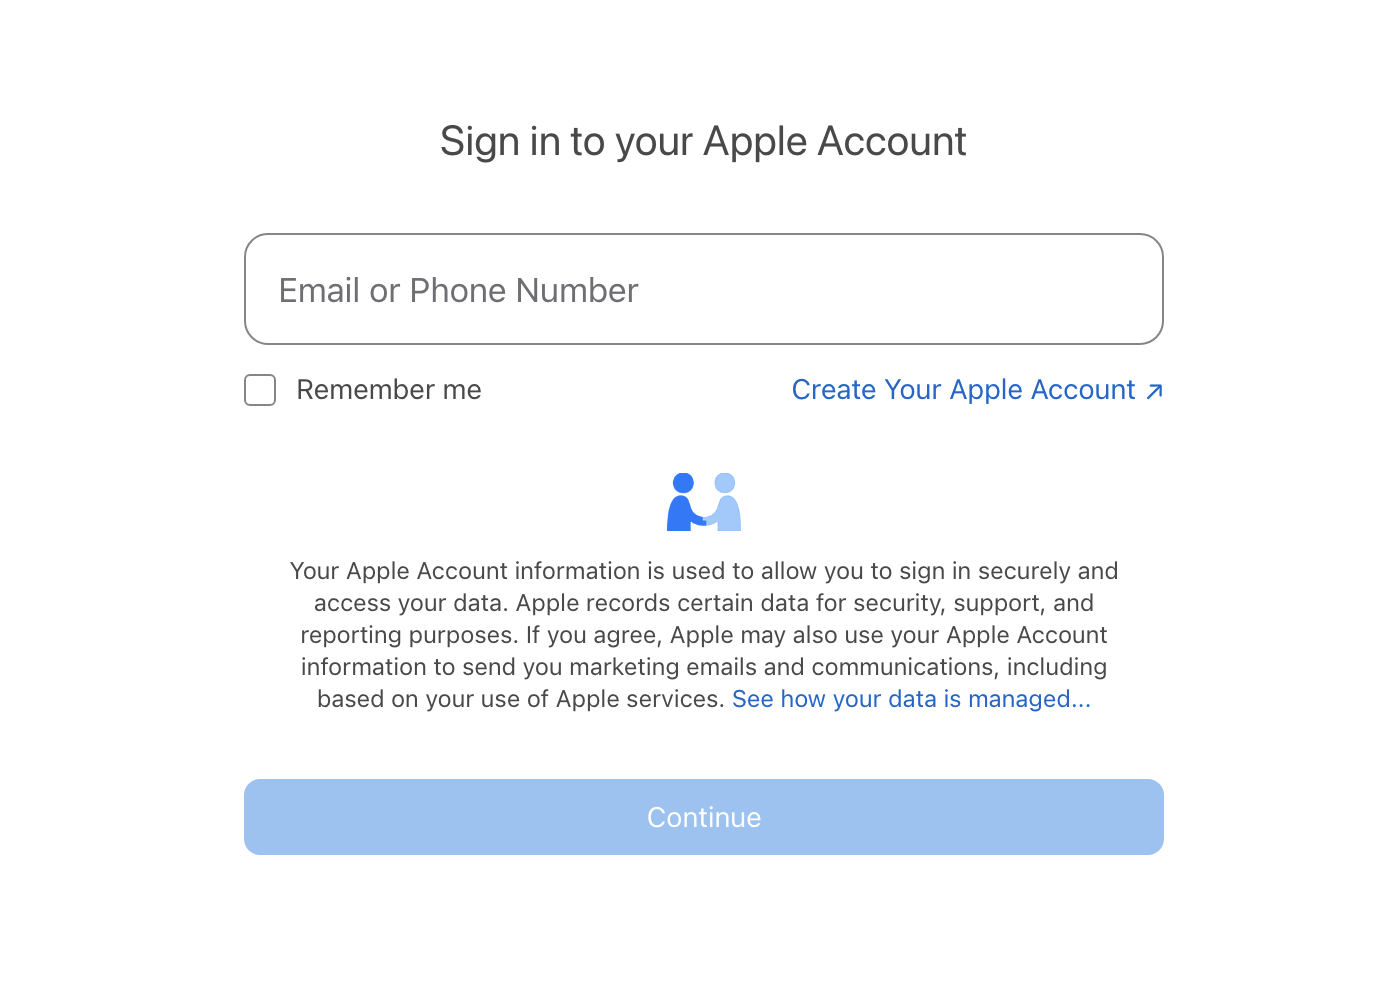
In the Apple MDM Push Certificate section you will need to first check the box granting Microsoft permission to send info back and forth with Apple. Next you will need to download the IntuneCSR.csr file by clicking "Download your CSR". Once downloaded, click the link for "Create your MDM push Certificate" which will take you to Apple's page asking you to log in with your Apple ID.
Here you will need to log in with the Apple ID you intend to use with Intune.
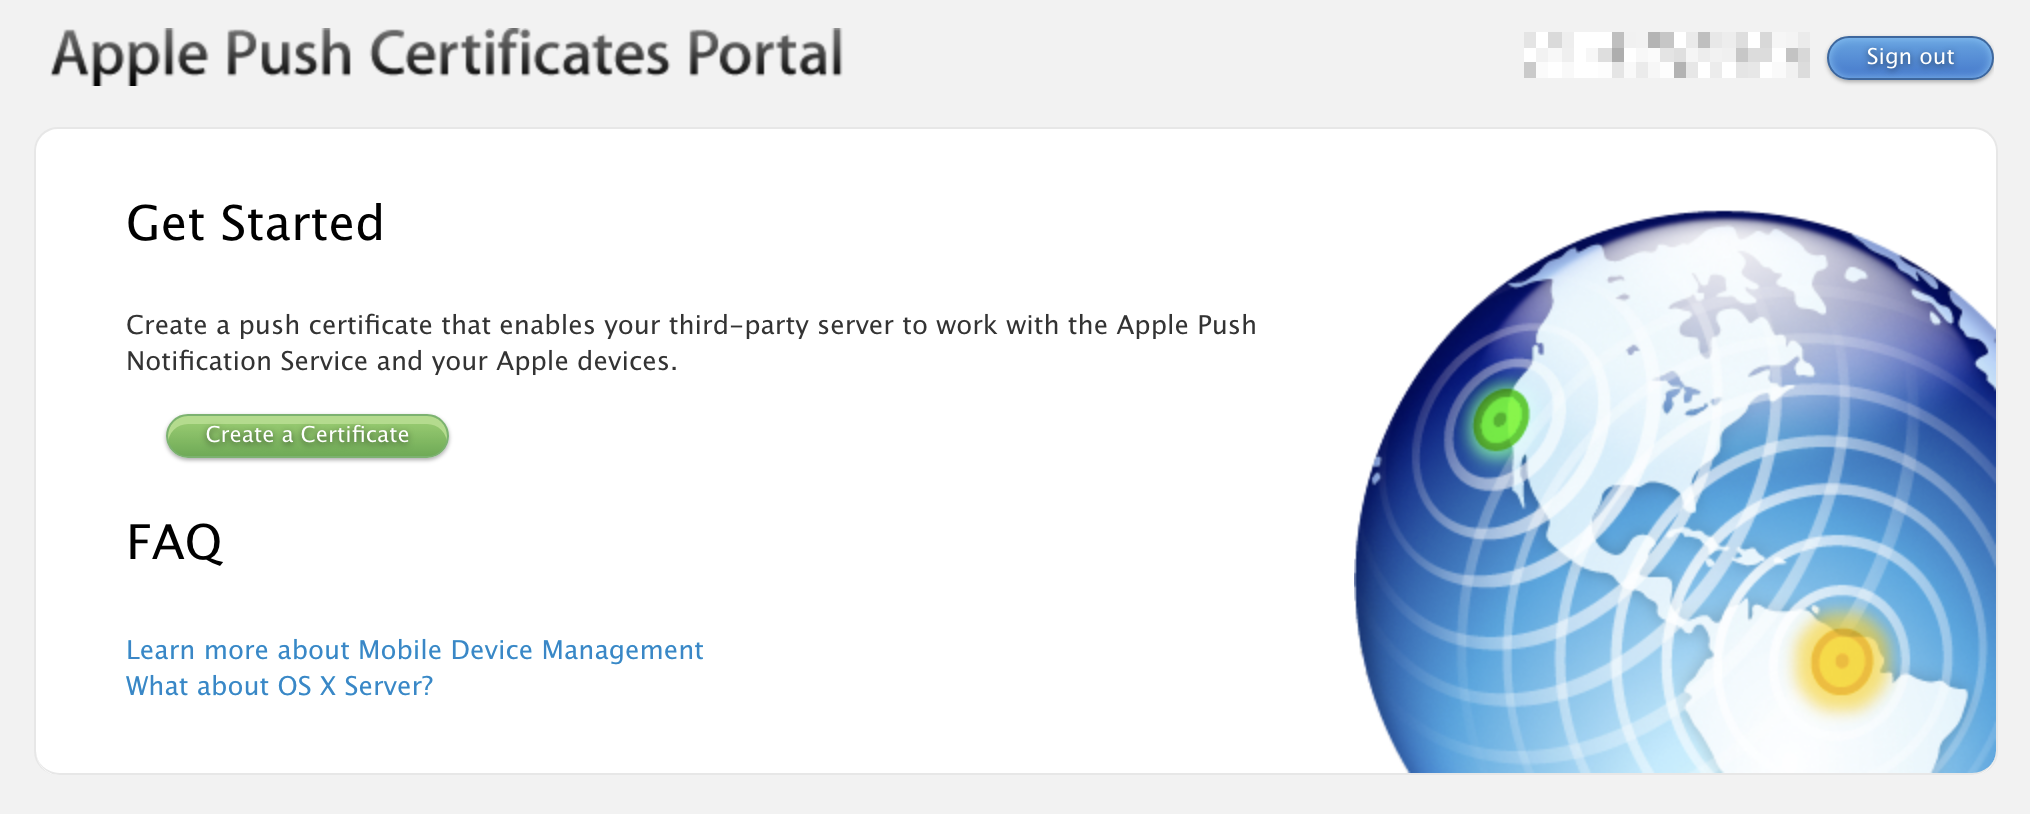
Logging in will take you to Apple Push Certificate Portal. You will just need to click the Create a Certificate button to get started.
Agree to the Terms and Conditions, then upload the CSR file we downloaded from Intune. You can leave a note for the certificate such as "Intune Lab Connector".

Once you click Upload you will be taken to the next page where your Push Certificate gets generated and you can download a copy.

Clicking download will provide a file called MDM_ Microsoft Corporation_Certificate.pem that we can take back to Intune. Clicking Manage Certificates takes you to a page where you can see all 3rd Party server certificates issued by this Apple account. You have the ability to revoke, renew, or download the certificate we just made.
It's worth noting that the APN Certificate we created has an expiration set for 1 year from its issue date. This should be plenty of time for our lab setup but depending on your use-case you may want to consider renewing or replacing the certificate after one year.
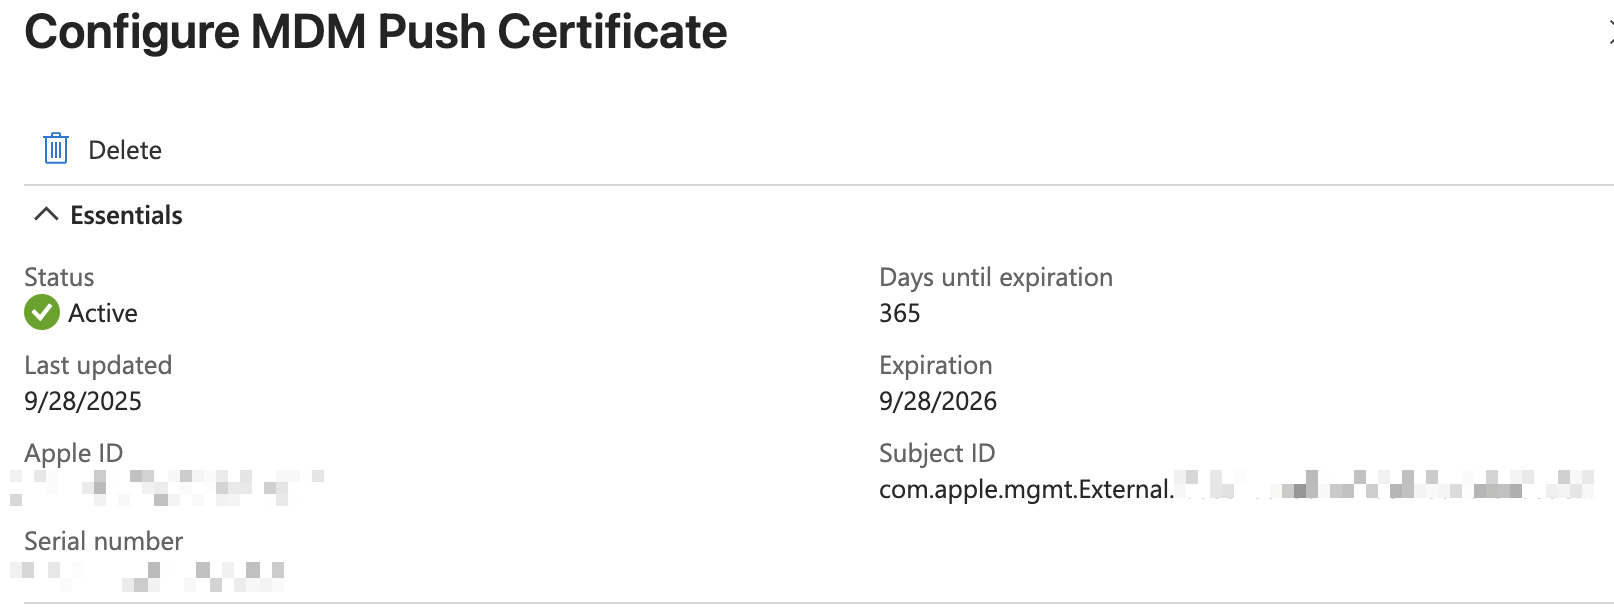
Now that we have the .pem file we can upload it back into Intune which will complete our trust connection between the two environments. Back on the Configure MDM Push Certificate blade where we were setting things up enter the Apple ID we used to create the certificate on step 4 and upload the .pem file on step 5.

Once finished you should immediately see a successful connection on the Apple MDM Push Certificate Page.
Company Portal App
The Company Portal app is one way to enroll devices on iPhone into the Intune. Users will need to download an app called Intune Company Portal from the Apple App Store and sign in using their organization login. Since this enrollment method requires user's devices to already be setup to access the App Store, Company Portal is better as an option for BYOD devices or those that require fewer restrictions.
Another enrollment method would be to use Automated Device Enrollment to create an Out-of-the-box experience that automatically sets up the iPhone during first power on. Unfortunately, this method requires access to Apple Business Manager which can only be obtained by having a business account with Apple. This will be out of reach for many aspiring lab builders so I will leave it out of the scope of this guide.
To setup the Company Portal go to Intune > Apps > iOS/iPadOS apps > Create > iOS Store app. In the create wizard you will need to select "Search the App Store" in the first step when selecting the app and search "Intune Company Portal".

For App Information I will keep the defaults the app provides. On the Assignments page I will apply this app to members of the All-Employees group under the "Available for enrolled devices" section.
Testing Enrollment
It seems the only way to test an iPhone enrollment is to grab a device and download the Company Portal app. I tried running an iPhone simulator through Xcode but it does not allow app installs from the app store. Instead, enjoy these photos from my phone:

First go to the App Store and search for and download the Intune Company Portal app. When you open the app it will ask you to sign in. Use the organization account of one of the users in Entra. Once signed in you will see a series of steps to complete to enroll your device.

The first page will outline what information Intune can and can't see on your personal device. This will be important to users of the organization who may worry about what data they are sharing to the organization from their personal devices.
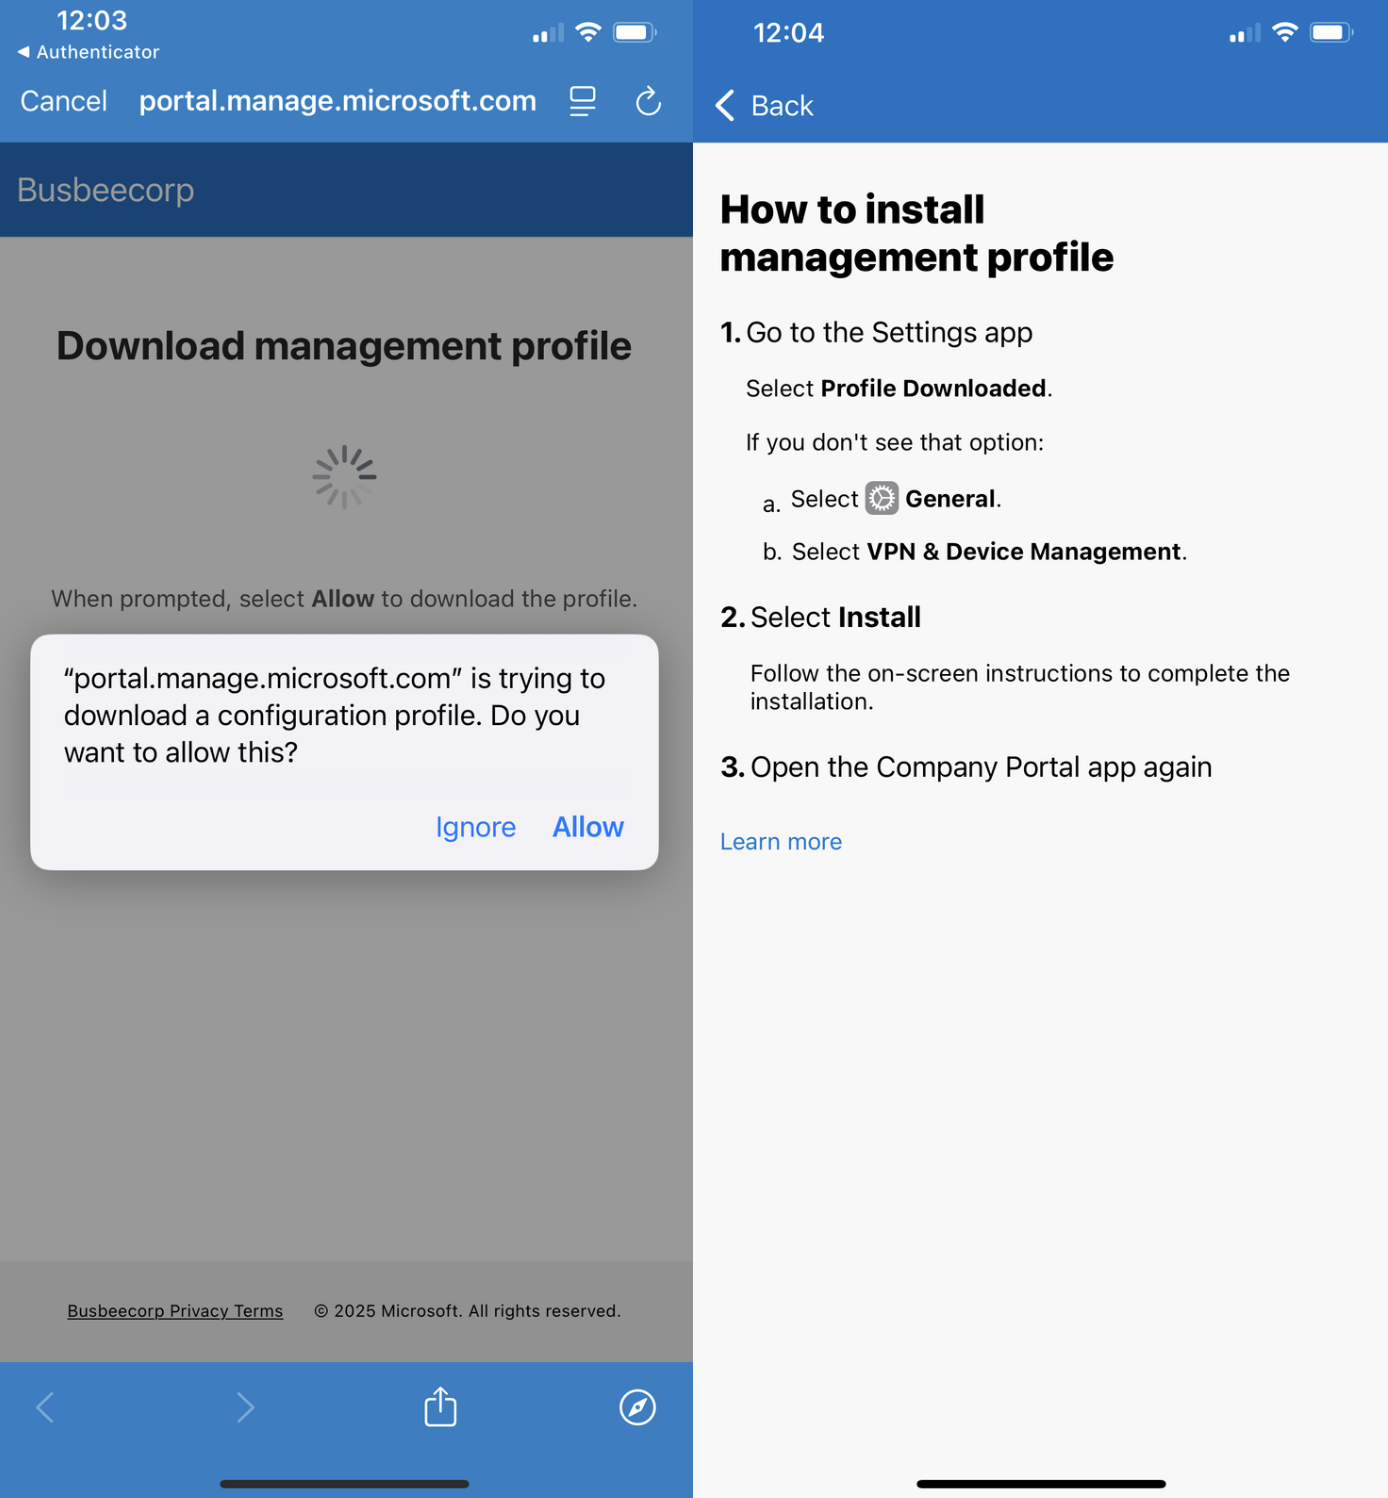
The next page will ask you to allow download the configuration profile required by Intune to be on the device. If your device is configured like mine is, this is the part that will trigger a 1 hour security delay on your iPhone that will require you to wait until resuming the setup process.
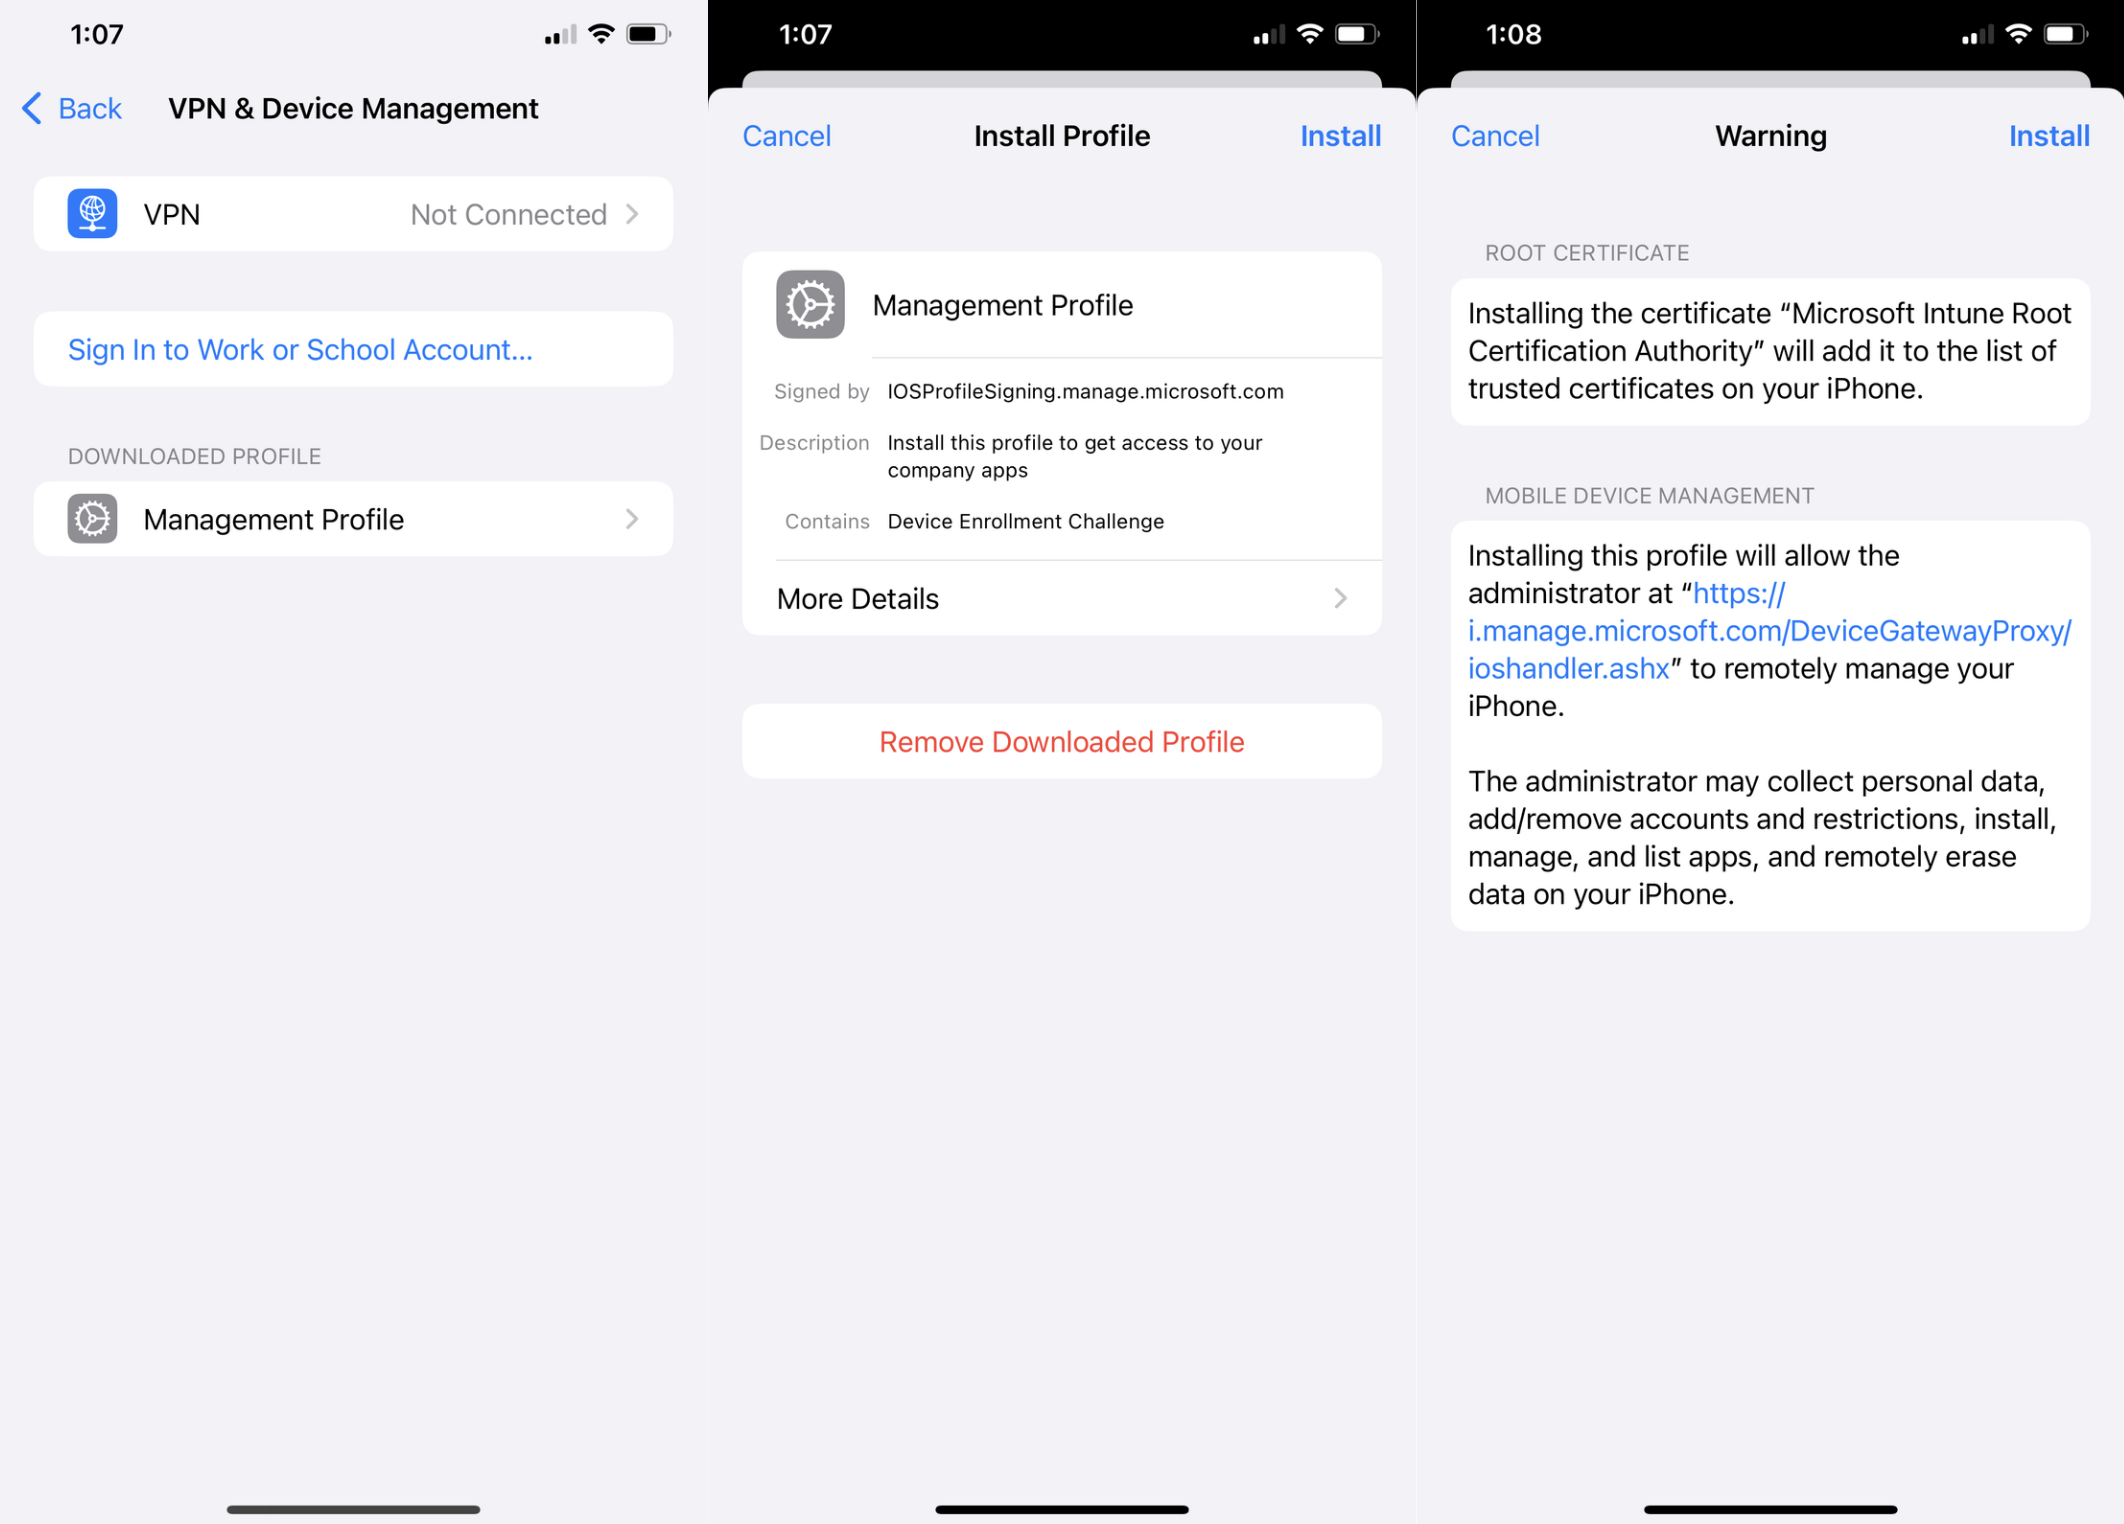
Once the profile is downloaded you can go to Settings app > General > VPN & Device Management and click Management Profile from the Downloaded Profile section. On the next page click Install in the top right corner, read the warning, then Install again in the top right corner.
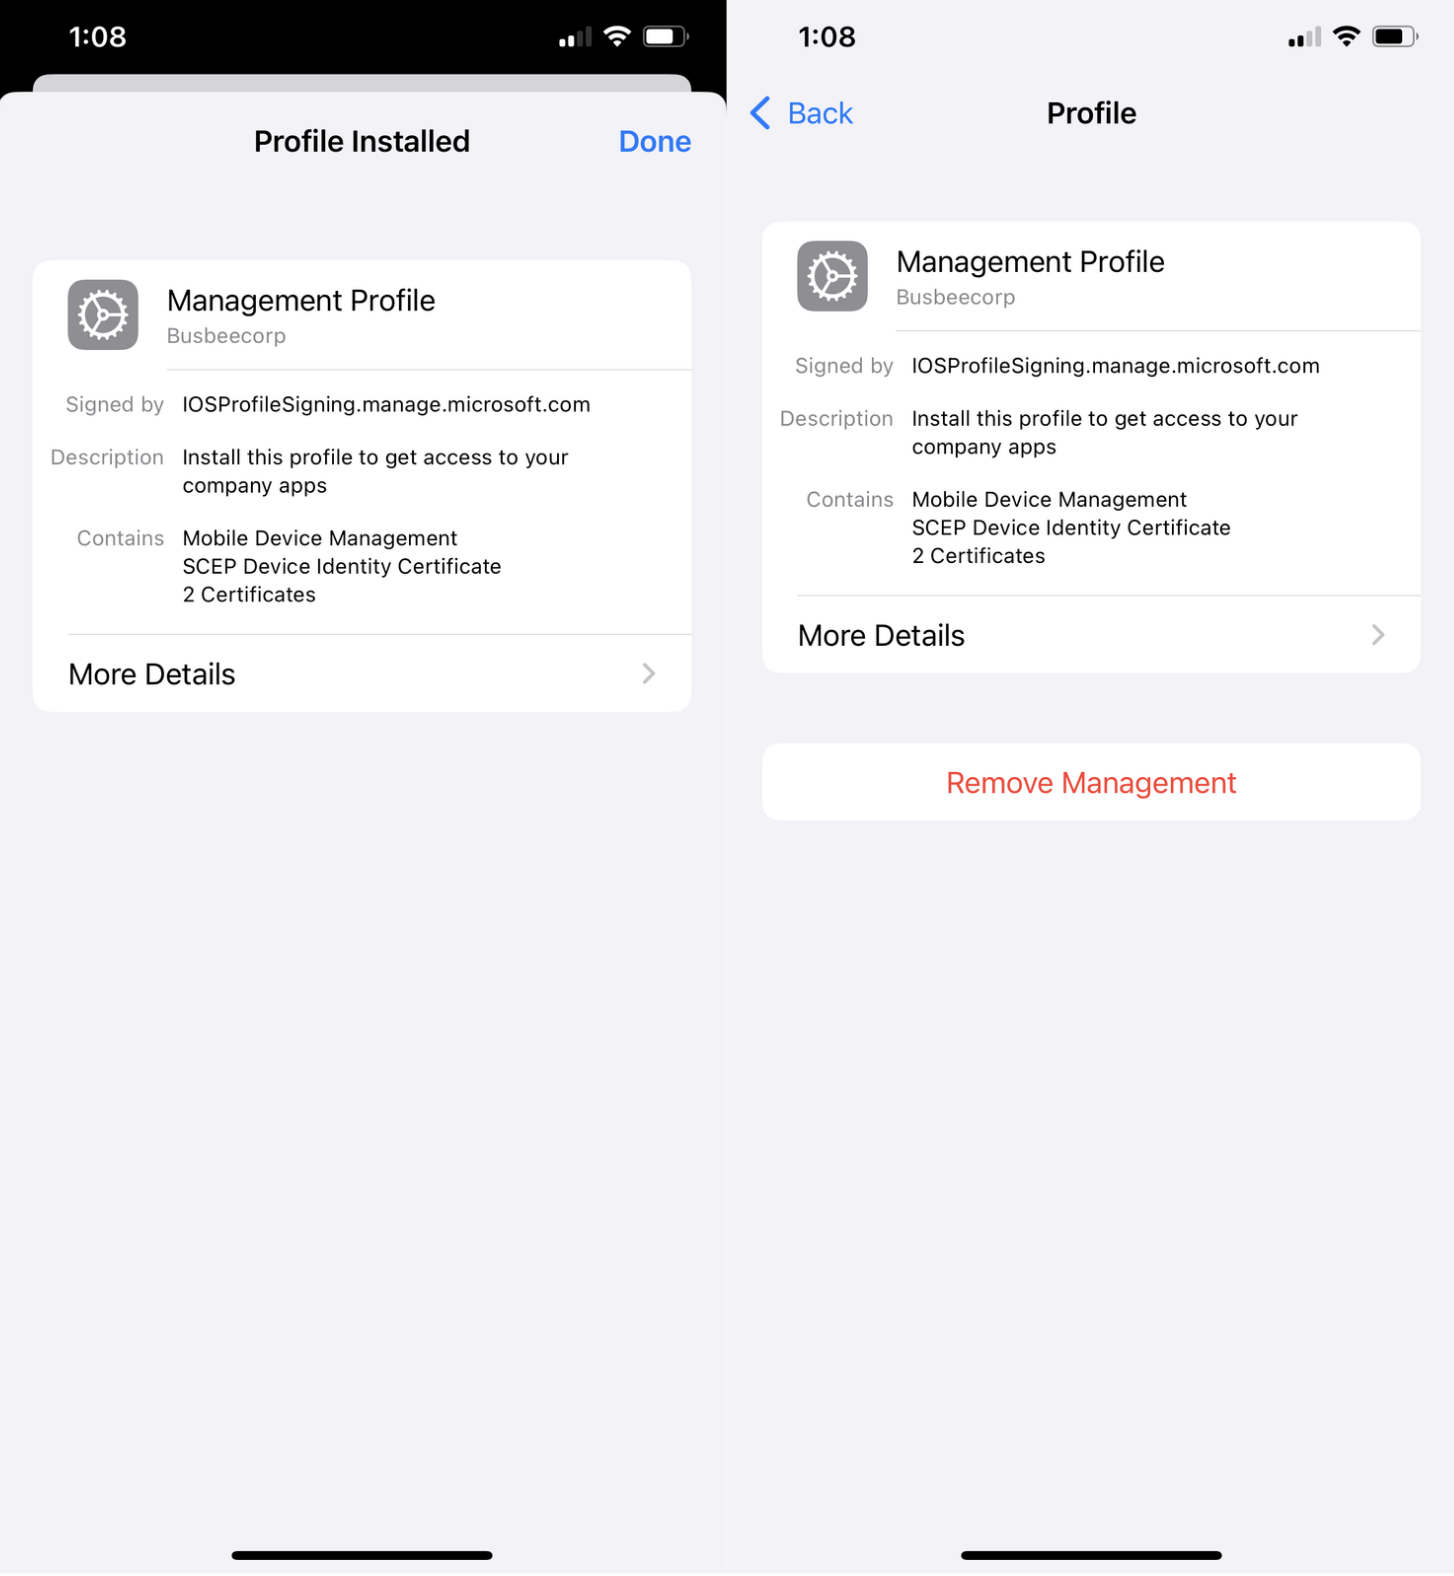
Once the profile is installed you will see a success screen and back on the VPN & Device Management screen you will see this profile as an entry with the option to remove it from the device.
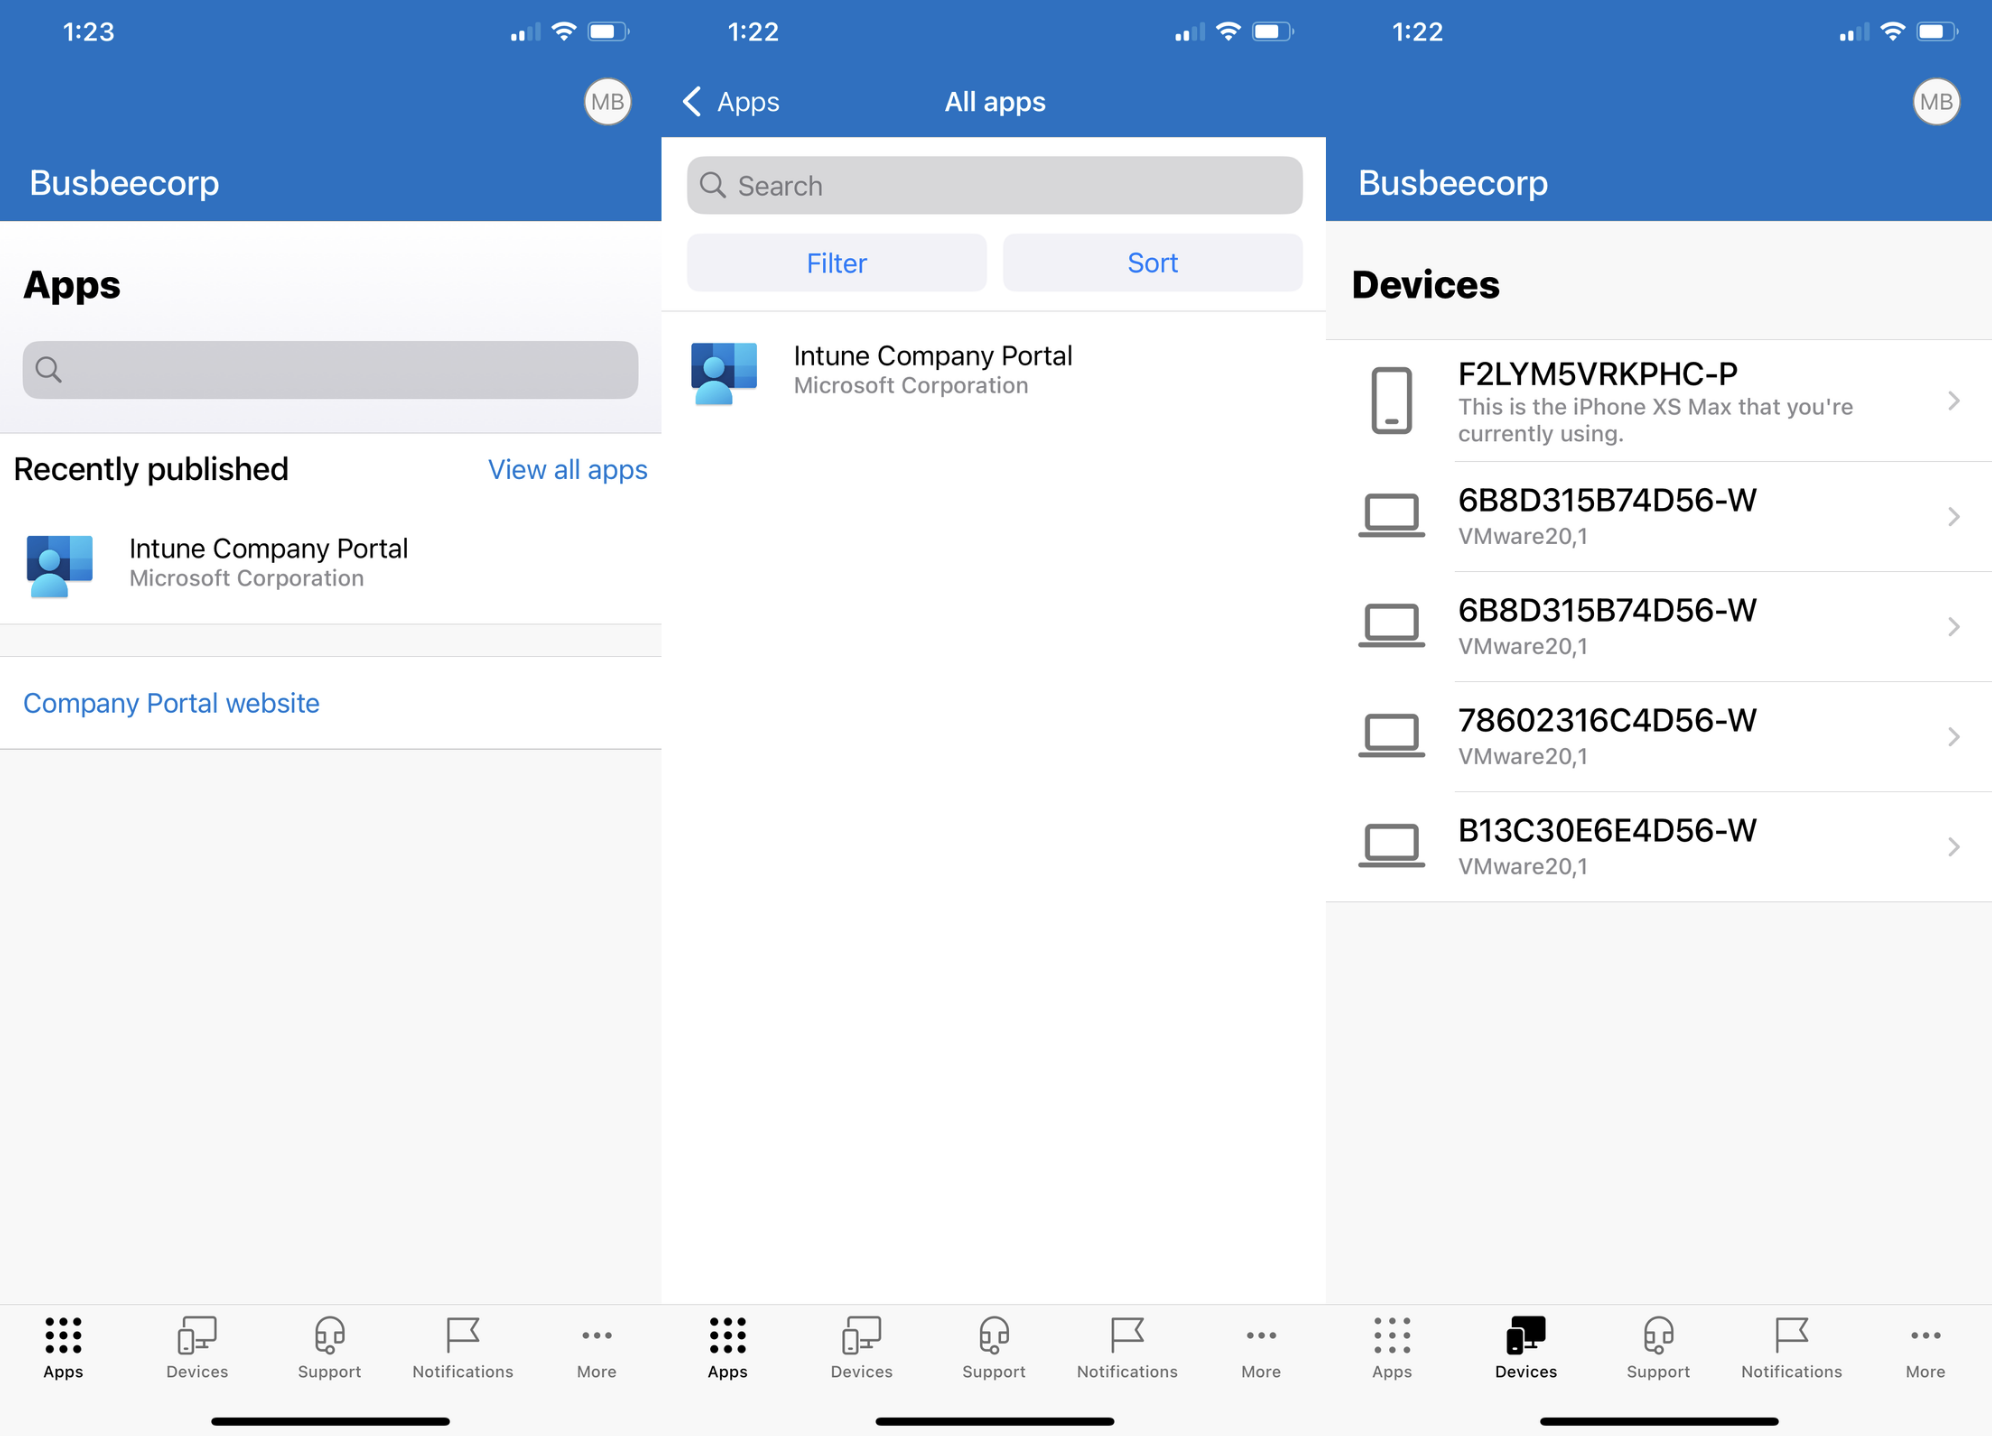
The Intune Company Portal now allows users to download apps from the company to their phone as well as view devices they are connected to. Apps provided here by the company can be configured to have increased protection through Intune MAM policies.
Benefits of Managed Androids
Intune allows you to enroll and manage other devices beyond just Windows 11. With some additional setup, you can connect Apple iPhone and Google Android devices. In this section I will show how to connect a Managed Google Play account to Intune.
Managed Google Play
To make the connection just go to Intune > Devices > Enrollment > Android > Managed Google Play which will open a blade allowing you to give permission to Intune to connect to Google Play then a button to log in with a Google account.
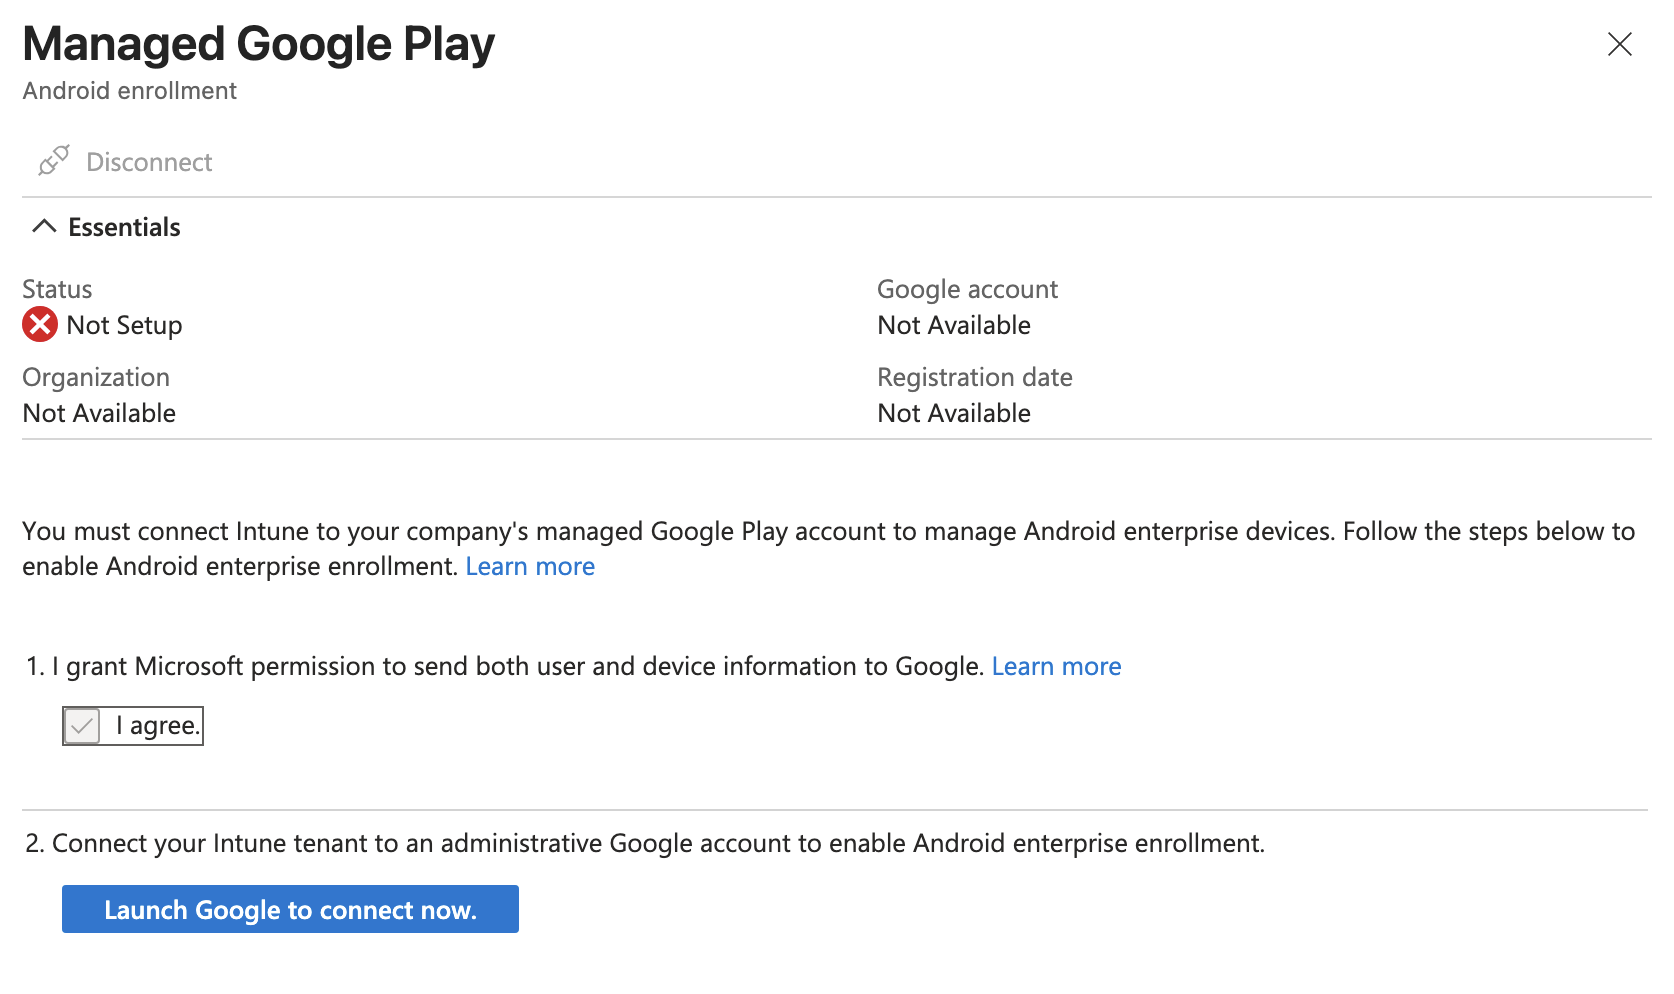
In a real scenario you would want to use a secure Google account managed by the organization but for the purposes of this lab I think it will be fine to just use a personal account. It will warn you that using a personal account limits you to Android only but this is fine since we don't plan on doing anything with Chromebooks or Google Workspace in this lab.
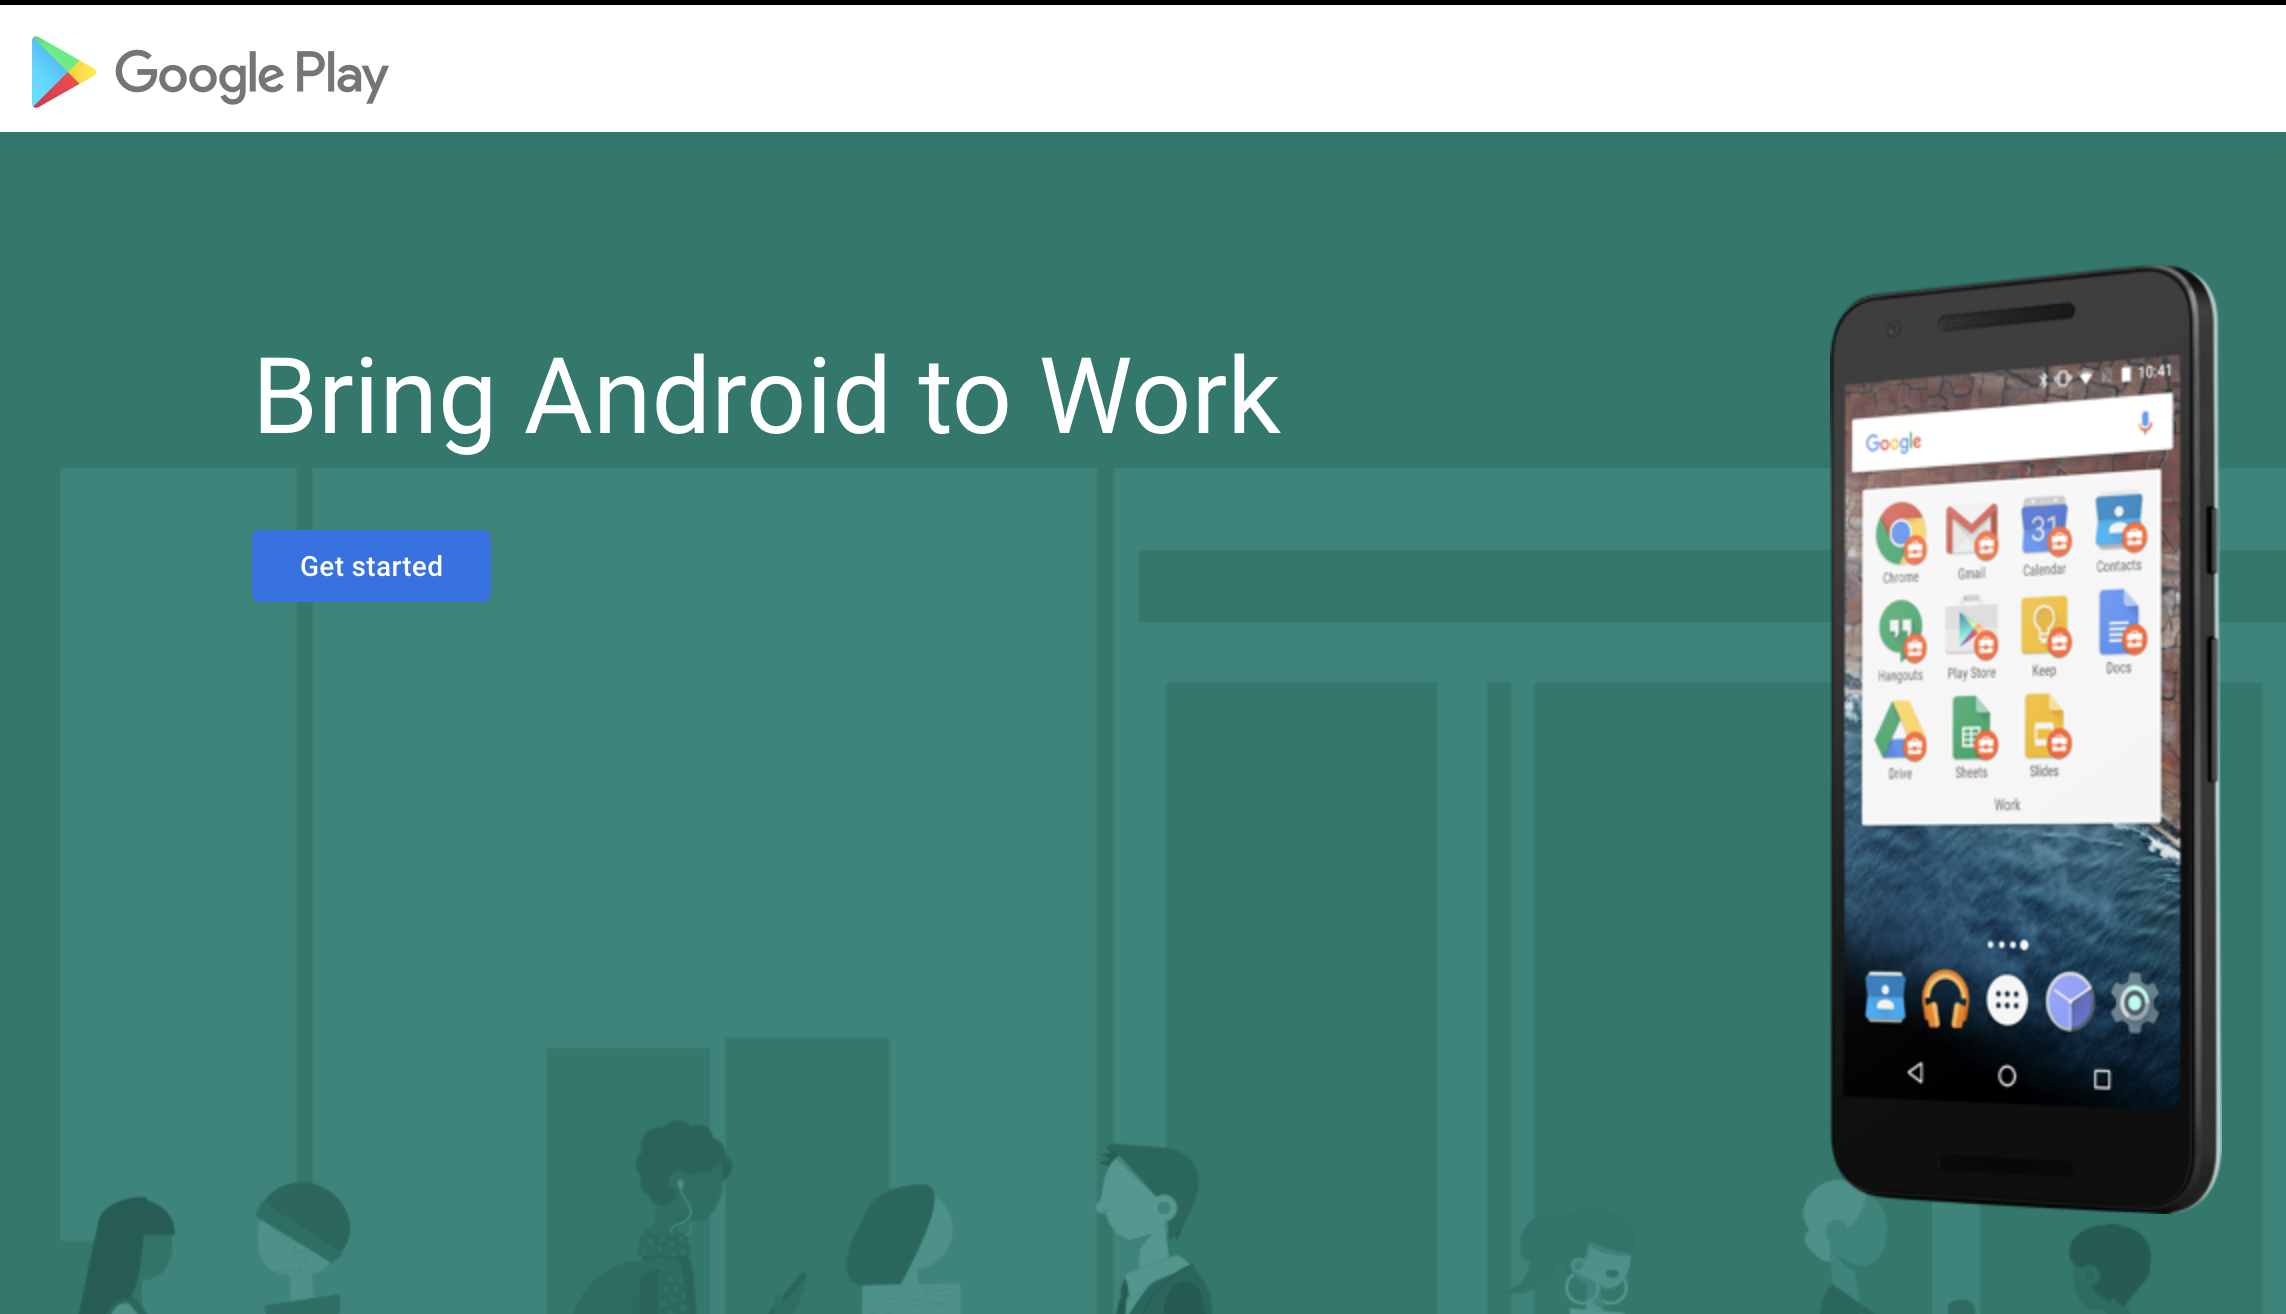
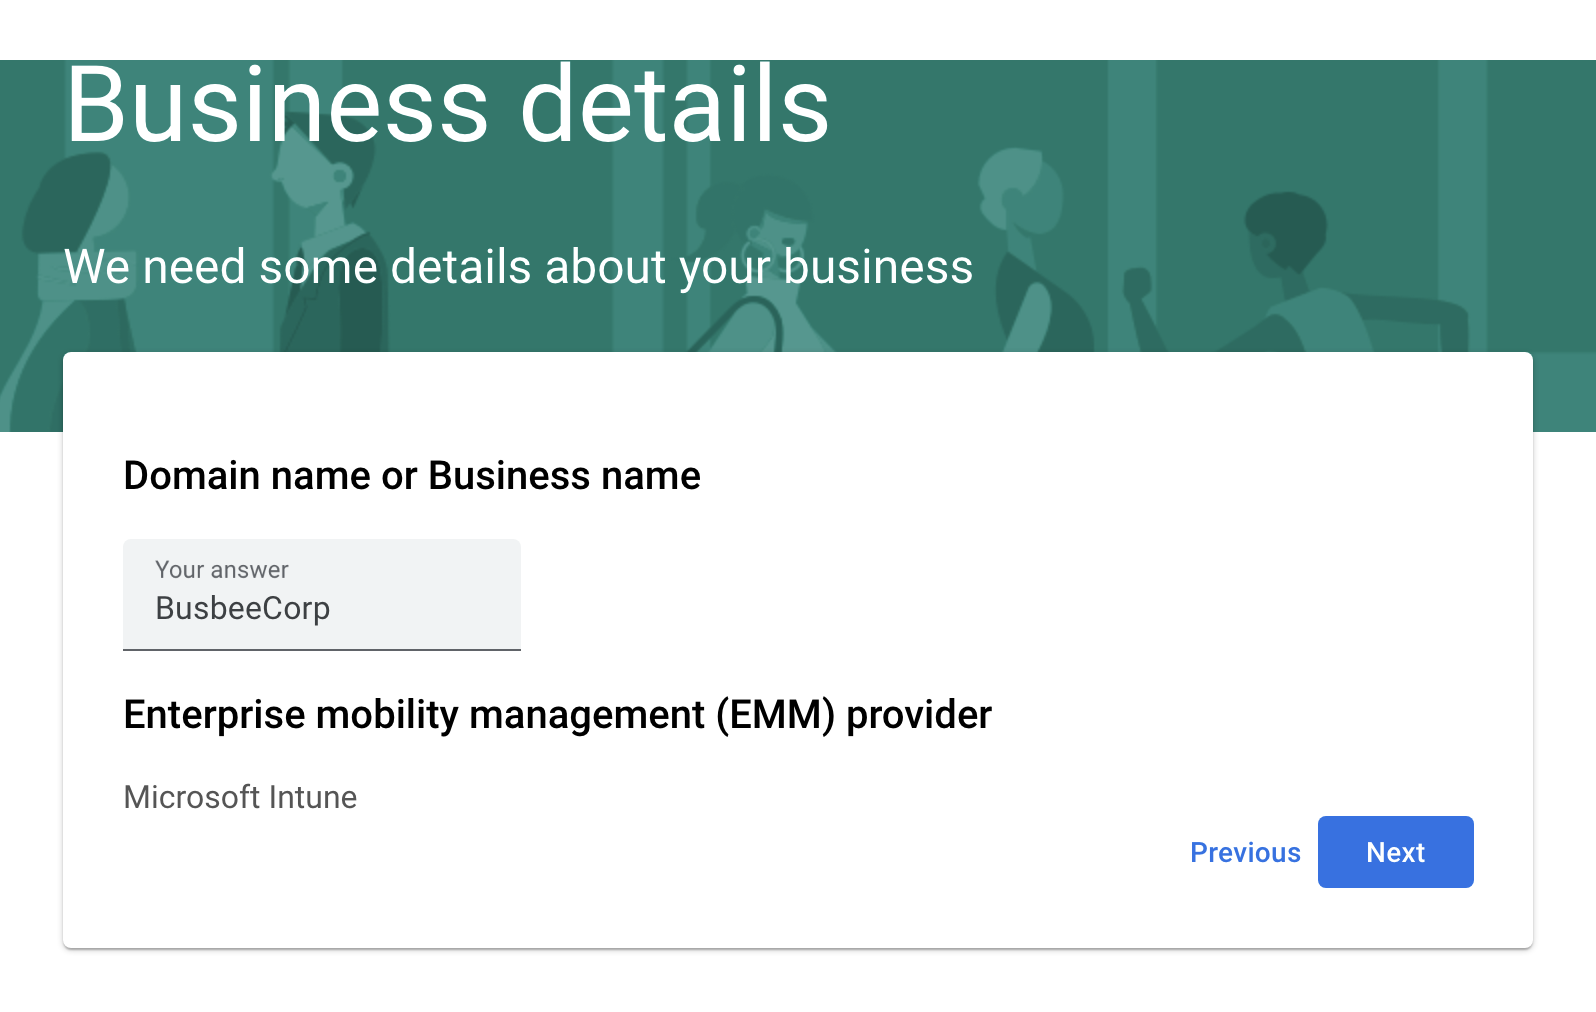
After logging in you should see a splash screen. Click the Get started button. Next it will ask for your Company name, here you can just put the name of your fake organization as well as your contact info when it asks for company officers.
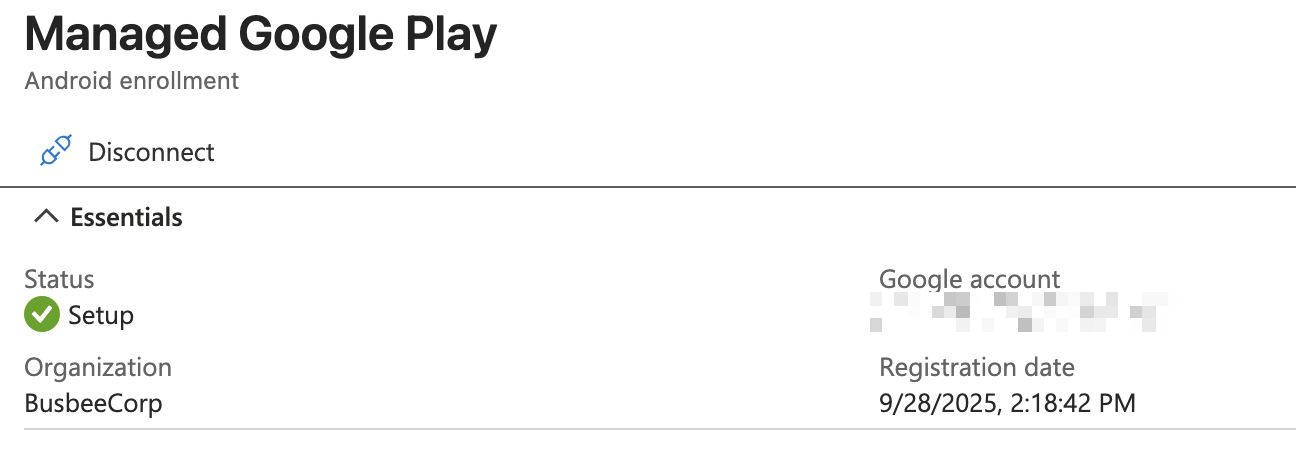
If everything worked correctly you should be able to go back to the Managed Google Play screen and see a successful Setup Status.
Testing Enrollment
To test enrollment I grabbed a virtual android install from the Android Studio and once it finished setting up I went to the Google Play Store and downloaded the Intune Company Portal app.
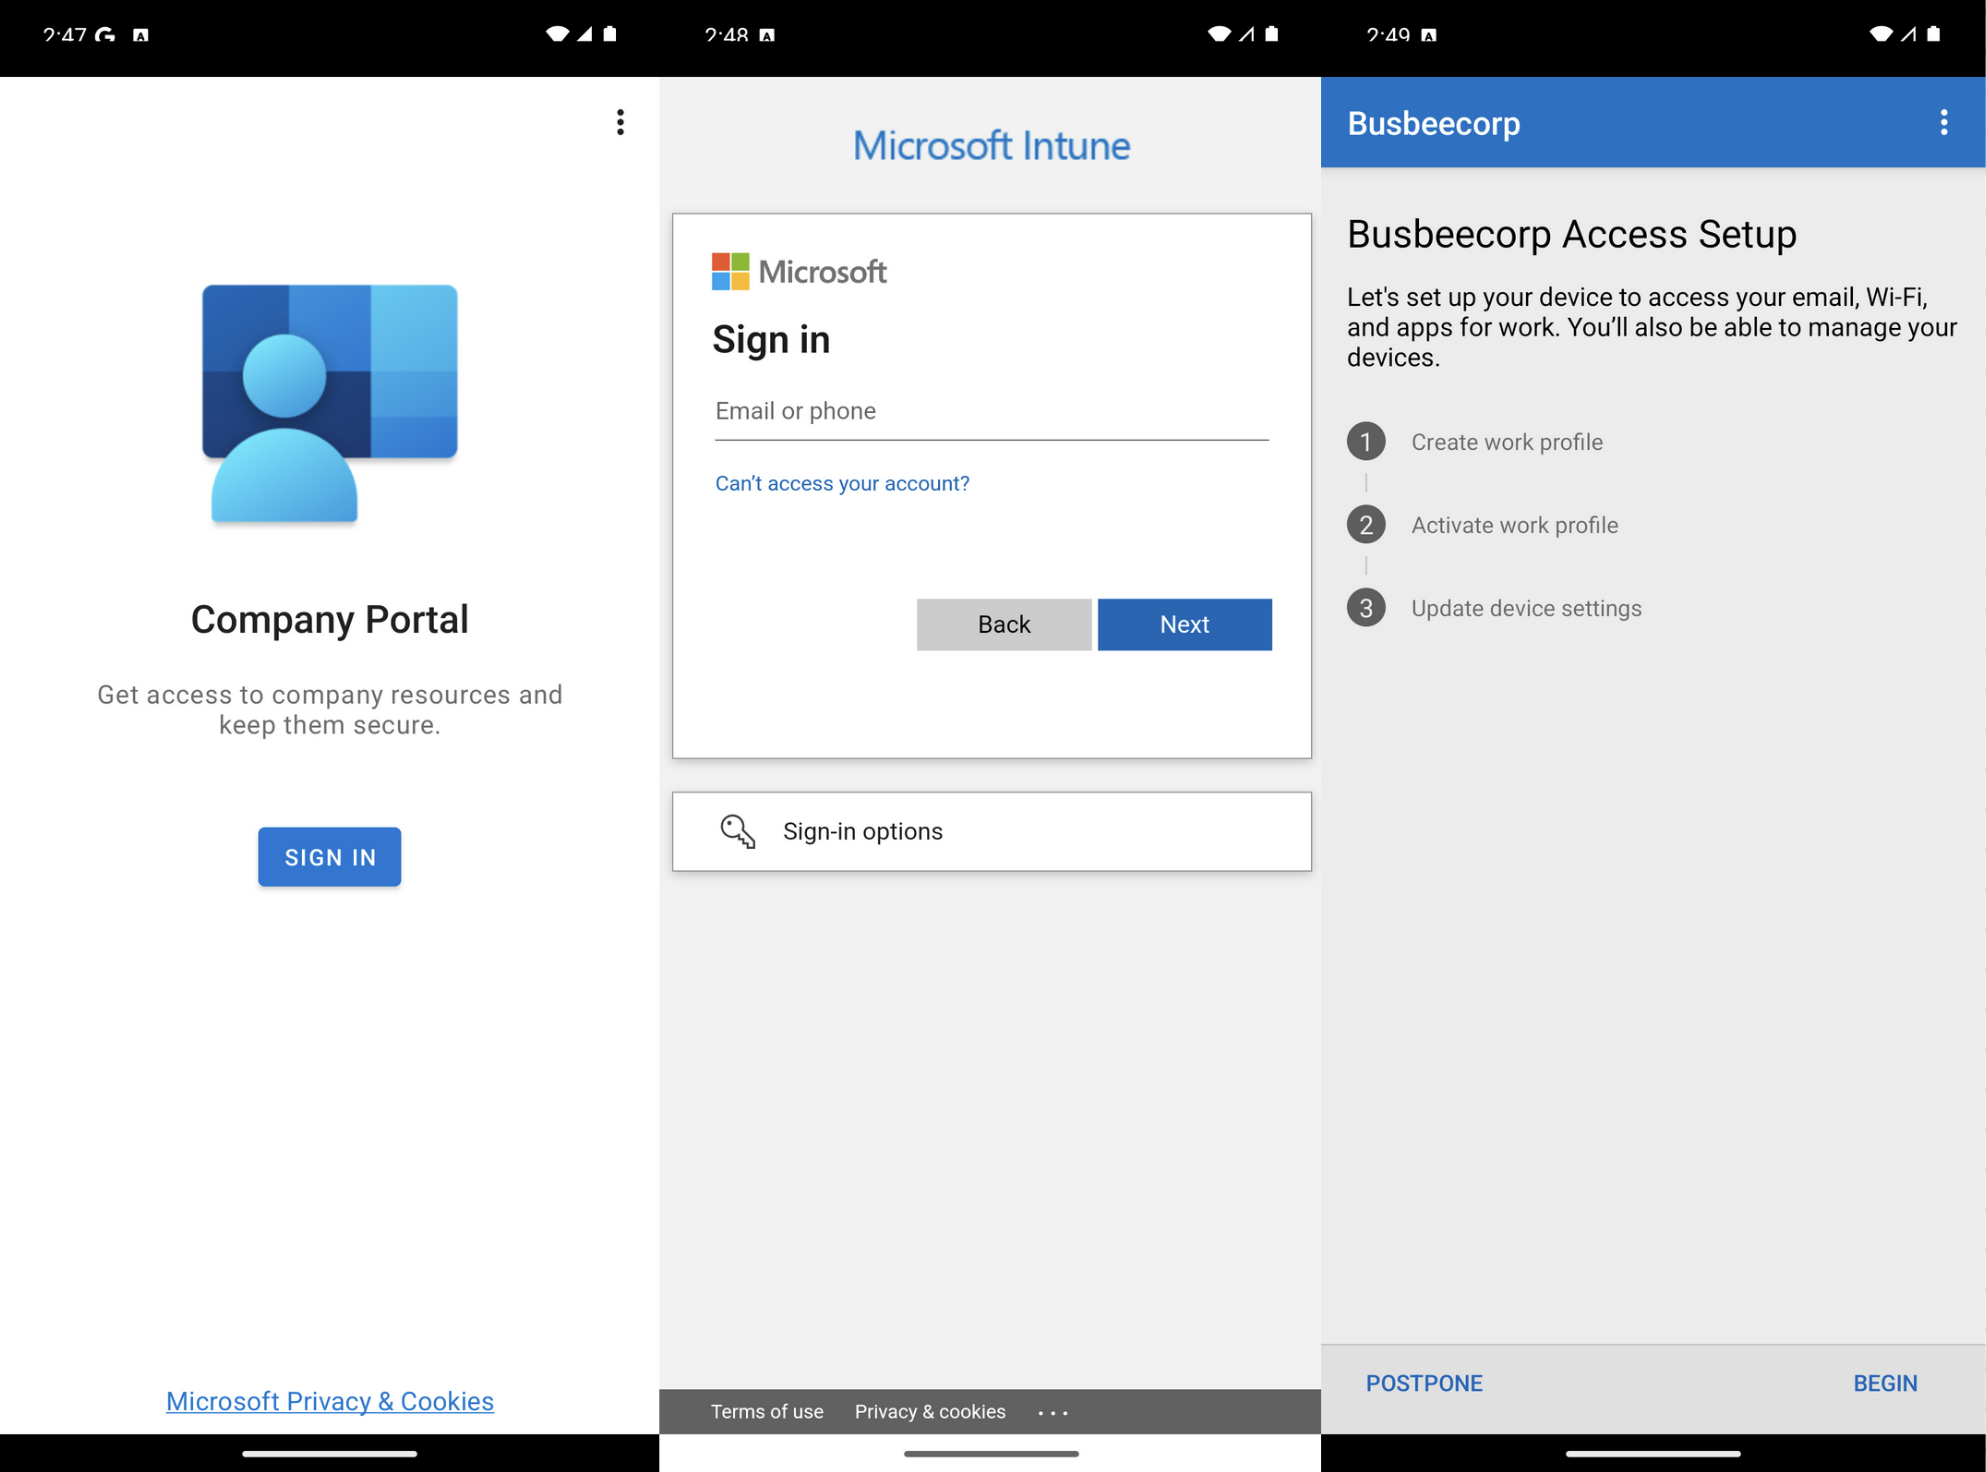
When the app finishes downloading, open it and sign in with an organization account. It will then give you a rundown of what goes into enrolling the device with Intune.
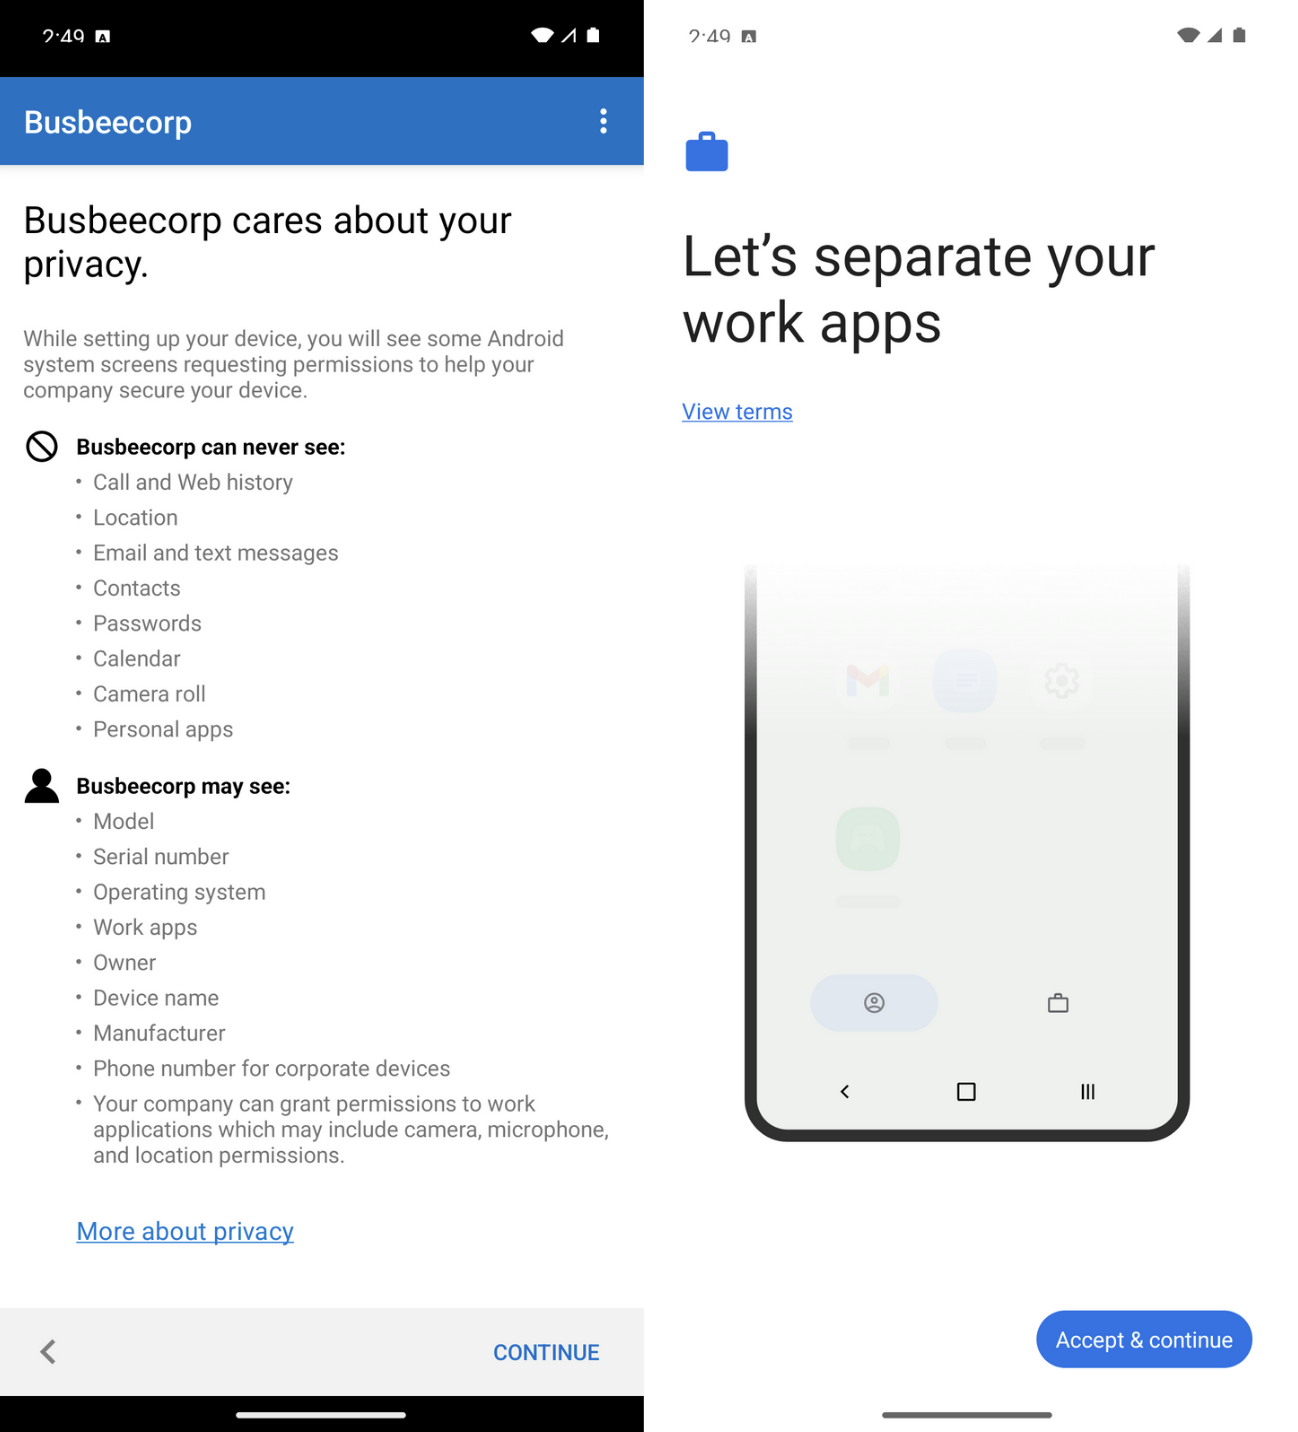
When you click begin it will give you an outline of what the organization is and is not able to see through this Intune Company Portal connection. Click Accept & Continue.
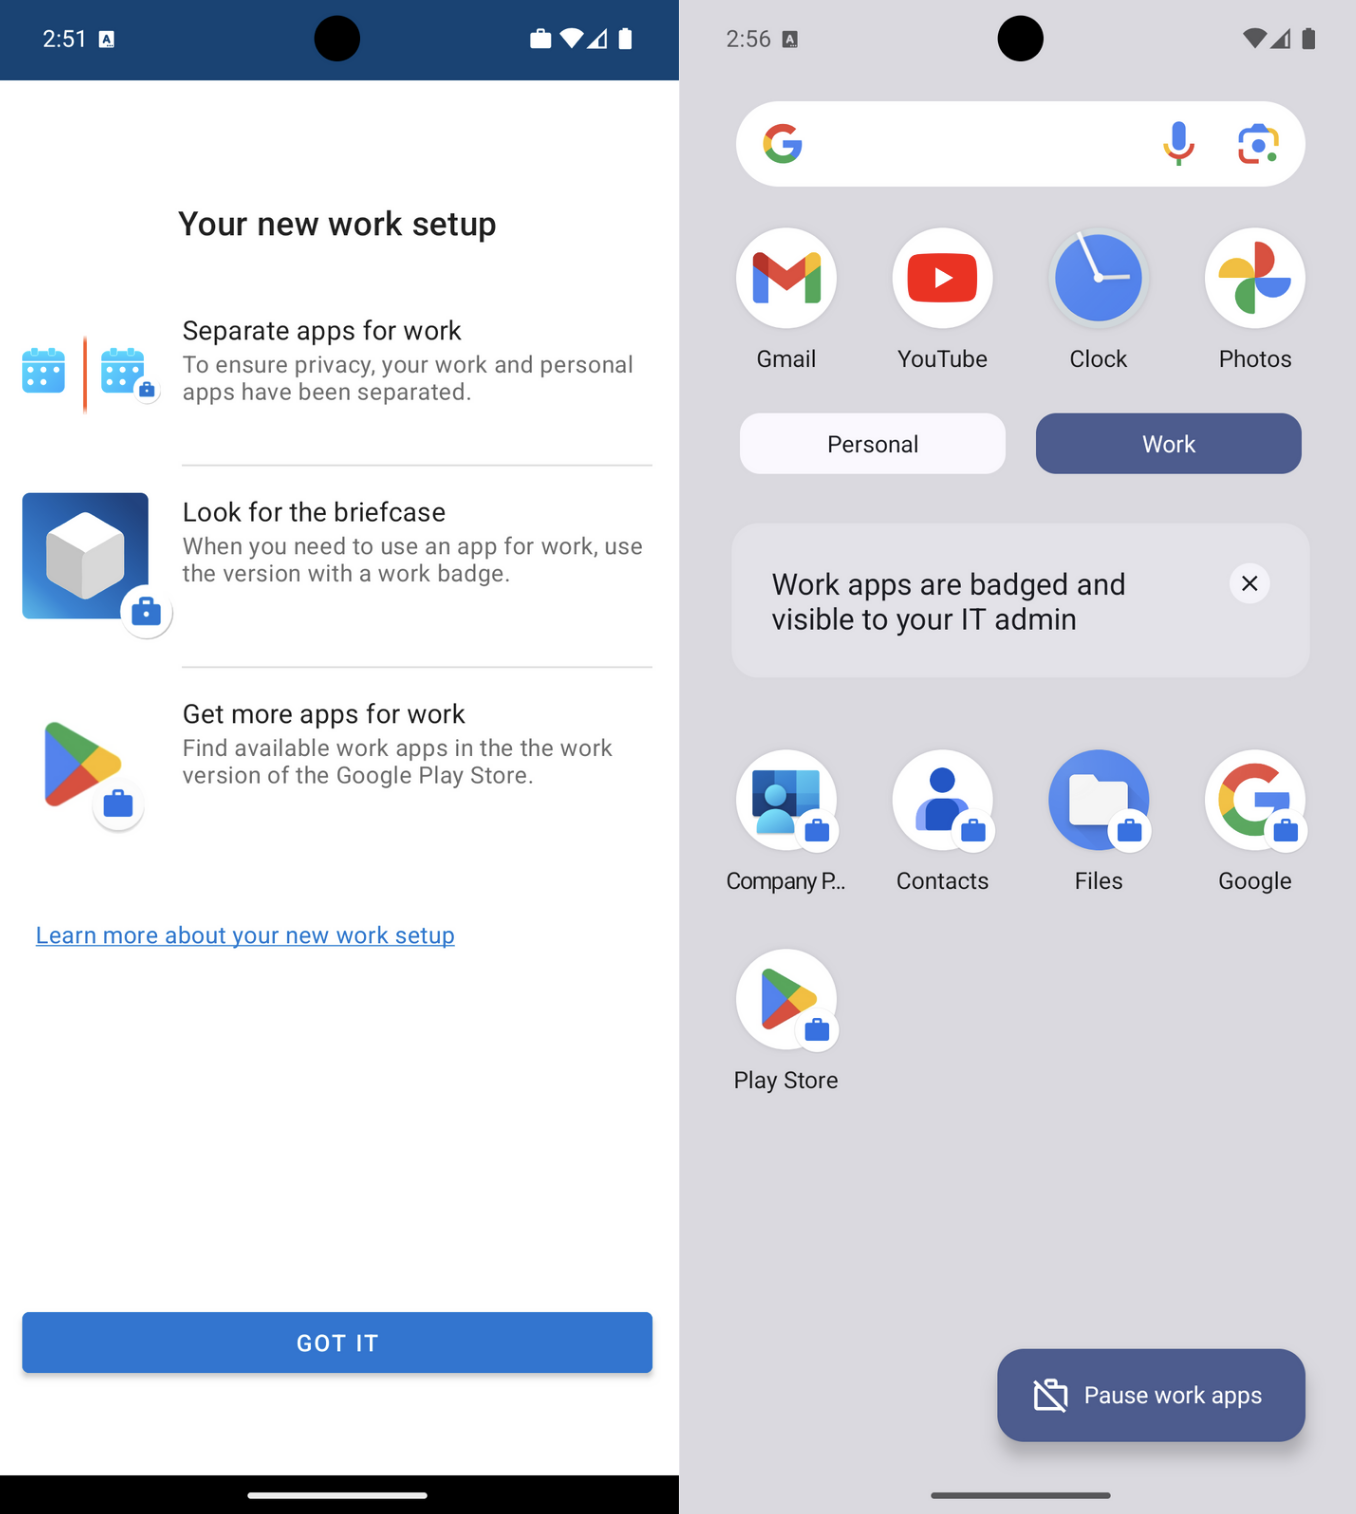
Once you move on from this page you will be shown another screen explaining that your work and personal apps will now be separated. Apps for work will now come with a briefcase icon in the bottom right corner to differentiate themselves. In the app drawer you will now see two separate folders to separate Personal and Work apps. You can click the Google Play for Work icon to see apps provided by the organization available for download.
What can I monitor?
Intune provides several ways to monitor devices it manages. You can make configuration and compliance reports, you can view deployment history or endpoint antivirus reports, or even drill down into a specific device for more information. When in doubt, poke around and take a look at anything that says monitoring and reporting.
Compliance Reports
Go to Intune > Reports > Device compliance to view a summary of device compliance information. If nothing shows here you may need to click the "Generate" button to refresh the data on the page.

Here you will be able to see a breakdown of devices that are compliant vs not. You can also go deeper and get Intune to generate more specific reports such as a Noncompliant devices and settings report.
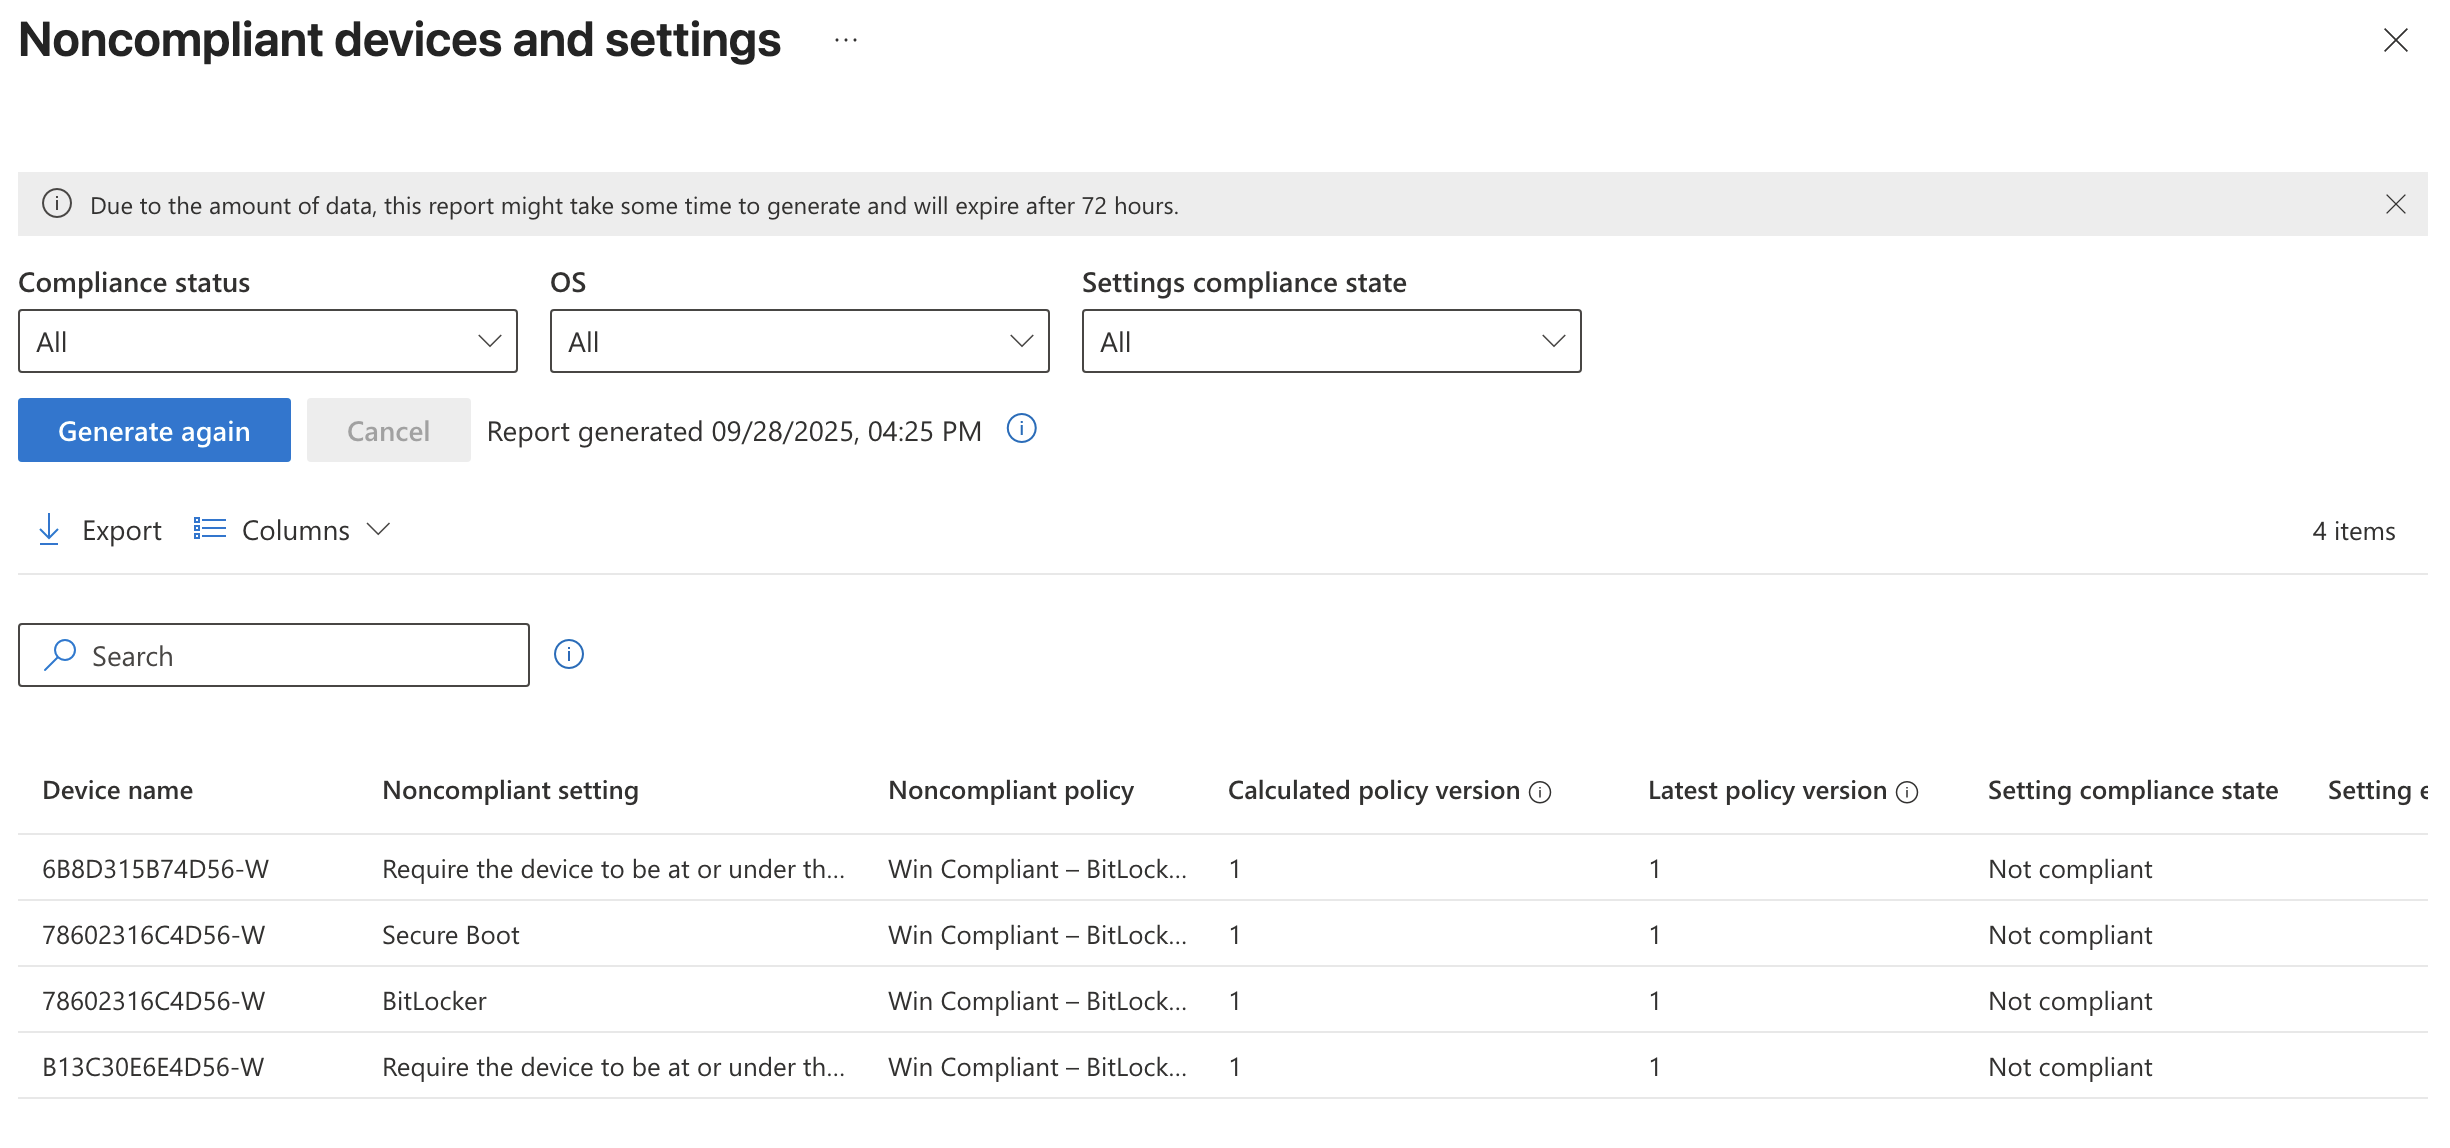
The full list of built-in reports related to compliance can be found in the reports tab Intune > Reports > Device compliance > Reports
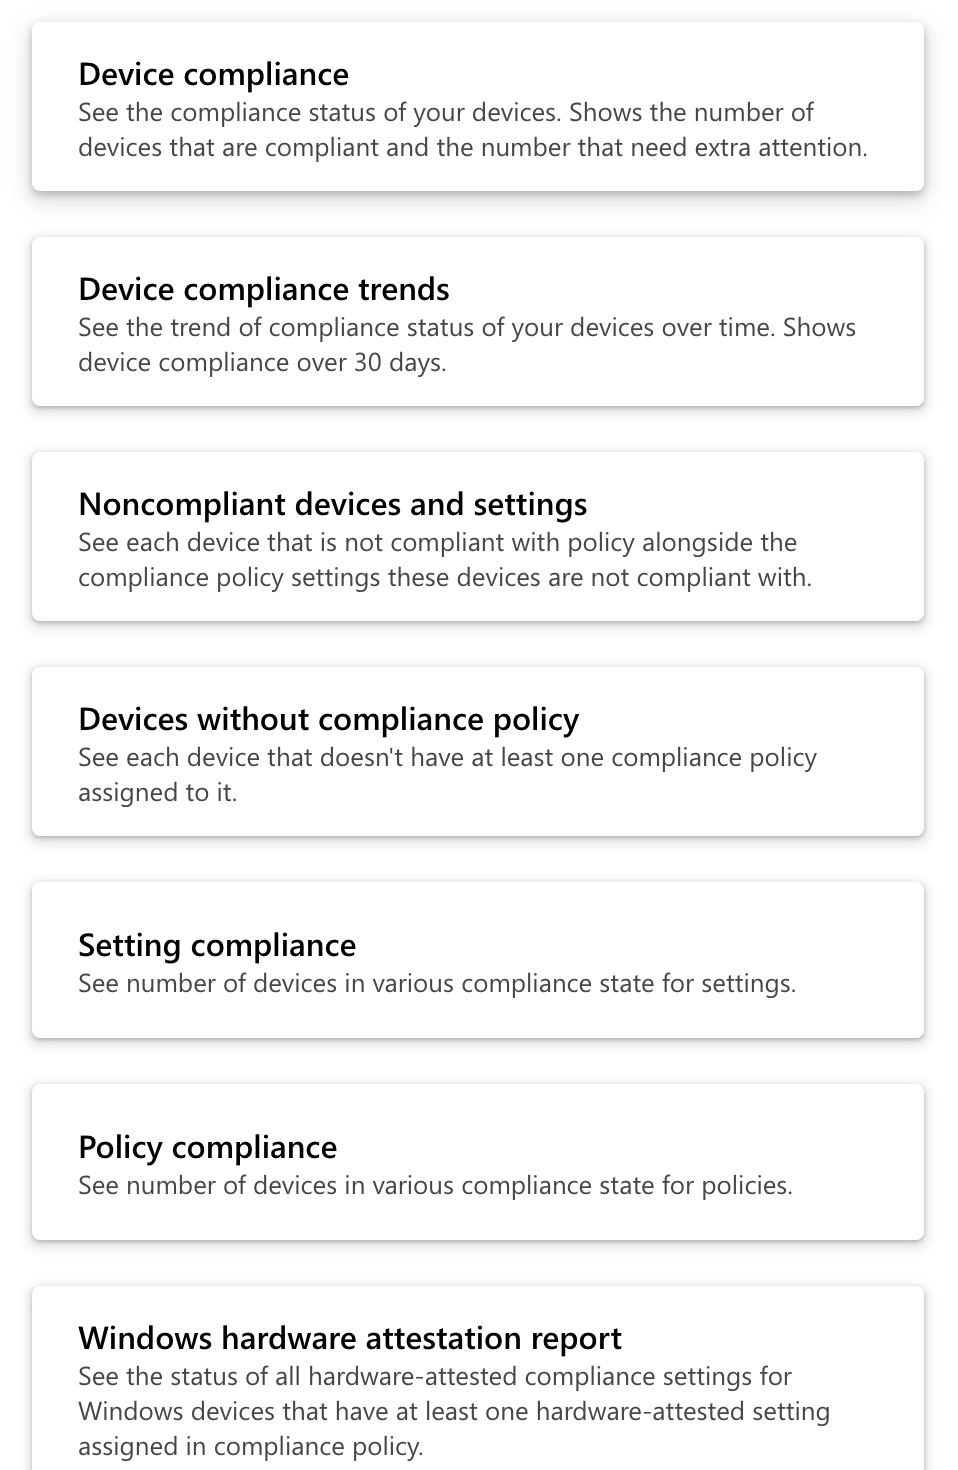
Options include:
- Device Compliance
- Device Compliance trends
- Noncompliant devices and settings
- Devices without compliance policy
- Settings compliance
- Policy compliance
- Windows hardware attestation report
Configuration Reports
On the Intune > Reports > Device configuration screen you can see a summary of configuration policies and their success/failure device totals.

Microsoft Defender Antivirus
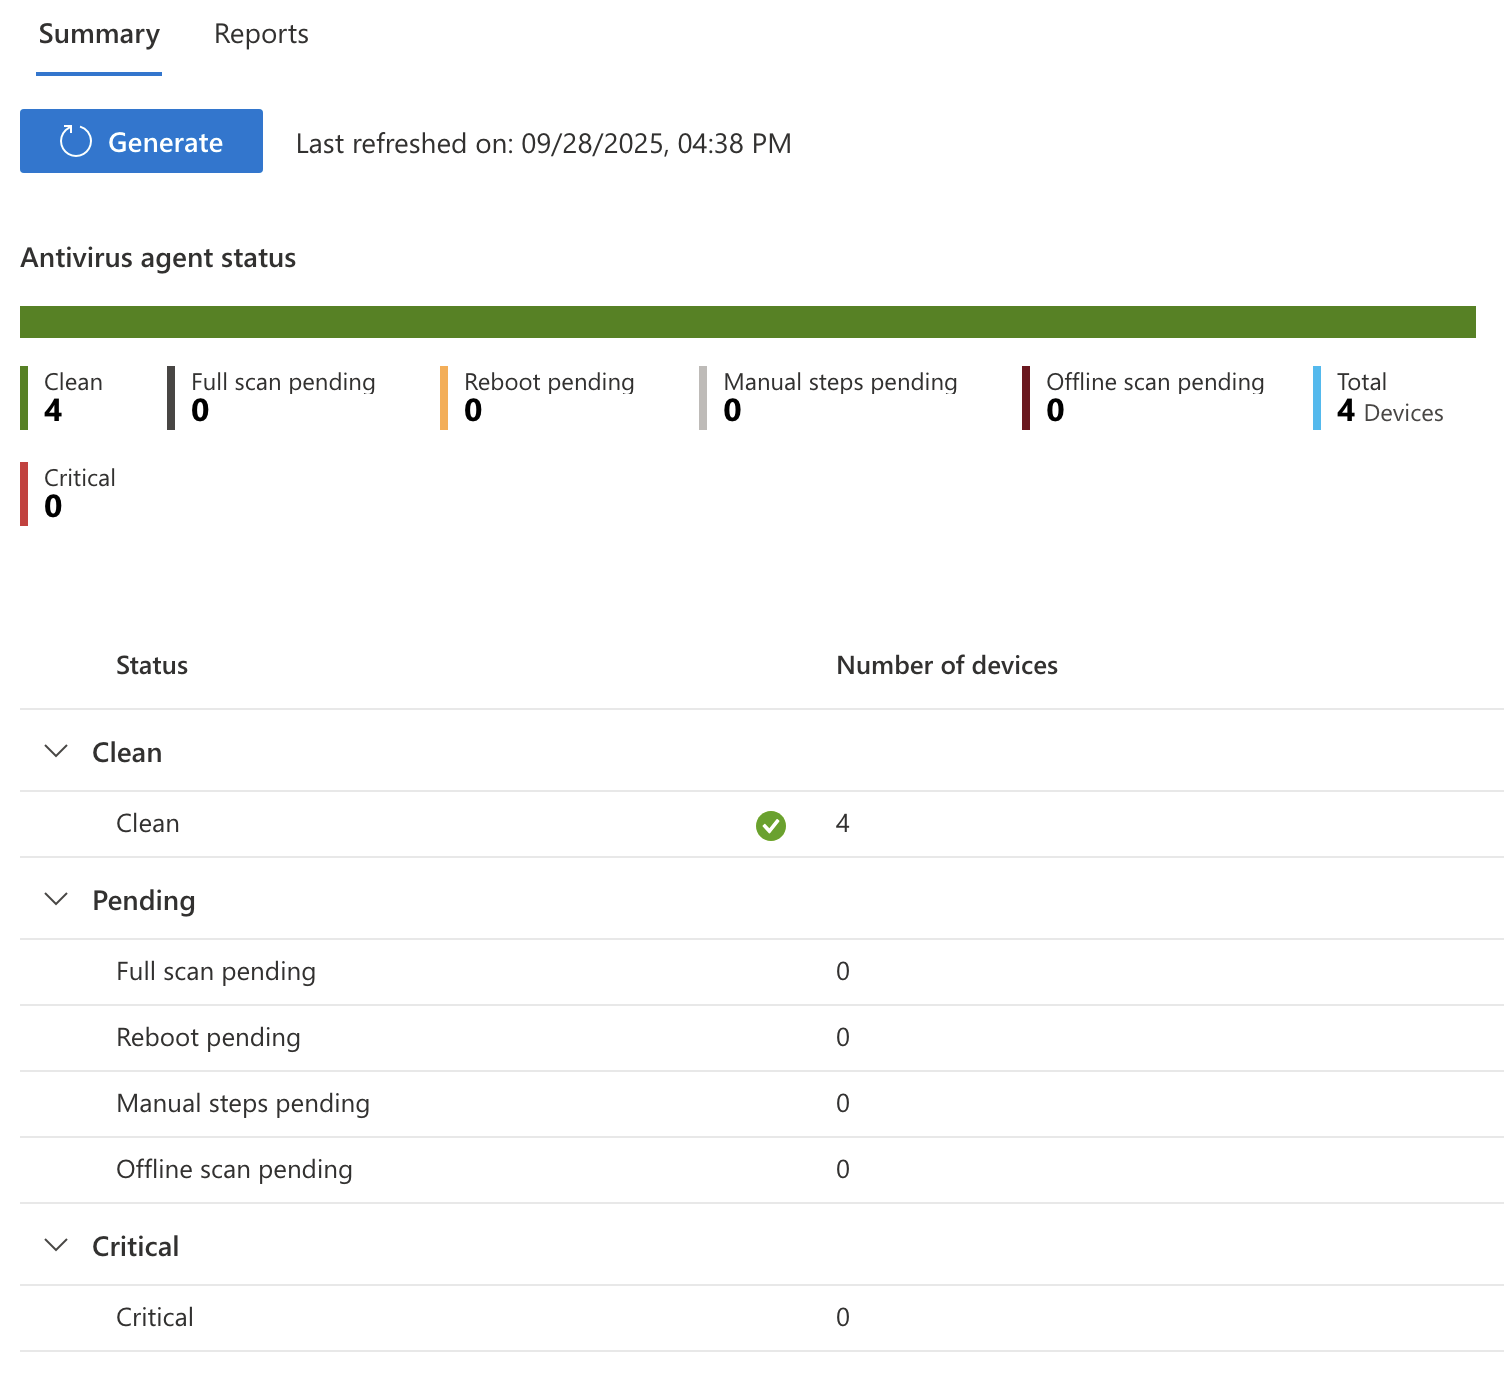
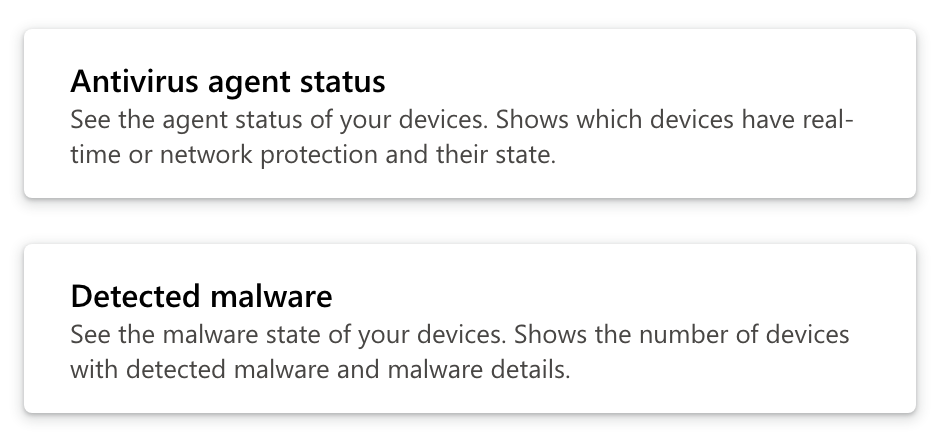
On the Intune > Reports > Microsoft Defender Antivirus to see a summary of Antivirus scans on devices managed by Intune. It will give a breakdown of number of devices by status such as clean, pending, critical etc.
In the Reports section of this page you can also get a report of detected malware on endpoints.
Device and App Monitoring
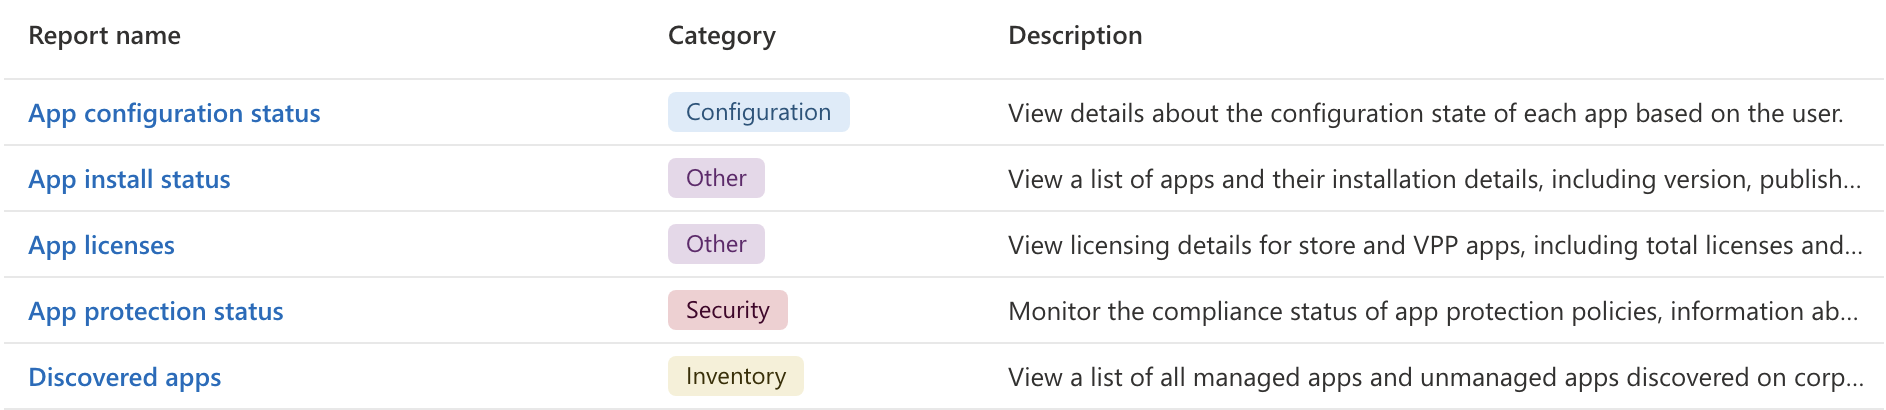
Both Intune > Devices and Intune > Apps have their own page called Monitoring that has a list of reports specific to their category that can be generated to give teams more insight.
Screenshot of available Device reports:
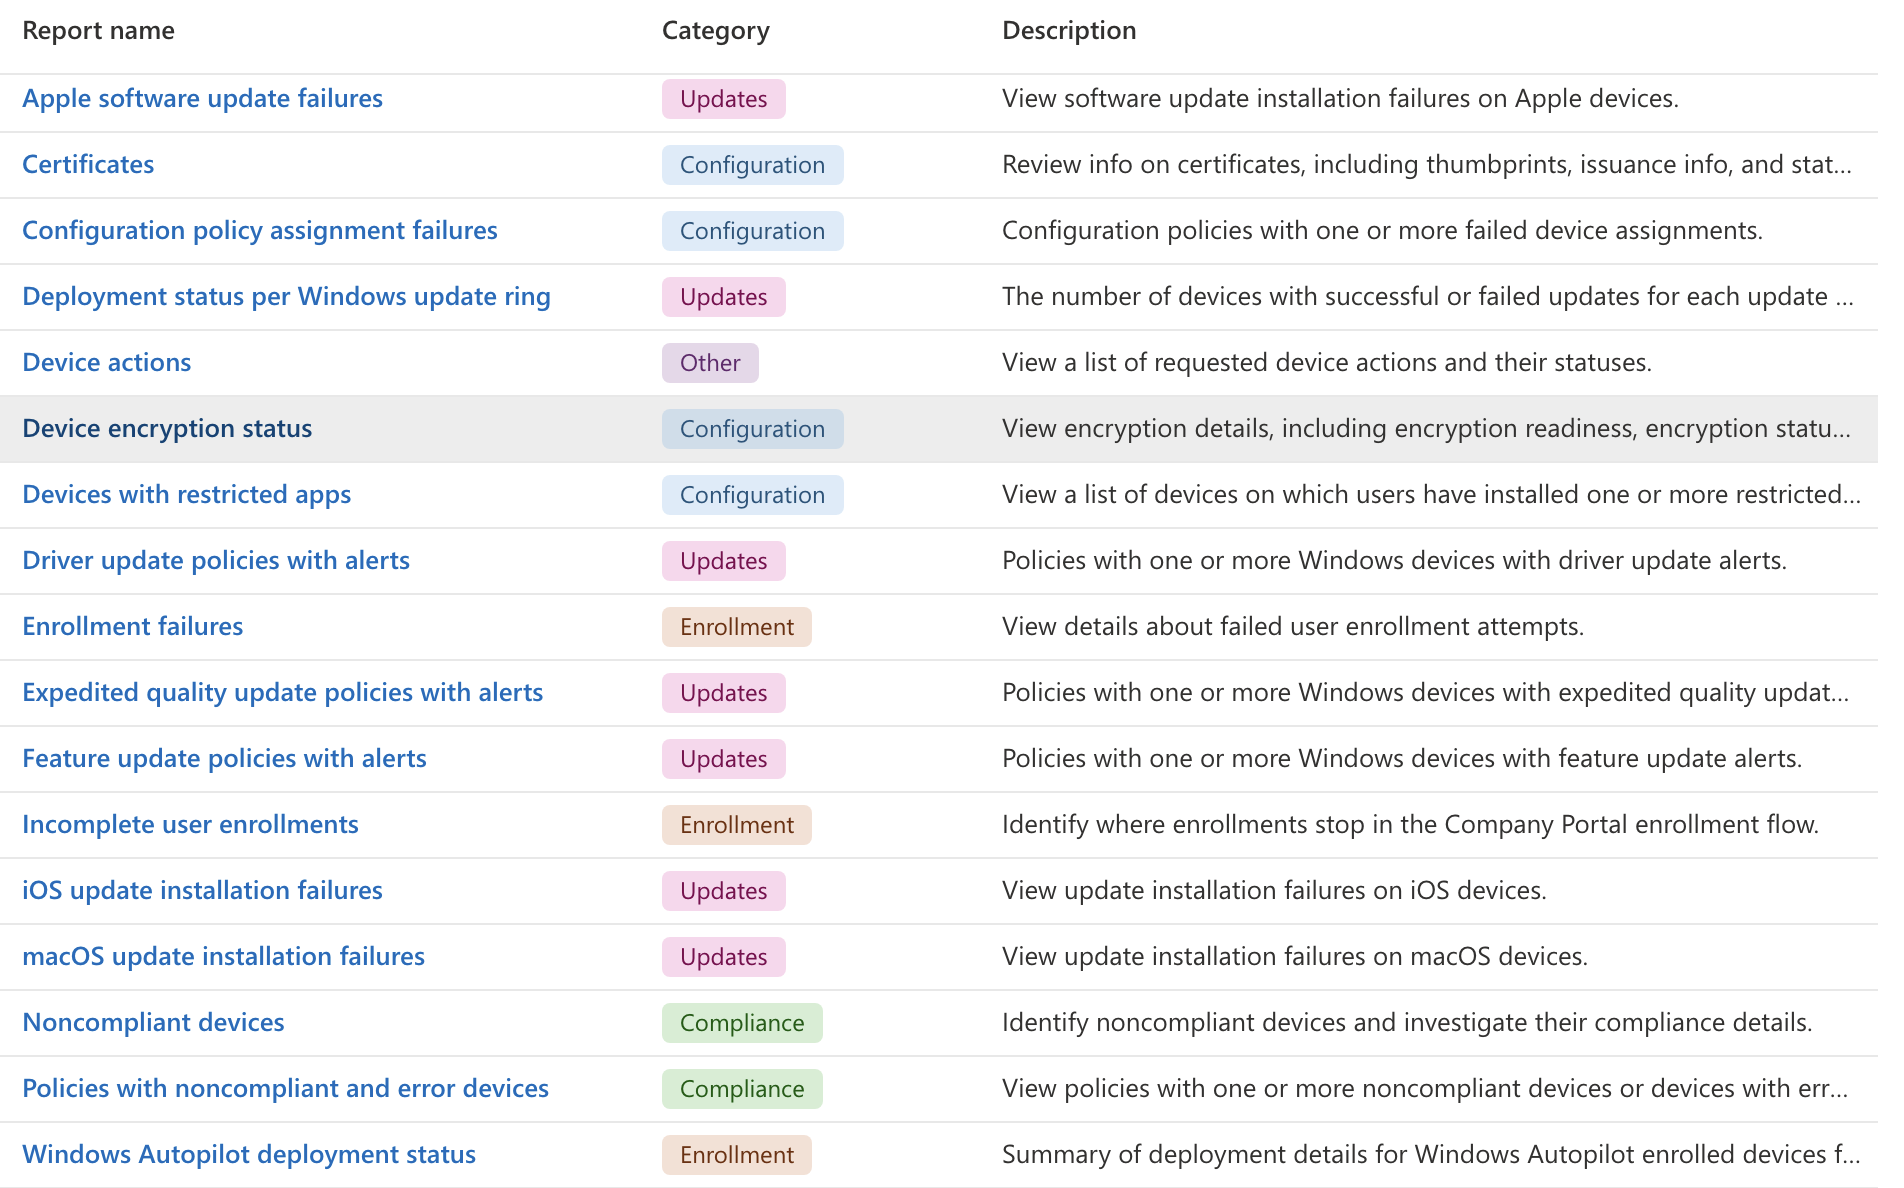
Screenshot of available App reports:
Now What?
I have reached the end of things I intended to experiment with in my lab for now, although there are many more stones to turn over that we didn't even get a chance to play with. It sometimes requires a living breathing environment to get a sense of how some of the tools and features work within Intune. I am not too heartbroken I wasn't able to test everything, but I am excited to get the chance to work on an even more complex Microsoft 365 environment.
For the time being, there are a few last minute bits of tidying up to accomplish before I can close out the lab entirely.
Collecting Lab Artifacts
First I want to collect as many bits of my lab as possible to save to the GitHub repository, like users, groups, and policies that can all be exported from the Intune portal. In the event I create a new lab down the road these pieces may save me time getting back up to where I was before.
Install-Module Microsoft.Graph -Scope CurrentUser -Force
Connect-MgGraph -Scopes "Group.ReadWrite.All" -TenantID "<TenantID>"
Install-Module IntuneBackupAndRestore -Scope CurrentUser -Force
Import-Module IntuneBackupAndRestore
Connect-MgGraph -Scopes `
  "DeviceManagementConfiguration.Read.All", `
  "Device.Read.All", `
  "DeviceManagementApps.Read.All", `
  "DeviceManagementManagedDevices.PrivilegedOperations.All"
cd ~/Desktop
Start-IntuneBackup -Path ./IntuneBackup
Running the PowerShell commands above prompted me to sign in with my Microsoft account, then connected me to Intune and downloaded my Intune configurations into a folder on my Desktop called IntuneBackup.
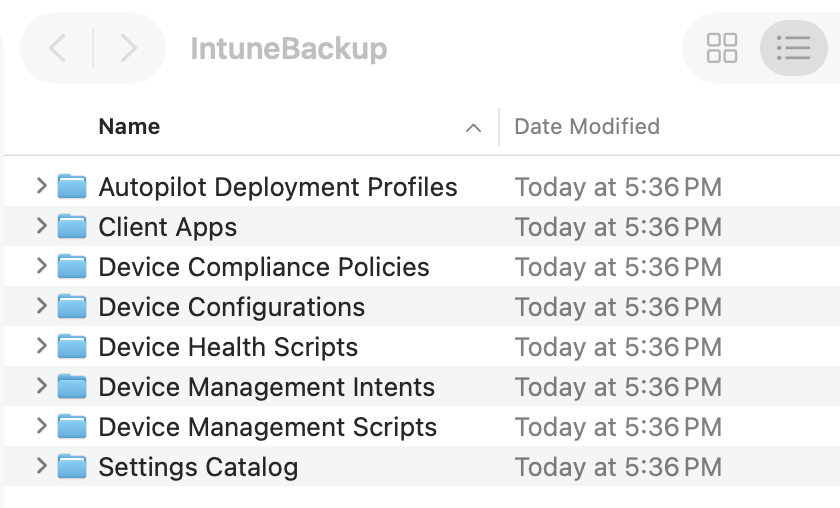
Inside the folder there were several subfolders that contain apps for devices, policies, profiles, scripts and settings. This folder should be all we need to import into a new Intune environment to get us back to where we were before. Now I just need to do another one of these for Entra.
Install-Module EntraExporter -Scope CurrentUser -Force
Import-Module EntraExporter
Connect-EntraExporter
Export-Entra -Path ~\Desktop\EntraBackup -All
The above PowerShell commands will create a folder on the Desktop called EntraBackup. Sign into Microsoft when the pop-up requires it.
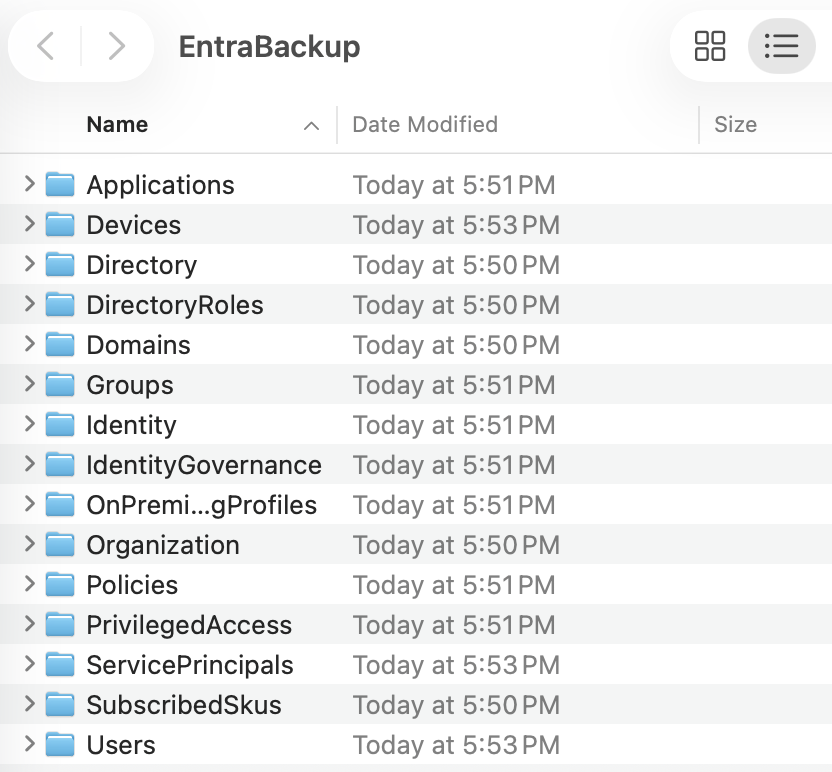
The image above shows all the items that Entra exported for us.
I considered whether to put all of this data in GitHub. Considering all of my environment data is synthesized except for my own personal user in the tenant I just deleted that user out and decided it was safe enough.
In the real world having your users personal info in JSON files publicly hosted on the internet would be a bad idea. It is also a bad idea to share to the world all of your compliance and conditional access policies because a threat actor could use it to build a plan to get around your security.
Ending The Free Trial
One last thing I wanted to do with my project is end the free trial to make sure I don't get charged unexpectedly when the 30 day period ends. You can go to Microsoft 365 Admin > Billing > Your products and see a full list of every product connected to the account. You can go through them all and hit Cancel Subscription.
I found that the default setting was for recurring billing to be turned off and to expire the trial at the end of the period which was kind of them. If you wanted to take it a step further you could also delete the tenant and Microsoft account for the trial. For now I'll leave that up in case I realize I need anything. With this now done I can consider this lab complete.
End of the Road
Now that I have finished I think its a good idea to reflect on what we learned in this lab. We got to see how to upload a user database into Entra and assign them to dynamic groups based on their departments. We got to see how to assign licenses to users both by PowerShell scripts and through the portal. We got to learn how to get the hardware hashes of devices and upload them to Intune, as well as creating deployment and enrollment configurations to manage the out-of-the-box experience for users. We learned how to install apps, configure update rings, push security settings to devices as well as enrolling smartphones Lastly we learned how to secure and monitor our environment to ensure smooth operation. There are countless things in the Microsoft 365/Azure environment to learn but I think we did well getting this far.
How To
Home page for miscellaneous How-To guides
ISO Dump
Create a new folder to be turned into an ISO then fill it with the files you want to transfer.
Mac OS
hdiutil makehybrid -iso -joliet -o ~/Downloads/Files.iso ~/Downloads/Files
Linux
genisoimage -V FILES -o ~/Downloads/files.iso ~/Downloads/files
Upload the ISO
Proxmox > Datacenter > [Node] > local ([Node]) > ISO Images > Upload
Here upload the Tools.iso file we created.
Add ISO to MalwareSandbox
Proxmox > Datacenter > [Node] > MalwareSandbox > CD/DVD Drive
Replace the Windows 11 Installer IOS here with the Tools.iso file from the drop down.